School Hisaab
How to use every screen, step by step
School Hisaab is a web app that runs the whole school in one place: admissions, attendance, fees, exams, payroll and a portal for parents. You open it in a browser (Chrome or Edge) on a computer or a mobile phone.
Many schools can use the same app. Each school sees only its own data. An owner with several branches can join them in a School Group and see all branches with one login.
Contents
- Start hereBefore you start
- Chapter 1Login and Dashboard
- Chapter 2Different Logins
- Chapter 3Students
- Chapter 4Attendance and Holidays
- Chapter 5Fees
- Chapter 6Exams, Timetable, Homework, Certificates and Promotion
- Chapter 7Staff, Payroll and Expenses
- Chapter 8School Groups (Branches) and Transfers
- Chapter 9Parent Portal
- Chapter 10Users, Audit Log, School Setup and Common Questions
- Chapter 11Transport, Library and Notice board
- Chapter 12For the platform owner
Before you start
Who can do what (Roles)
| Role | What they can do |
|---|---|
| Admin | Everything: students, staff, fees, users, settings, school bank accounts, the school website |
| Principal | Same menu as Admin: students, attendance, exams, fees, payroll, users, reports |
| Accountant | Fees, collection, vouchers, scholarships, installments, uniform and book sales, admission enquiries, payroll, expenses and finance reports |
| Teacher | Attendance, marks, homework, students at risk in their own class, syllabus and lesson plans for their own classes only; scanning ID cards; lending library books; answering parents' messages |
| Parent | Portal: their children's fees, attendance, results, board exams, date sheets, timetable, homework, school van, library books and notices, in English or Urdu; send proof of a fee payment; write to the school; install the app for notifications |
| Owner (Super Admin) | Add schools and school groups; the website, packages and requests from new schools; paid services (SMS, WhatsApp, JazzCash, Easypaisa, school websites and their domains) and each school's monthly bill |
See Different logins for the full list of pages each role can open.
The Sidebar (menu on the left)
Every page opens from the sidebar on the left. The menu has groups: Overview, Students, Academics, Fees, Finance, School and Administration. Only one group is open at a time.
Press Ctrl + K (or click Search at the top) and type a page name or a student name to jump straight there. The button at the top right switches between light and dark colours.
Login and Dashboard
Login
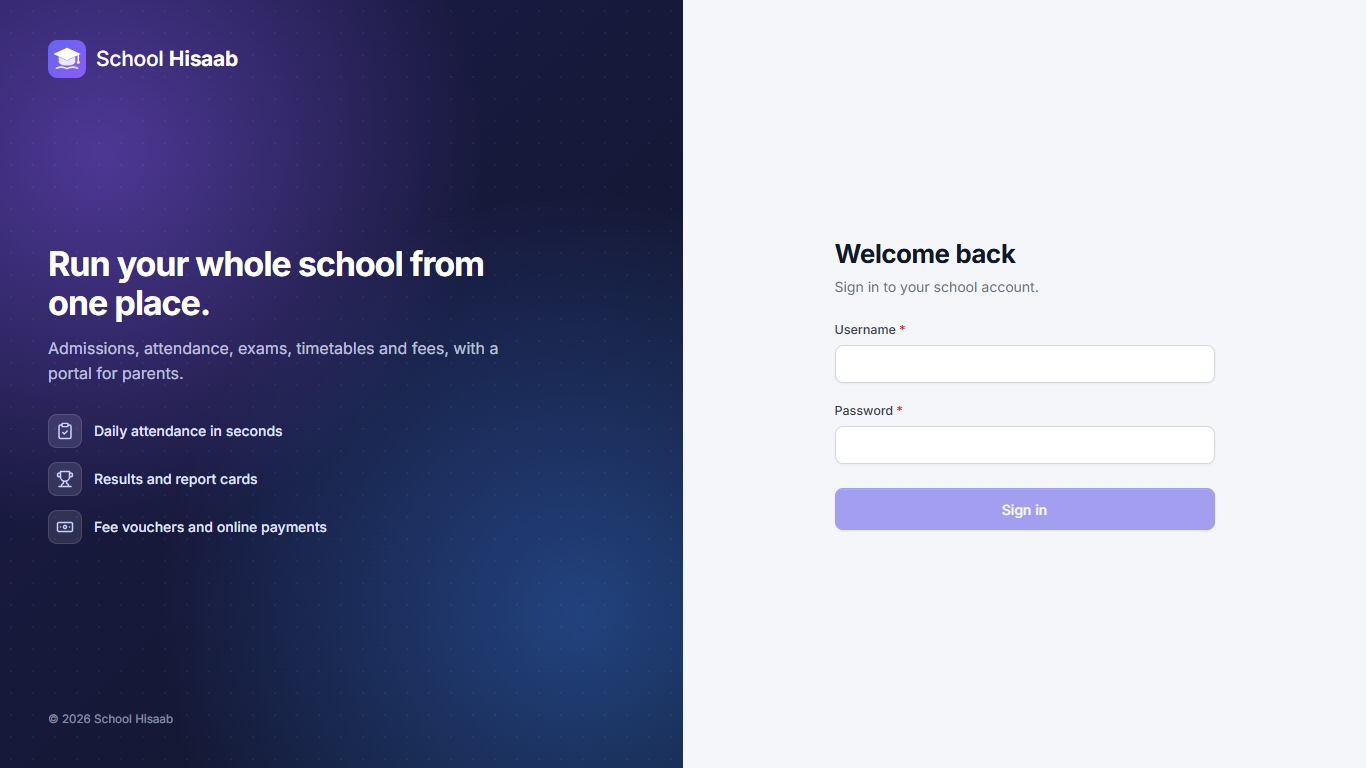
- Open the app's address in your browser. The login page opens.
- Type your Username and Password. You do not need a school code: every username is used only once in the whole app.
- Click Sign in. Staff go to the Dashboard. Parents go to the Portal.
- The first time you sign in, or after your password is reset, you must choose a new password.
If you type the wrong password many times, login stops for a few minutes. If you forget your password, ask the Admin to reset it.
Dashboard
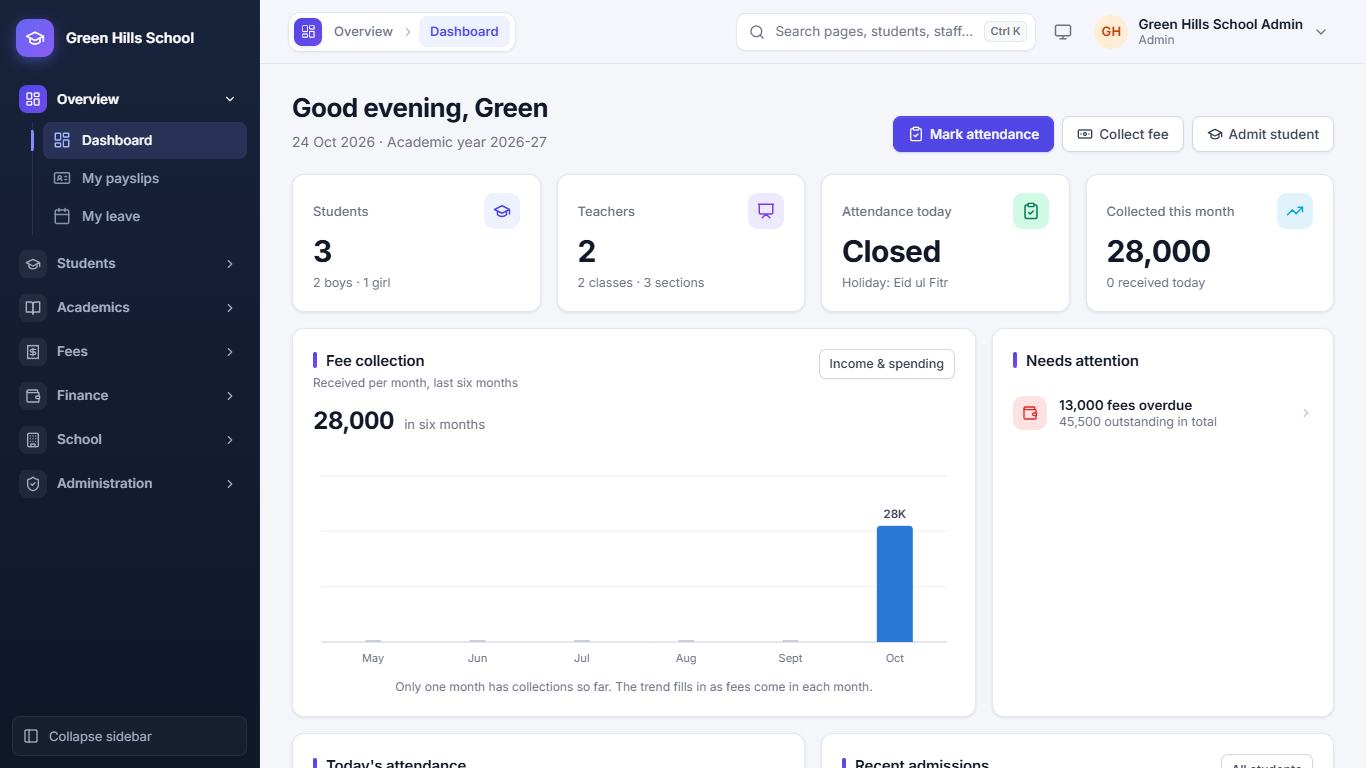
The Dashboard is the first page after login. It shows the school's day at a glance:
- Four cards at the top: number of Students, Teachers, Attendance today (shows Closed on a holiday) and fees Collected this month.
- Fee collection: how much fee came in each month for the last six months.
- Needs attention: things to look at now, like overdue fees or transfer proofs waiting to be checked. Click a line to open that page.
- Three quick buttons at the top right: Mark attendance, Collect fee and Admit student.
- Lower down: Today's attendance and Recent admissions.
Different Logins
Every person signs in on the same login page. What they see next depends on their role: each role gets its own menu, and pages outside it cannot be opened. Staff logins are made in Administration → Users; parent logins are made from the student's page.
Which pages each staff login sees
| Menu | Page | Admin / Principal | Accountant | Teacher |
|---|---|---|---|---|
| Overview | Dashboard, Notice board, My payslips, My leave | ✓ | ✓ | ✓ |
| Overview | Parent messages | ✓ all | ✓ fee office | ✓ sent to them |
| Students | Students (list) | ✓ | ✓ | ✓ |
| Students | Admission enquiries | ✓ | ✓ | |
| Students | Attendance, Scan ID cards | ✓ | ✓ own sections (attendance) | |
| Students | Monthly attendance | ✓ | ✓ | ✓ |
| Students | Attendance devices, Promote students, Certificates, ID cards | ✓ | ||
| Academics | My timetable | ✓ | ||
| Academics | Timetable, Results, Board exams, Library | ✓ | ✓ | ✓ |
| Academics | Homework & diary, Marks entry, Syllabus, Lesson plans | ✓ | ✓ own classes | |
| Academics | Exams | ✓ | ||
| Fees | All fee pages (collection, vouchers, families, scholarships & installments, uniform & books, transfer proofs, reminders, reports, setup) | ✓ | ✓ | |
| Finance | Payroll, Salaries, Salary advances, Expenses, Income & spending | ✓ | ✓ | |
| School | Staff, Classes & sections, Subjects, Holidays | ✓ | ✓ | ✓ |
| School | Staff attendance by month | ✓ | ✓ | |
| School | Staff attendance, Staff leave, Academic years | ✓ | ||
| Administration | Users, School profile, Audit log | ✓ |
Admin and Principal
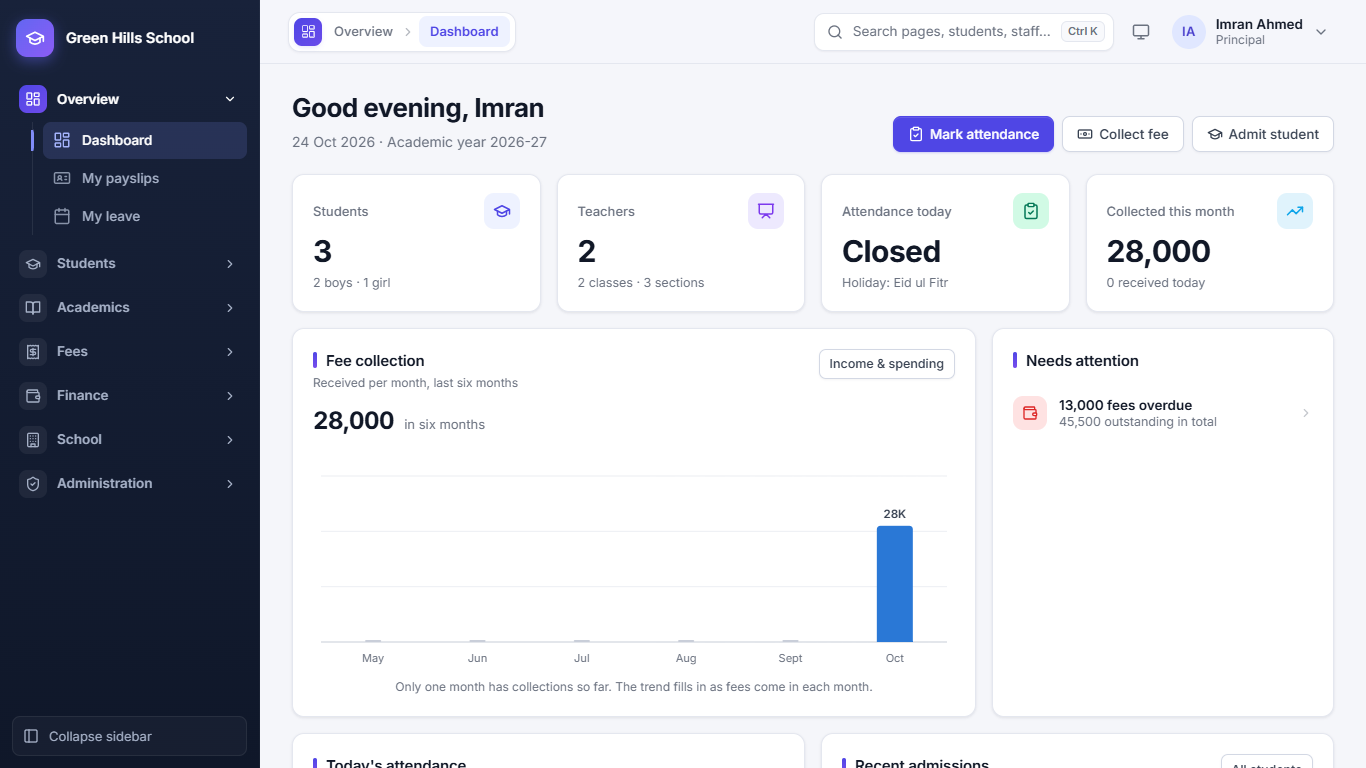
Admin and Principal see the same full menu and start on the Dashboard. They run the whole school: students, exams, fees, payroll, staff, users and settings. Use Admin for the school owner or office head, and Principal for the head teacher.
Accountant
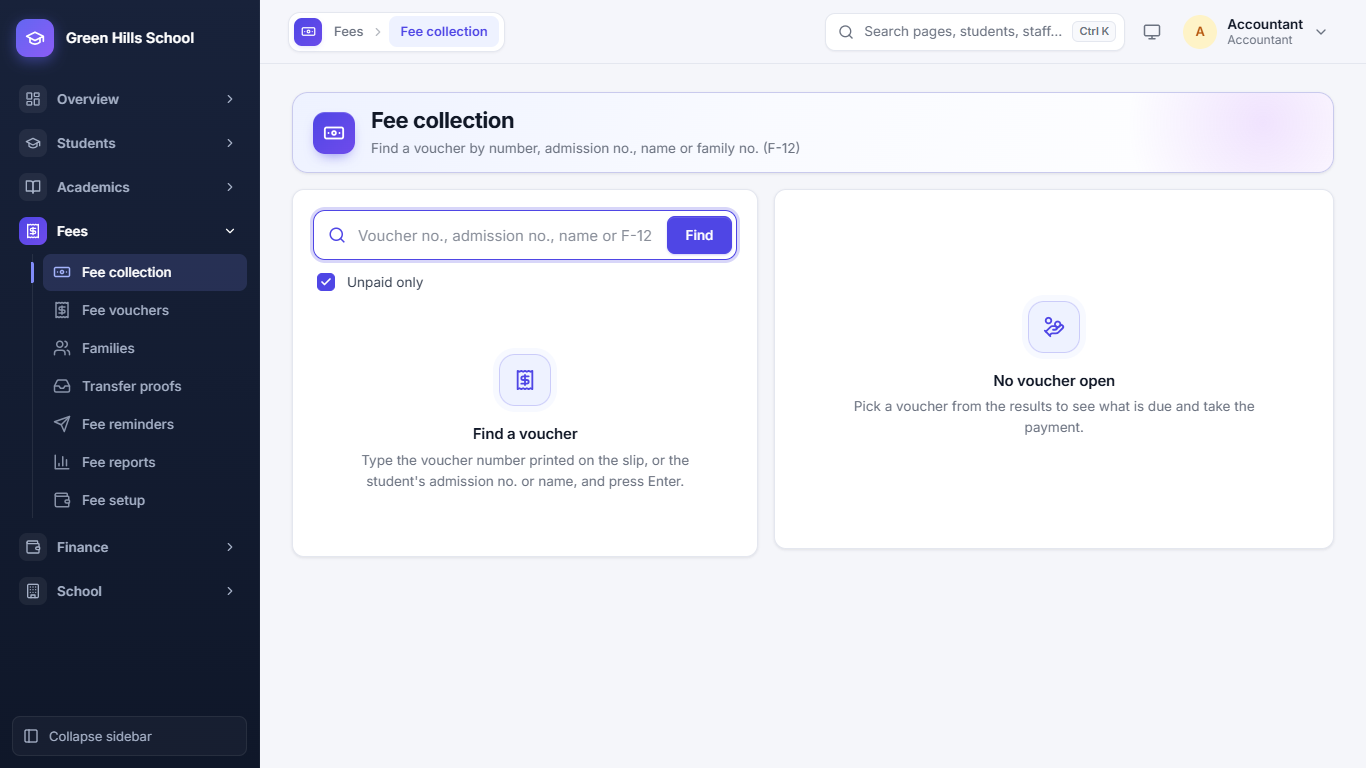
The Accountant starts on the Dashboard and works mostly in Fees and Finance: collecting fees, making vouchers, checking transfer proofs, sending reminders, payroll and expenses. They can look at students, timetables and results, but cannot mark attendance, enter marks, or open Users and the Audit log.
Teacher
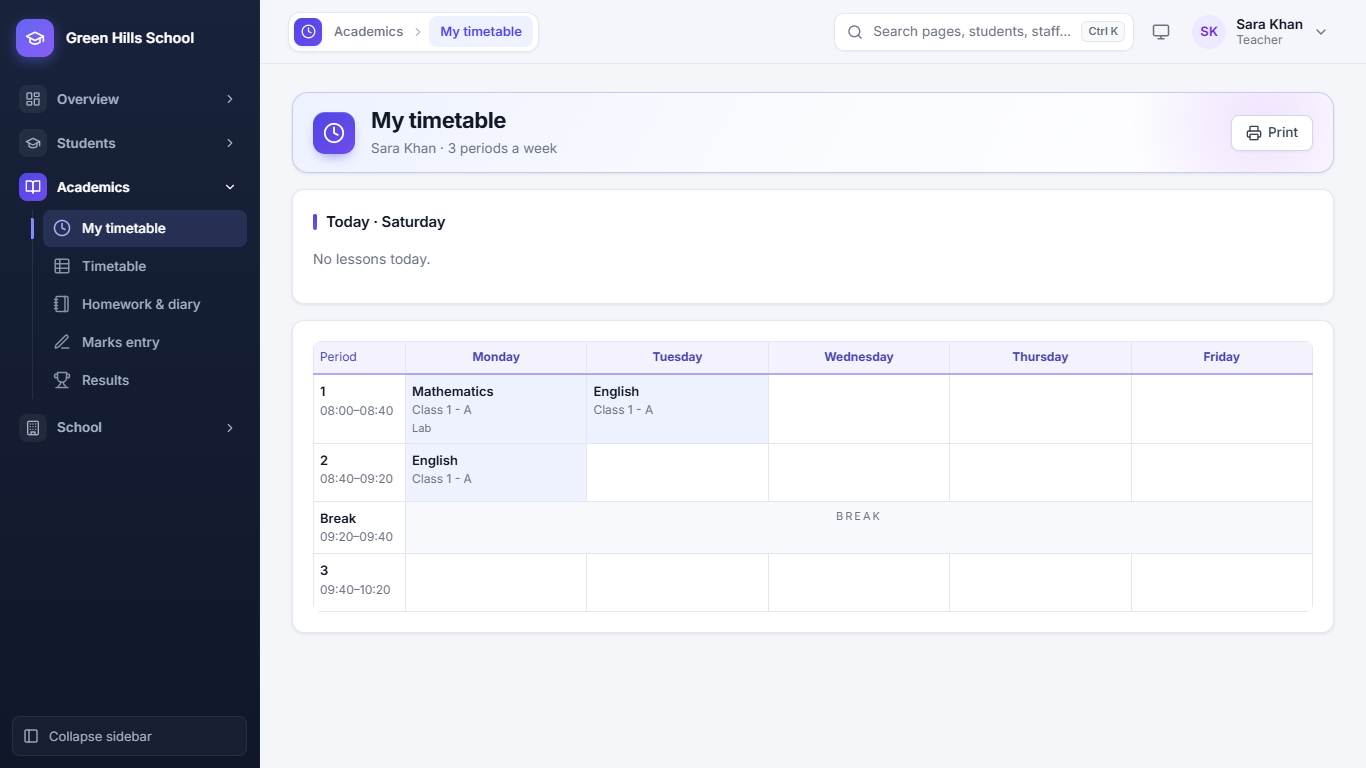
The Teacher starts on the Dashboard. My timetable shows their own lessons for the week and today. They mark attendance, enter marks and post homework only for the classes and subjects given to them; other classes do not appear. They have no Fees, Finance or Administration menu. Every staff login, including teachers, can see their own payslips and ask for leave under Overview.
Parent
A parent goes straight to the Portal (My children) and sees only their own children. See Parent Portal. One parent login can cover brothers and sisters. If the children study at different branches of a School Group, the parent can switch between branches in the Portal.
Owner (Super Admin)
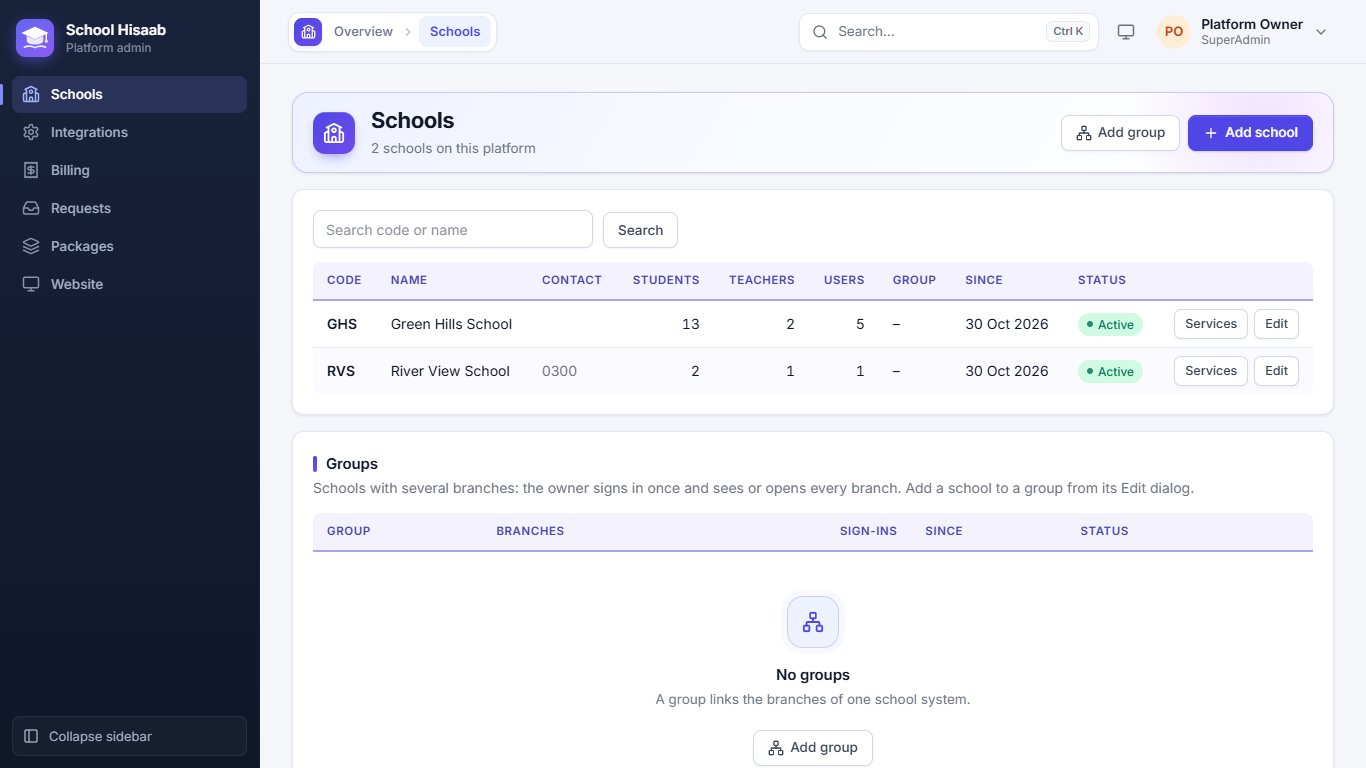
The Owner has no school of their own. Their menu is Schools, Integrations, Billing, Requests, Packages and Website: they add schools, give each school its first Admin login, switch schools on or off, make School Groups, set each school's package and paid services, and bill the schools every month. See For the platform owner.
Group login (several branches)
A group login can be an Admin, Principal or Accountant of the whole group. After sign-in it opens the group pages (All branches, Fees across branches, Branch transfers; Group sign-ins for Admin only). Pick a branch at the top of the sidebar to work inside it with that role's normal menu. See School Groups.
Good practice
- Give each person their own login. Do not share one login: the Audit log then shows who did what.
- When someone leaves, switch their login off in Users.
- Everyone must change the temporary password at first sign-in.
Students
Student list
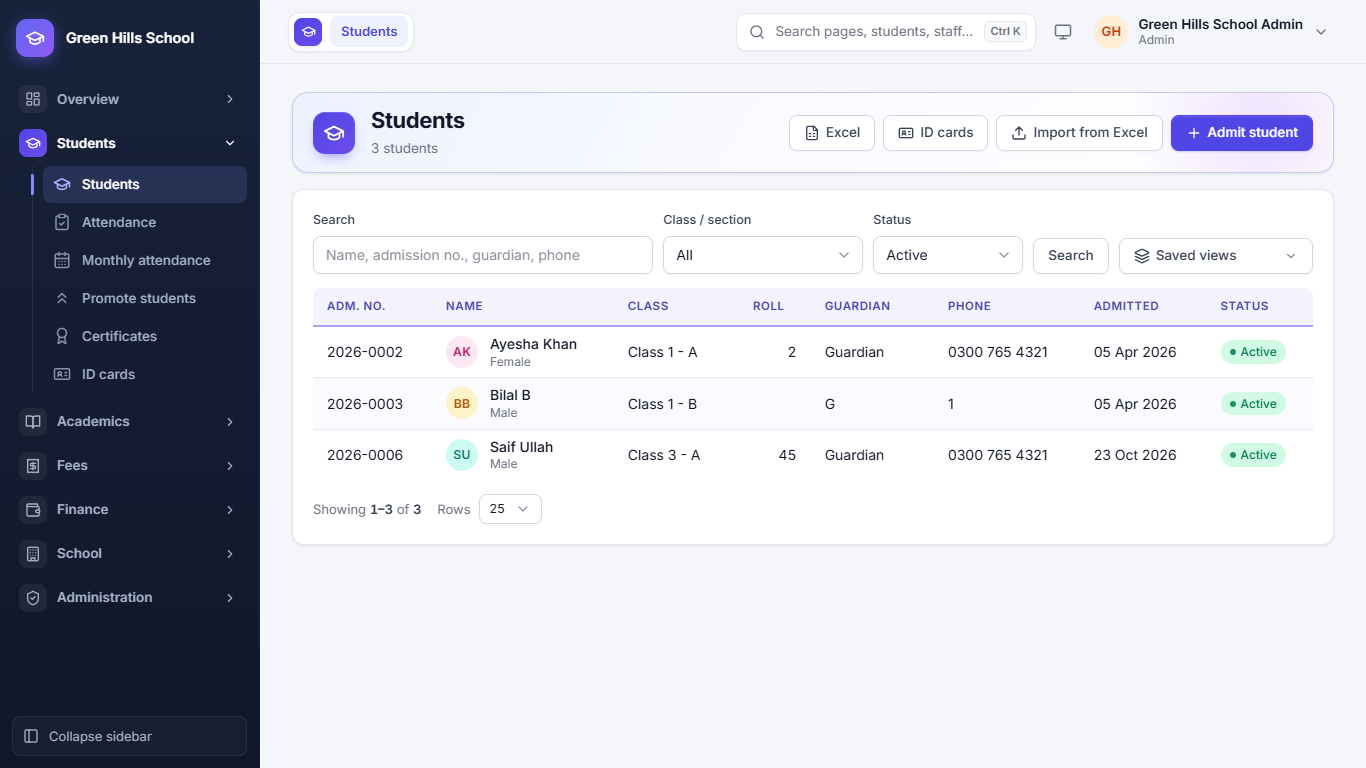
Open Students → Students. You see every student with Adm. No., Name, Class, Roll, Guardian, Phone, Admitted date and Status.
- Search by name, admission no., guardian or phone. Use Class / section and Status (Active, Left, Struck off) to narrow the list.
- Click a column heading to sort the list by that column.
- Saved views: save filters you use often. Admin and Principal can share them with other staff.
- The Excel button downloads the list as an Excel file.
Admission enquiries
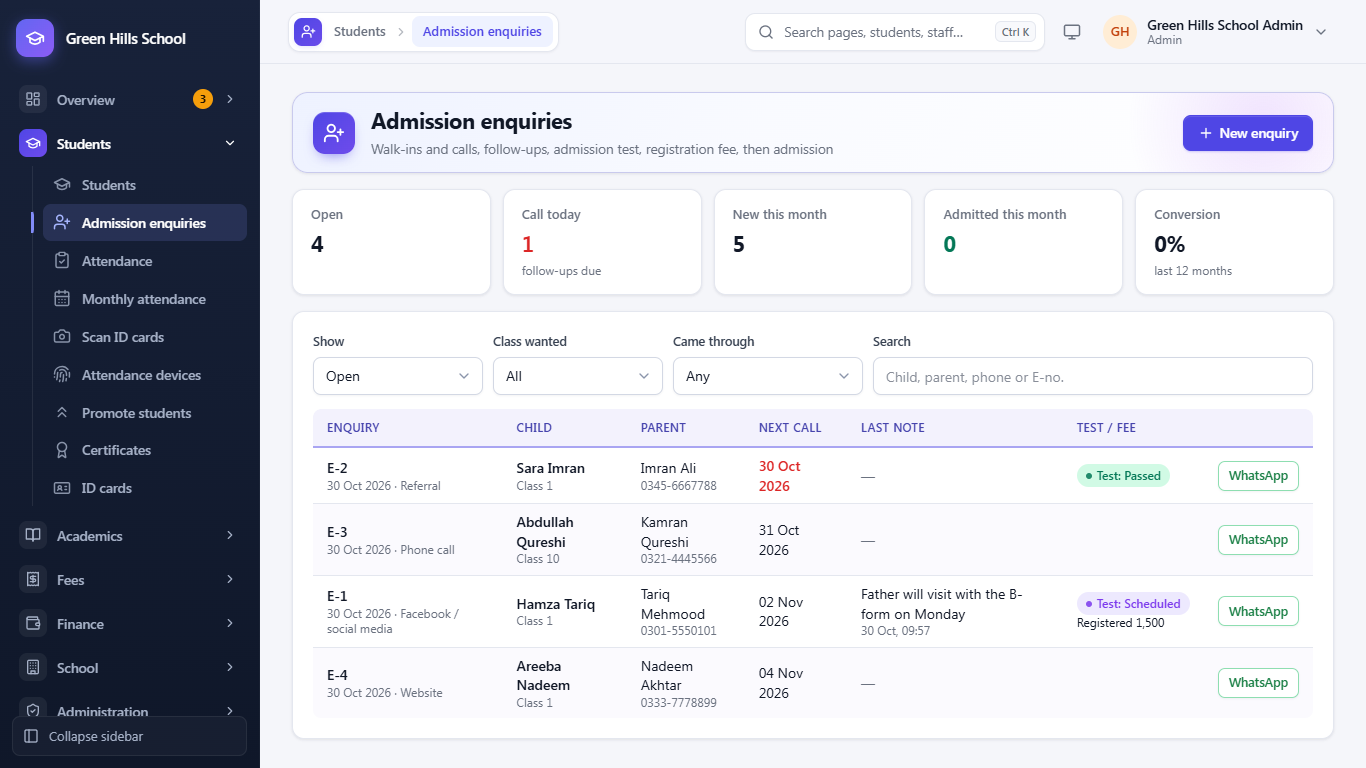
Open Students → Admission enquiries (Admin, Principal and Accountant). Every walk-in or phone call about admission is written here, so no interested parent is forgotten. The cards at the top show how many are Open, how many to Call today, the enquiries New this month and Admitted this month, and the Conversion (how many enquiries became students in the last 12 months). Click Open, Call today or Admitted this month to list those enquiries; filter by Class wanted and Came through, or search a name, phone or E-no.
Add an enquiry
- Click New enquiry.
- Enter the Child's name, gender, date of birth (if known), the Class wanted, the Parent's name and Phone, and how the parent heard of the school (Came through: walk-in, phone, social media, referral, website or other). Previous school, address and notes are optional.
- Set Call back on if you promised to call the parent, then Save. The enquiry gets a number like E-4.
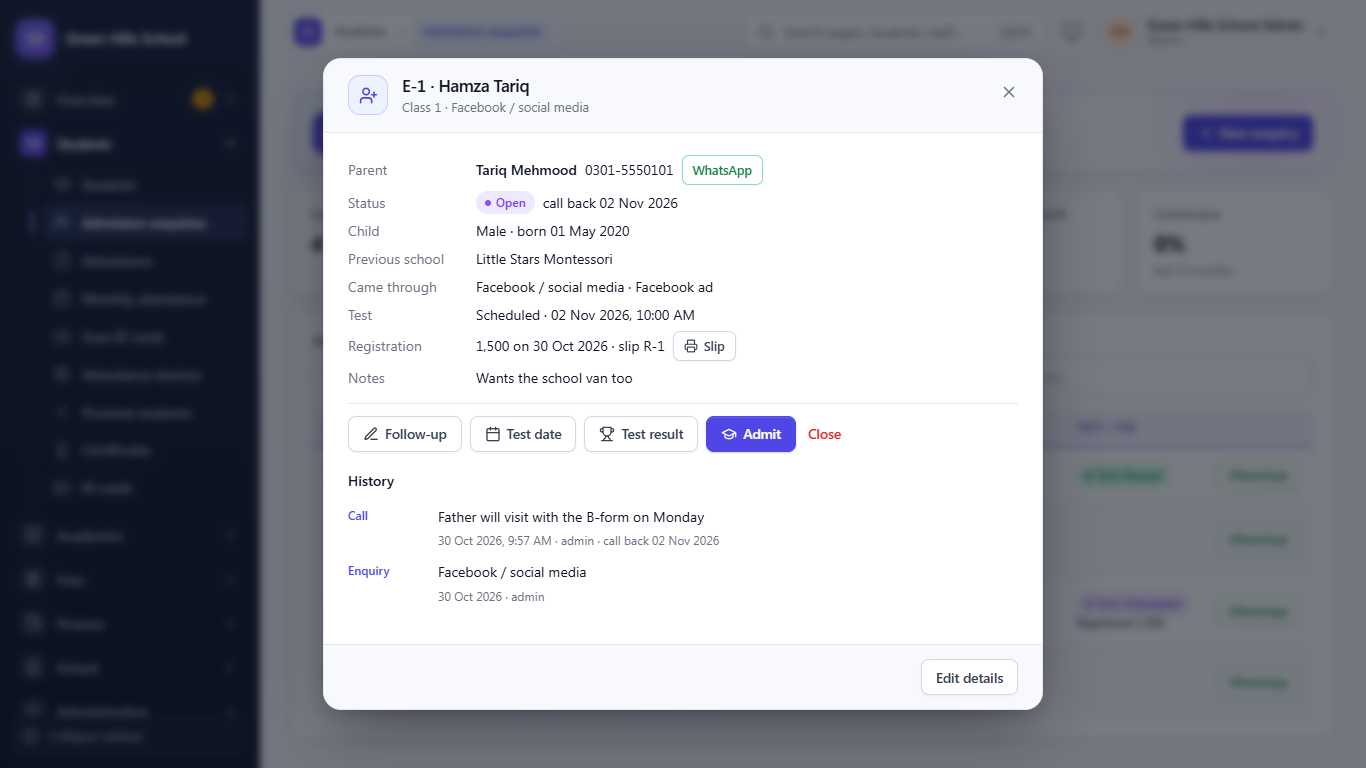
Click an enquiry to open it. The buttons there follow the usual steps:
- Follow-up: write What was said on each call or visit, and the next Call back on date. The list shows who to call today first. WhatsApp opens a chat with the parent's number.
- Test date and Test result: set the admission test or interview, then record Passed, Failed or Absent with marks or remarks.
- Registration fee: enter the amount and click Receive and print slip. The slip gets its own number (like R-2). This fee is kept on the enquiry; it is not part of the monthly fee collections.
- Admit: opens Admit student with the child's and parent's details already filled in. When you save, the enquiry shows Admitted and links to the new student.
- Close: the parent is not joining. Write the reason. A closed enquiry can be Reopened later.
Online admission form
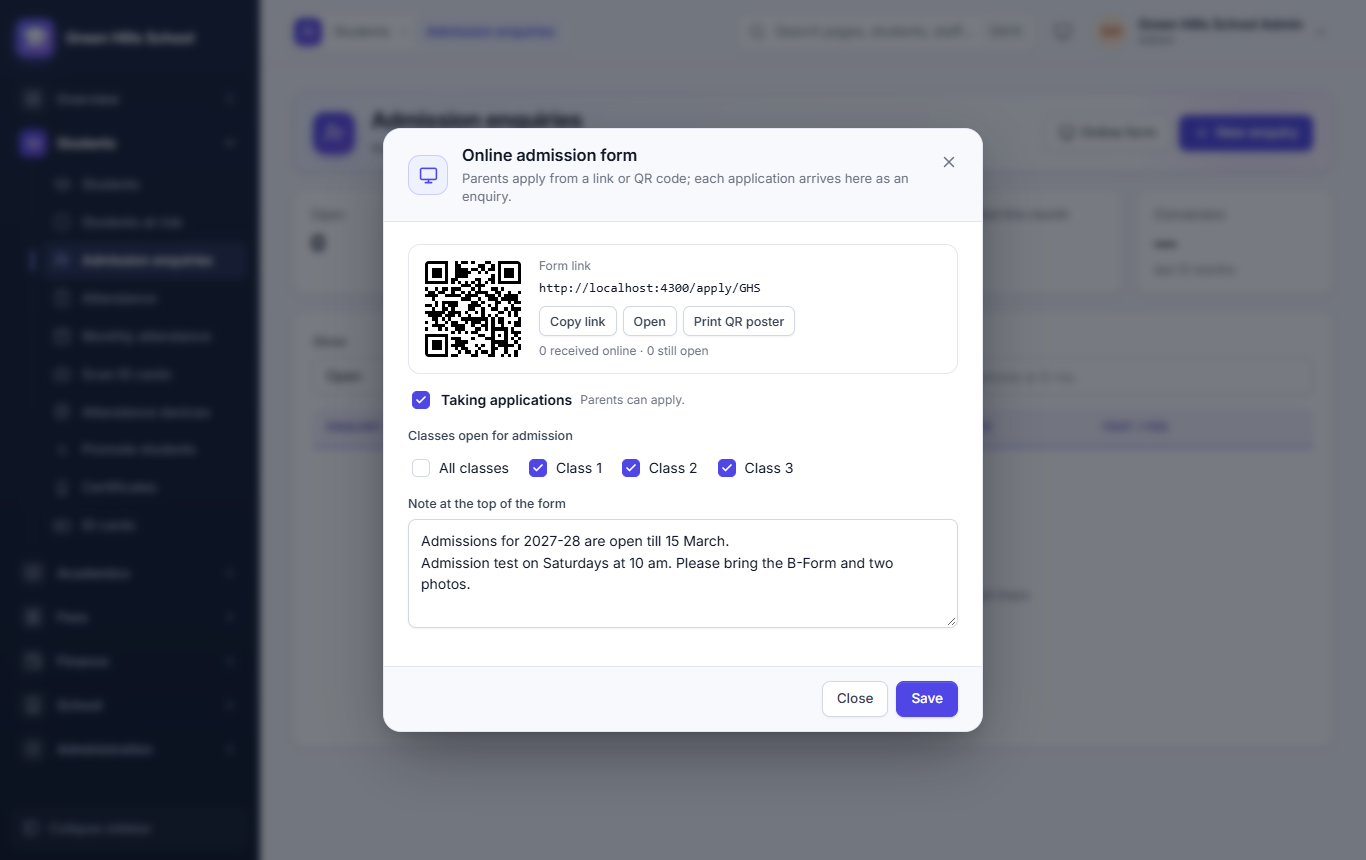
Parents can apply from their phone without visiting. Click Online form on the Admission enquiries page:
- Tick Taking applications.
- Choose the Classes open for admission (or All classes).
- Write a Note at the top of the form, for example the last date, the test day and the documents to bring.
- Click Save. Only the admin and principal can change these; other staff see the link.
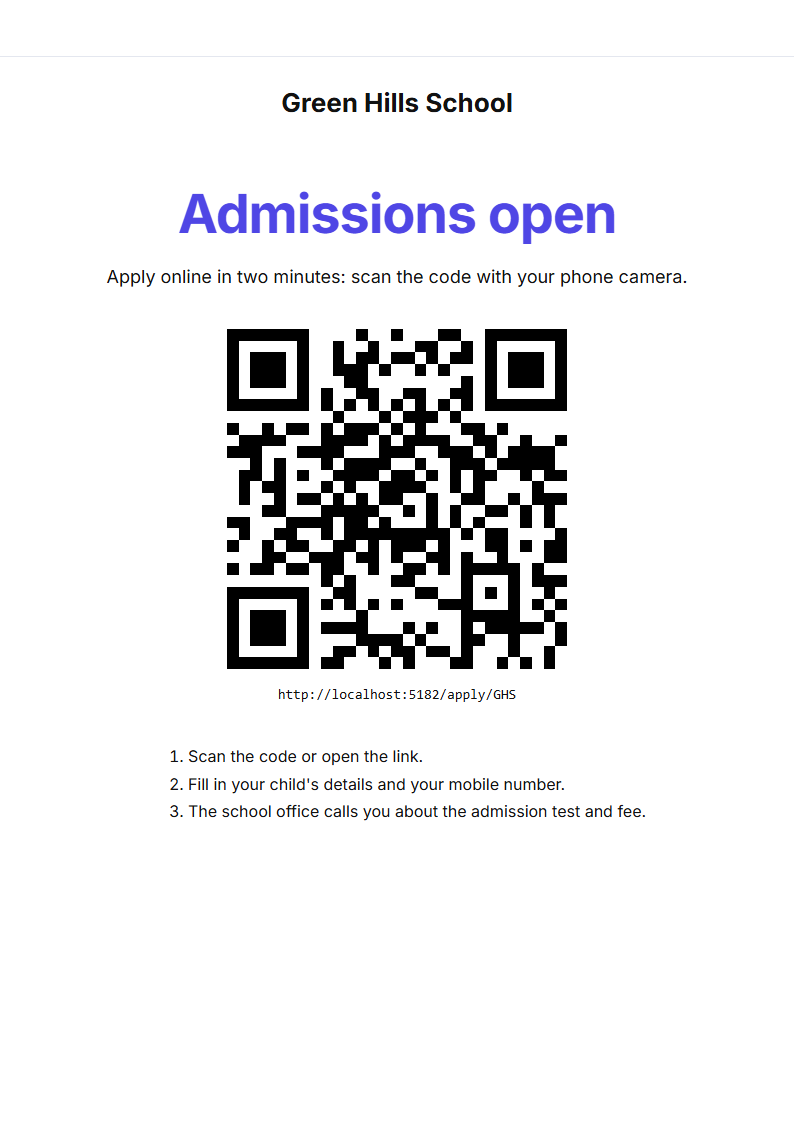
The dialog shows the form's link (like /apply/GHS, with your school code) and its QR code. Copy link to send it on
WhatsApp or put it on your Facebook page; Print QR poster prints an A4 "Admissions open" poster for the gate or the
notice board.
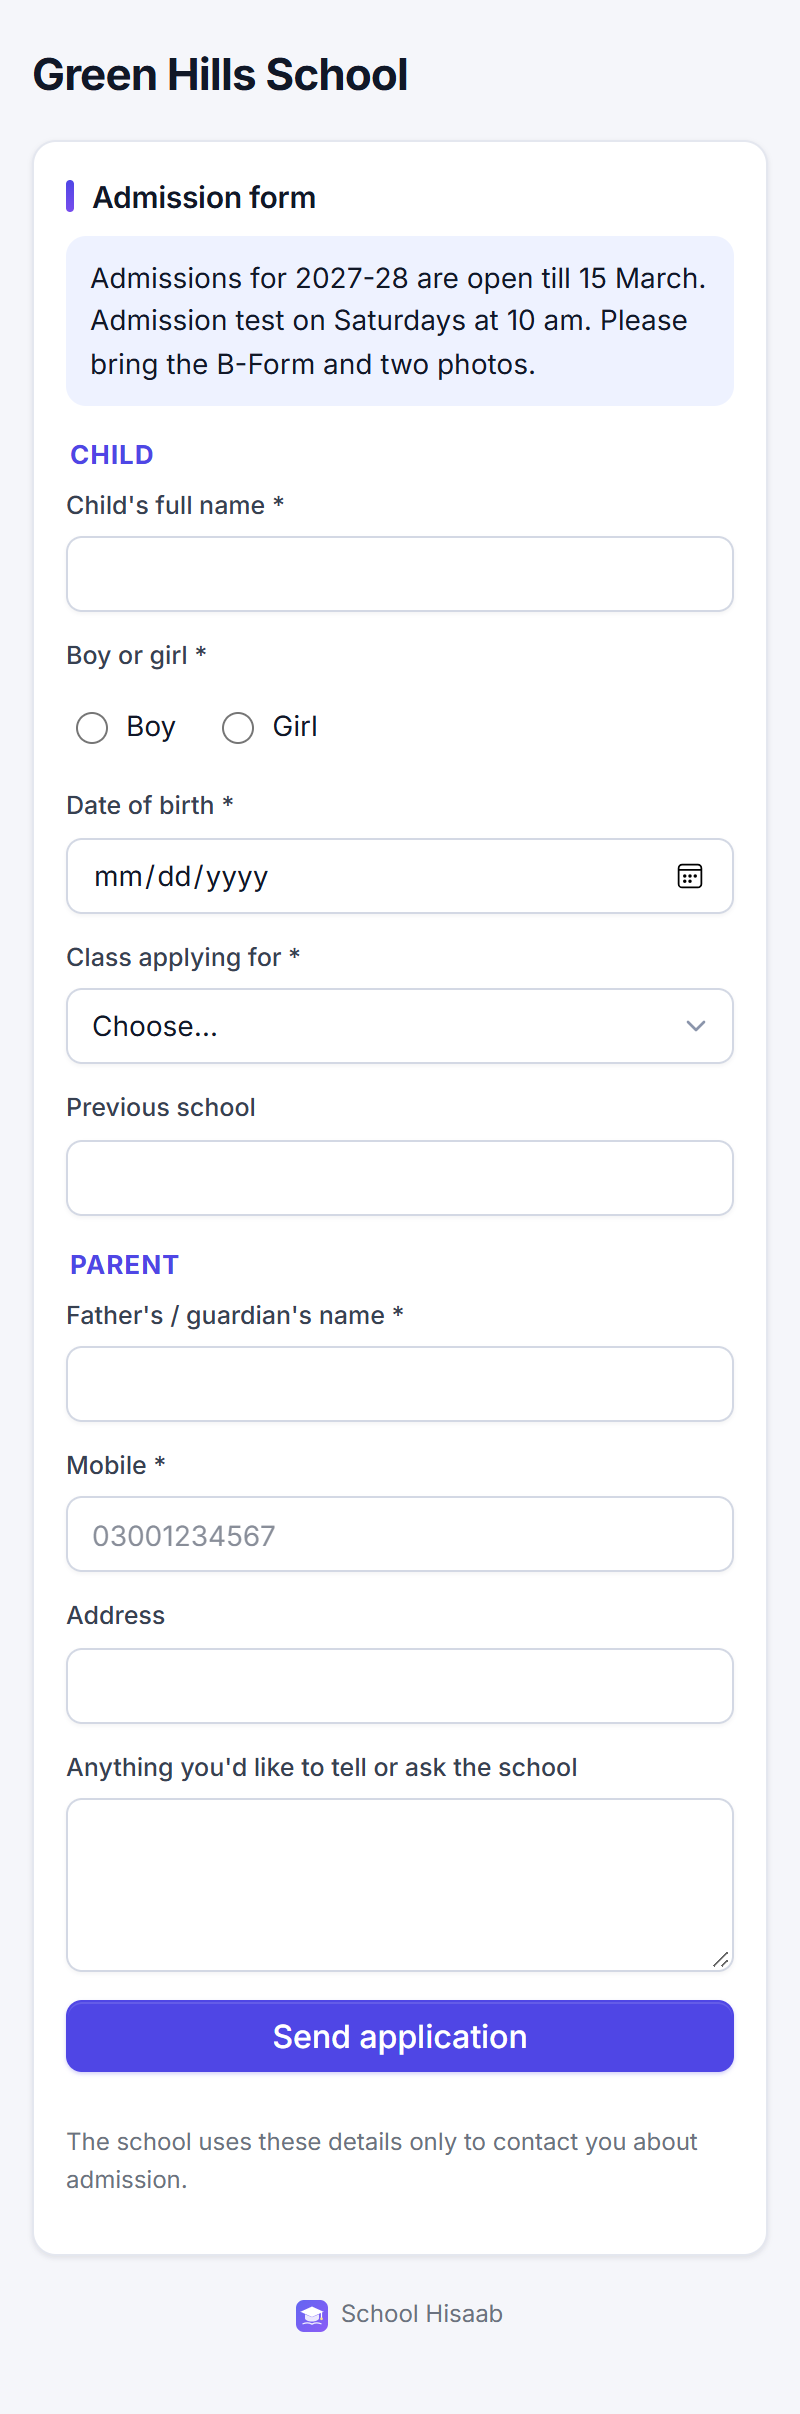
The parent fills in the child's name, boy or girl, date of birth, class and previous school, then their own name, mobile and address, and can write a question. They get a reference number like E-12. The application arrives in the list as an open enquiry from Website, with Call back on set to today, and the admin and principal get a notification. If the same child and mobile apply again while the enquiry is open, it is added there as a note instead of a second enquiry. Untick Taking applications to close the form: it then asks parents to call the school.
Admit a new student
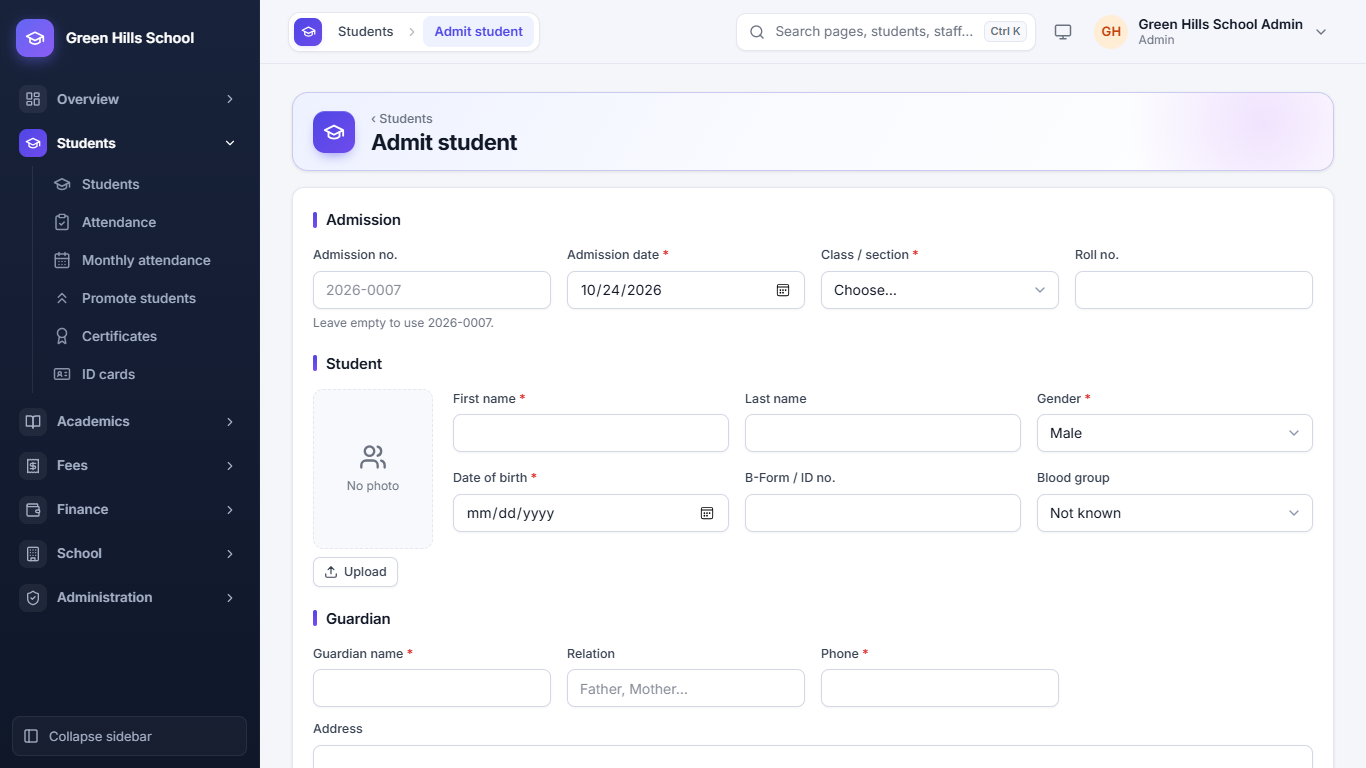
- In Students, click Admit student (or Admit on an admission enquiry, which fills in the details for you).
- Admission: leave Admission no. empty and the next number is used (for example 2026-0007). Fill in Admission date, Class / section and Roll no.
- Student: name, Gender, Date of birth, B-Form no. and Blood group. Click Upload to add a photo; the app crops it to passport size.
- Guardian: name, Relation, Phone and Address. Type the phone number carefully: fee reminders and absence SMS go to this number.
- If this phone already belongs to a family, the app asks if the child should join that family (for example F-12).
- Click Save.
Add many students from Excel (Import from Excel)
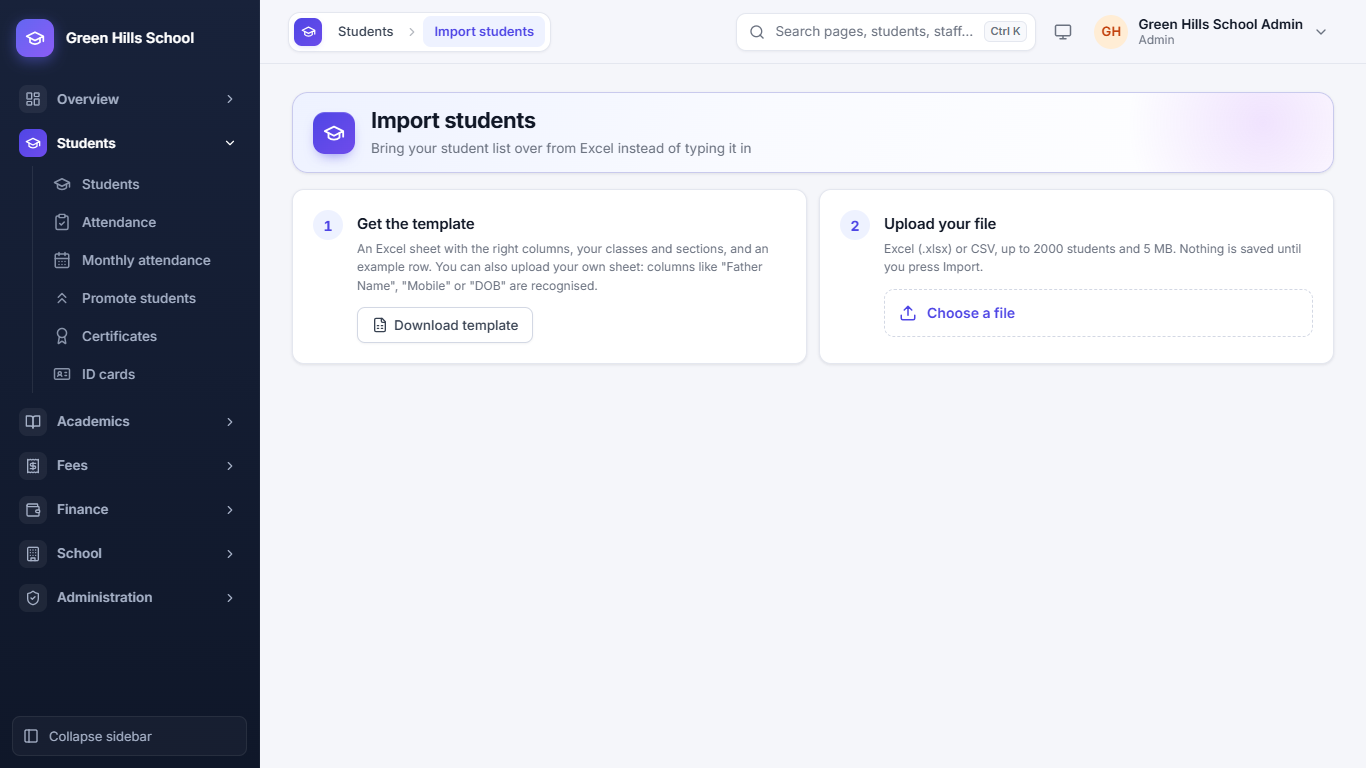
- In Students, click Import from Excel and download the Template. Its Classes sheet lists the exact class names of your school.
- Fill in the template and upload it (.xlsx or .csv).
- The Preview checks every row. Problems like a wrong date, a repeated row or a full class are shown in red.
- Fix the problems, or skip the bad rows and import the rest.
Moving from other software? Upload its student export as it is: columns like "GR No", "Father Name", "Mobile" or "DOB" are recognised. If it has a balance column ("Balance", "Dues", "Arrears"…), what each student still owed is brought over too, as an opening balance (see the Fees chapter).
A student's page
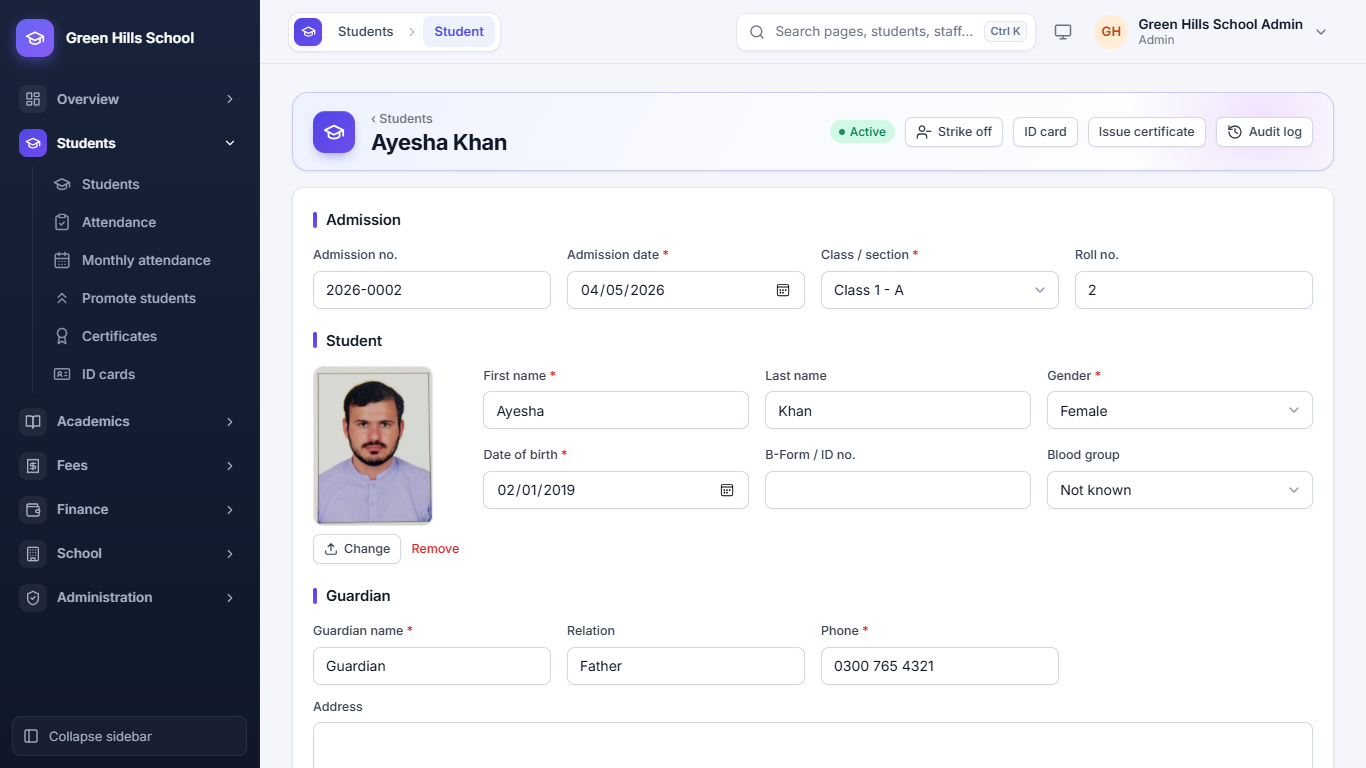
Click a student in the list to open their full record. Change any detail and click Save. Buttons at the top:
- Strike off: remove a student who does not pay or stops coming. When they come back, Readmit them; a readmission fee can be charged.
- ID card: make this student's ID card.
- Issue certificate: School Leaving, Character or Bonafide certificate.
- Audit log: who changed what in this record, and when.
The parent's Portal login is also made from this page. The guardian's mobile number becomes the username, and the app gives a temporary password. The parent must change it at first login. One login can be linked to brothers and sisters.
Students at risk
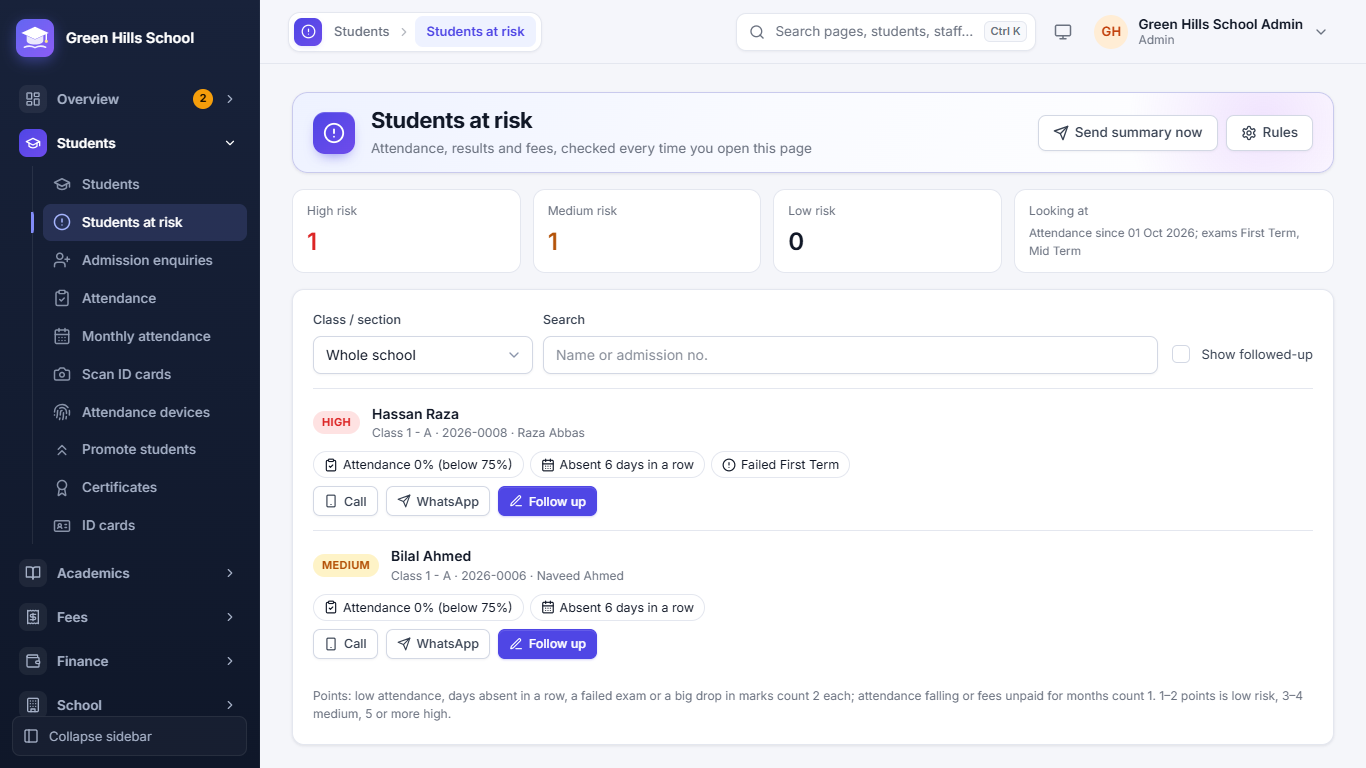
Students → Students at risk finds children who may drop out or fail, before it is too late. Every time the page opens, the app looks at each student's attendance, exam results and fees and gives points:
- 2 points each: attendance below the limit (75% to start with), absent several days in a row, failed an exam, or a big drop in marks since the last exam.
- 1 point each: attendance falling compared with the weeks before, or fees unpaid for months.
1–2 points is Low, 3–4 Medium and 5 or more High risk. Each student shows the reasons as small chips, and the counts at the top show how many are at each level. Choose a class / section or search by name.
- Call and WhatsApp open the guardian's number on a phone.
- Follow up writes what was done ("Spoke to the father, child was ill") and can hide the student for a week, two weeks or a month. Tick Show followed-up to see them again; earlier follow-ups stay on the student.
- Rules (Admin and Principal) changes the limits: how many days to look back, the attendance % that is too low, how far it must fall, how many days absent in a row, how big a marks drop counts, and after how many months unpaid fees count (0 ignores fees).
- Morning summary: in Rules, tick Send the principal a summary every school day, choose the time and up to 3 mobile numbers. It goes by WhatsApp or SMS (as the school sends its automatic messages) and as an app notification to Admin and Principal logins, only when someone is at medium or high risk. Send summary now sends it straight away.
The Admin and Principal see the whole school; a teacher sees only the sections where they are the class teacher. The Dashboard's Needs attention box shows how many students are at medium or high risk.
ID Cards
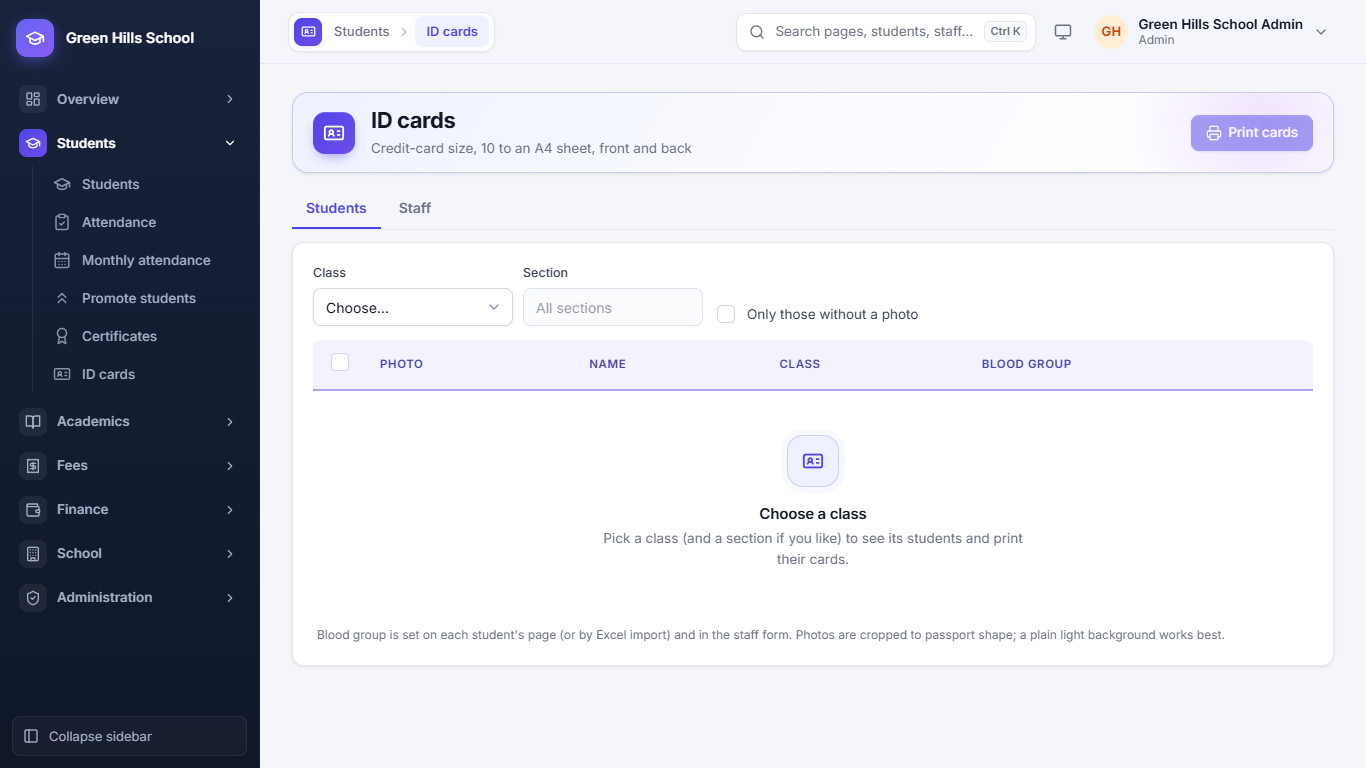
Open Students → ID cards. Choose a class, tick the students and click Print. Ten cards fit on one A4 page. Each card has the photo, blood group, school logo and a QR code. Staff cards are made here too. Scanning the card's QR code marks attendance: see Scan ID cards.
Attendance and Holidays
Daily student attendance
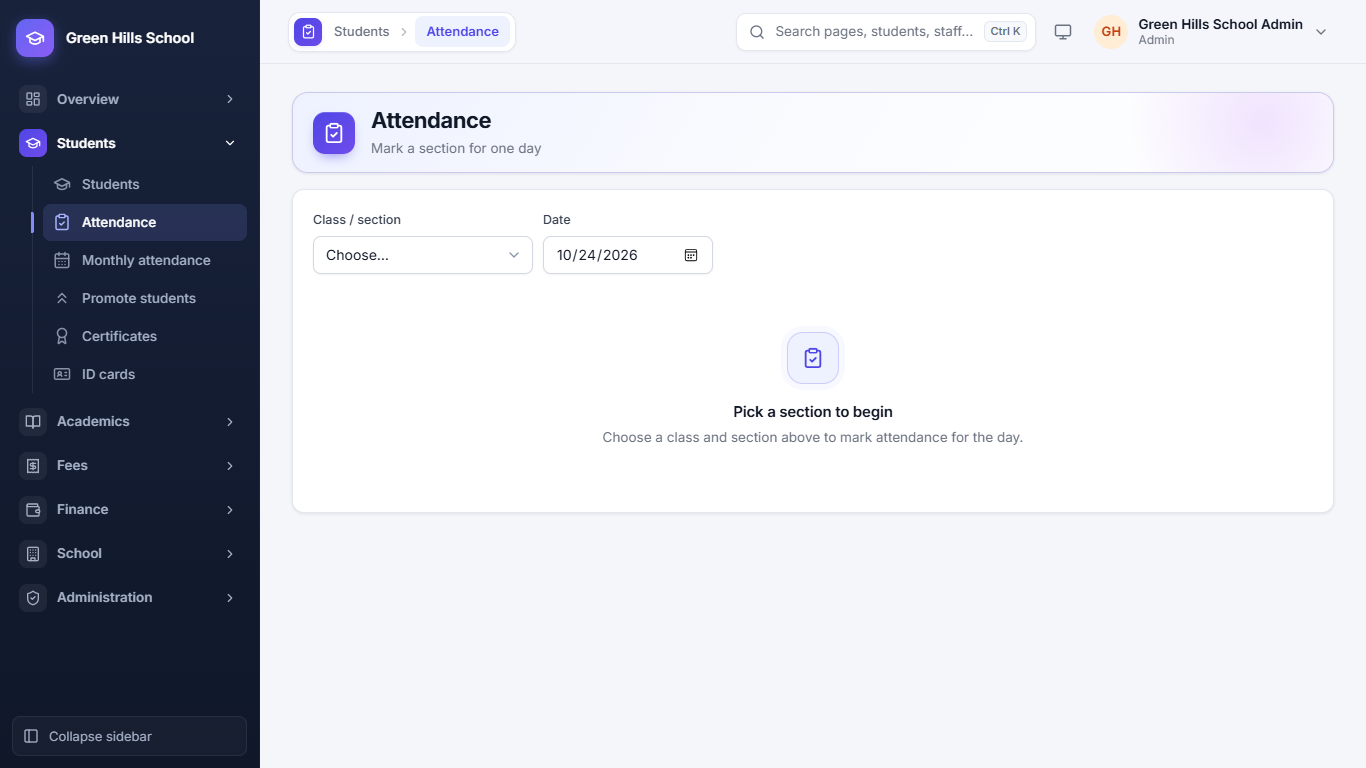
- Open Students → Attendance.
- Choose the Class / section and the Date. All students of that section appear.
- Mark each student Present, Absent, Late or Leave, then click Save.
Parents of absent students get a message 15 minutes later: by SMS, WhatsApp, or WhatsApp with SMS as the fallback, as set in the School profile. If you correct a mistake before then, no message is sent. A teacher can mark only their own sections. Attendance cannot be taken on a holiday.
Scan ID cards
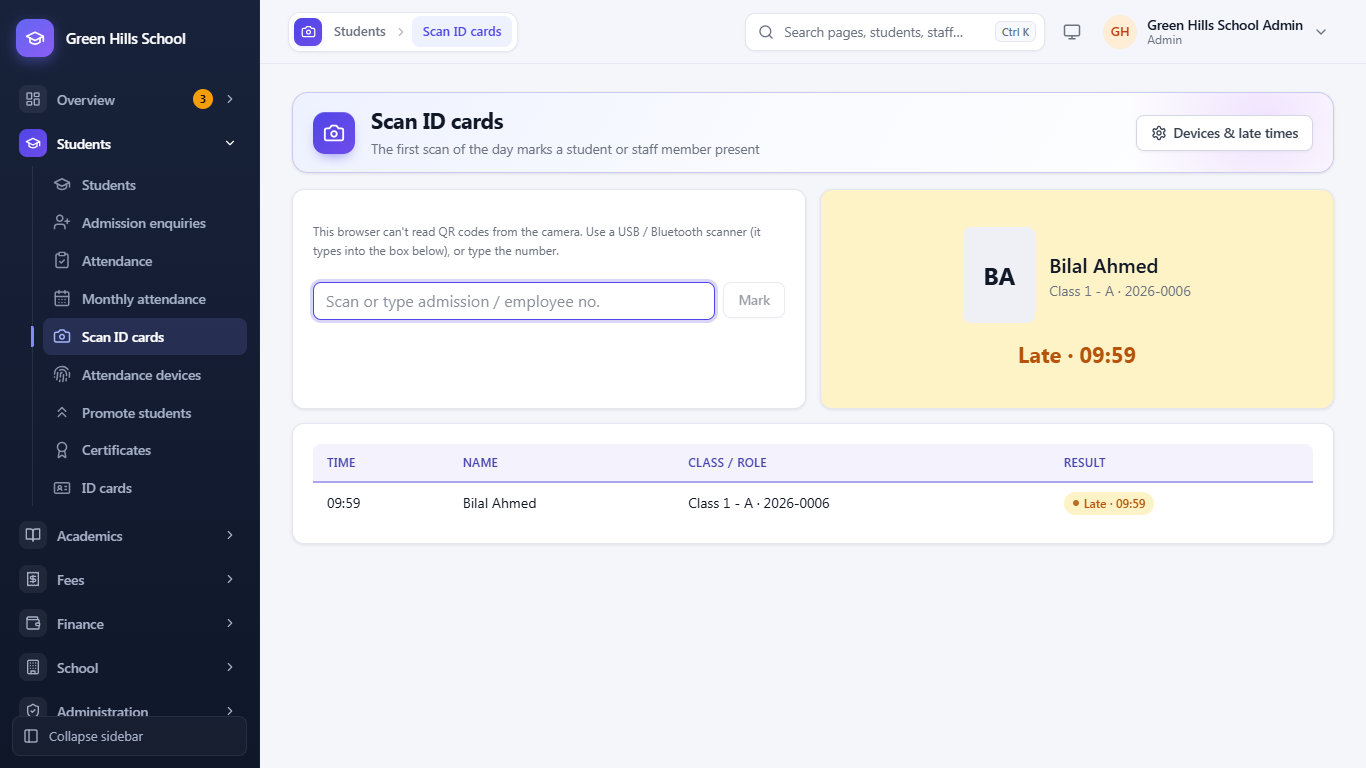
Instead of ticking names, students and staff can show their ID card at the gate. Open Students → Scan ID cards (Admin, Principal and Teacher).
- On a phone or tablet the camera reads the card's QR code. On a computer, plug in a USB or Bluetooth barcode scanner: it types the number into the box and presses Enter by itself. You can also type the admission no. or employee no.
- The first scan of the day marks the person Present, or Late after the late time. A student already marked absent is corrected to present, and the absence message is not sent.
- A second scan the same day (for example going home) is only logged. Scans on a holiday or weekend are refused.
- Teachers scan student cards; staff cards are scanned by the Principal or Admin.
The page shows each result in large letters (name, class and what happened) and a list of recent scans.
Fingerprint machines
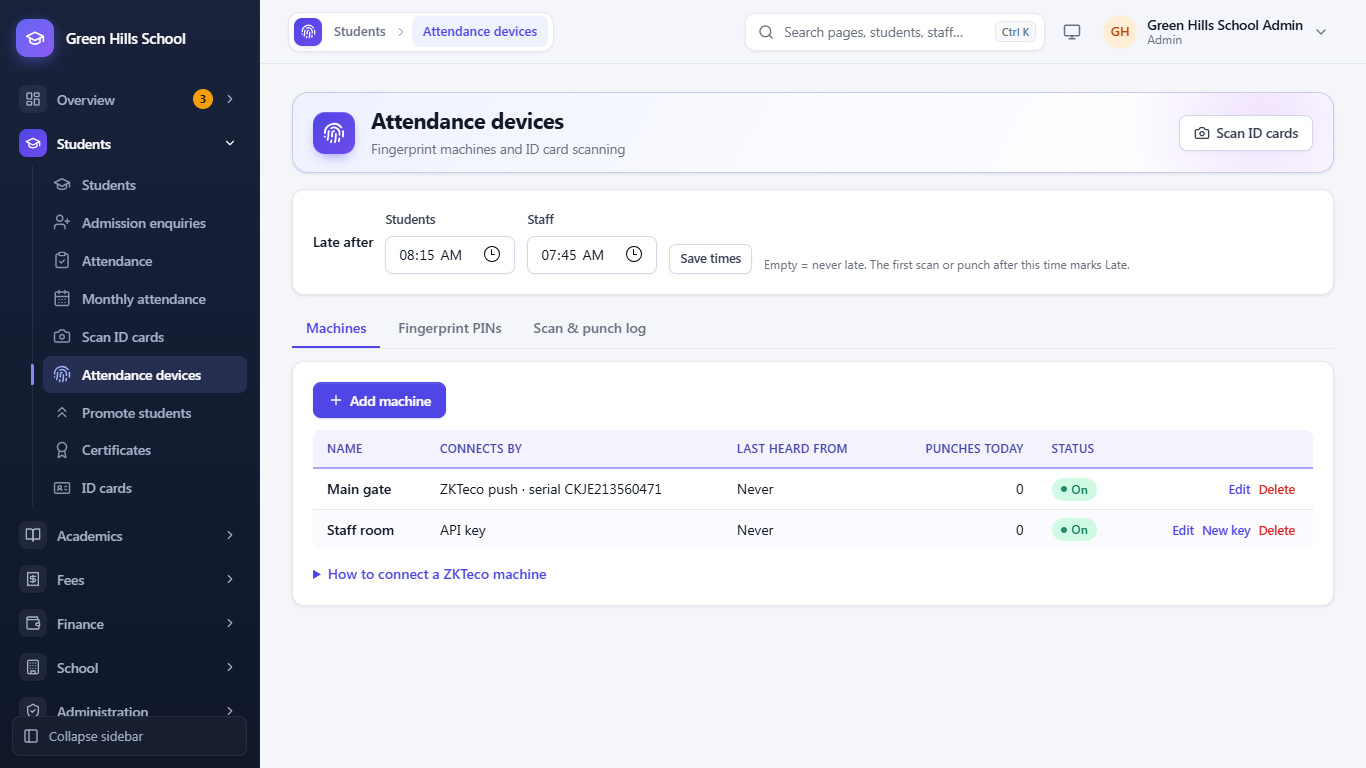
Students → Attendance devices (Admin and Principal) connects fingerprint or face machines, so attendance is marked when a student or teacher punches in. At the top, set the late times for students and for staff and click Save times; the first scan or punch after that time marks Late (empty = never late). Below are three tabs:
- Machines: click Add machine. For a ZKTeco machine choose ZKTeco push (ADMS) and enter its Serial number (on the machine: Menu › System Info). Then on the machine open Menu › Comm. › Cloud Server Setting (ADMS) and enter the server address shown on the page. Other machines, or a sync program, use an API key instead: it is shown only once, so copy it straight away (New key makes another). Last heard from shows that the machine is connected.
- Fingerprint PINs: every student and staff member needs a PIN, the number they are enrolled under on the machine. Give everyone a PIN fills in the missing ones (staff from 1, students from 1001). You can change a PIN and Save PINs.
- Scan & punch log: every card scan and machine punch of a day, with the person, the time and the result. Tick Unknown PINs only to find people enrolled under a PIN that is not in the app.
A punch works like a card scan: the first one of the day marks Present or Late.
Monthly attendance
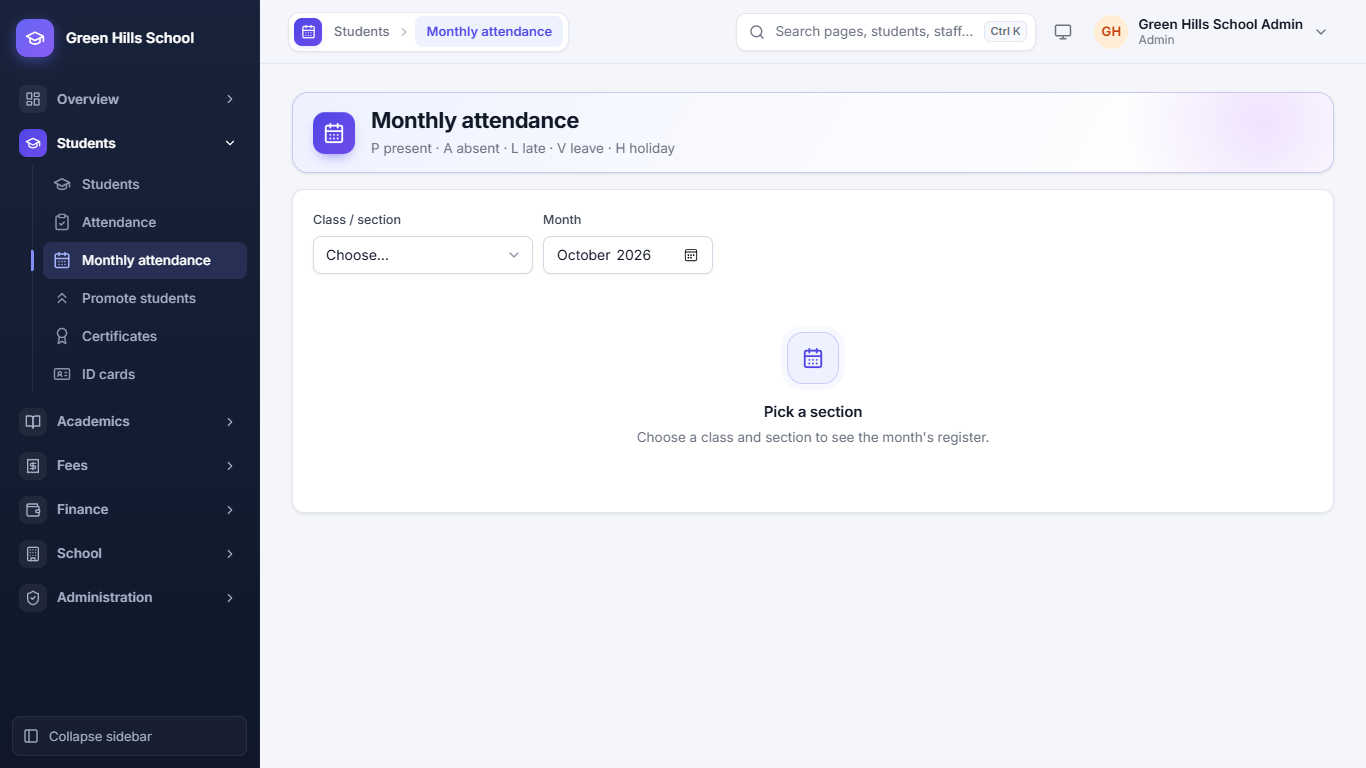
Students → Monthly attendance shows one section's whole month in a grid, with each student's total present and absent days. You can download it as Excel.
Staff attendance
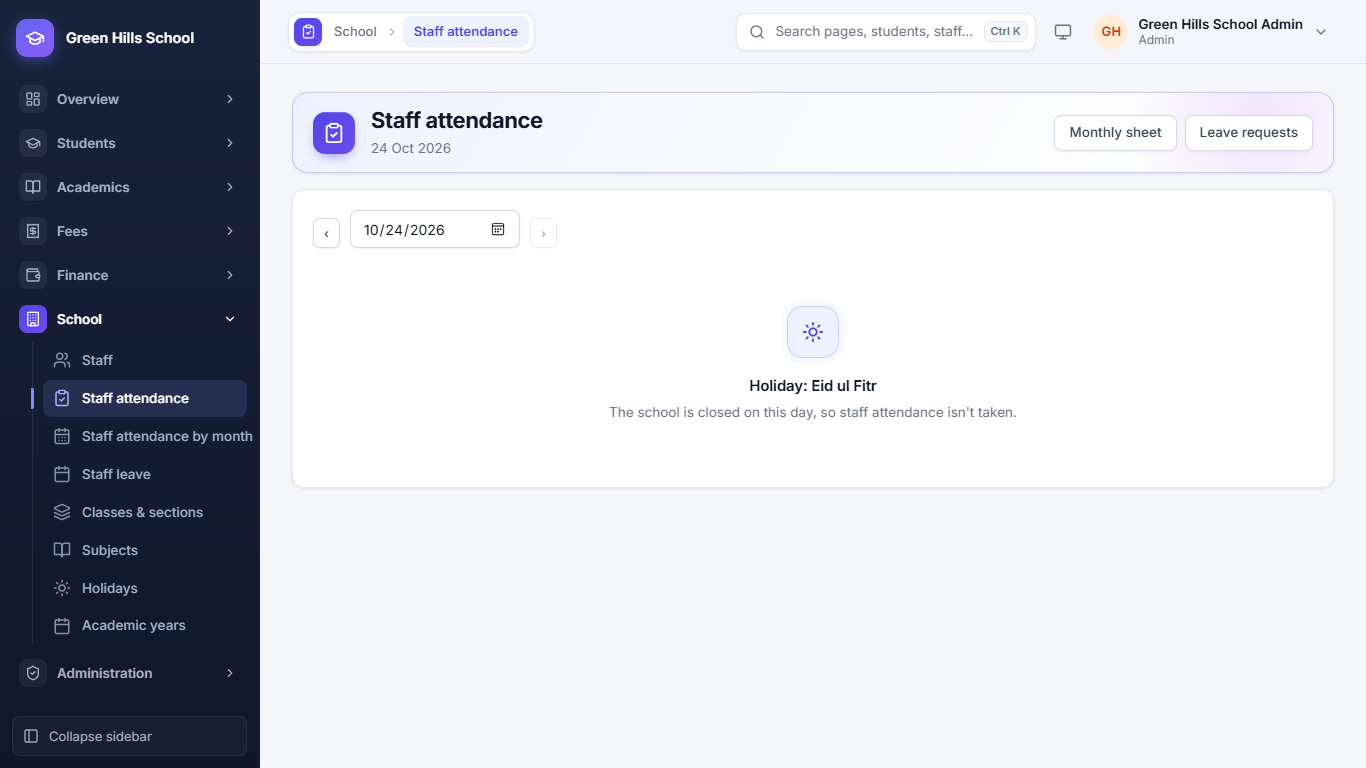
Staff can also be marked present by scanning their ID card or with a fingerprint machine (see above).
In School → Staff attendance, mark staff Present, Absent, Half day or Leave each day. Absent and Half day without approved leave are cut from pay in Payroll automatically (Absent = 1 day, Half day = half a day). Staff attendance by month shows the month's summary.
Staff leave
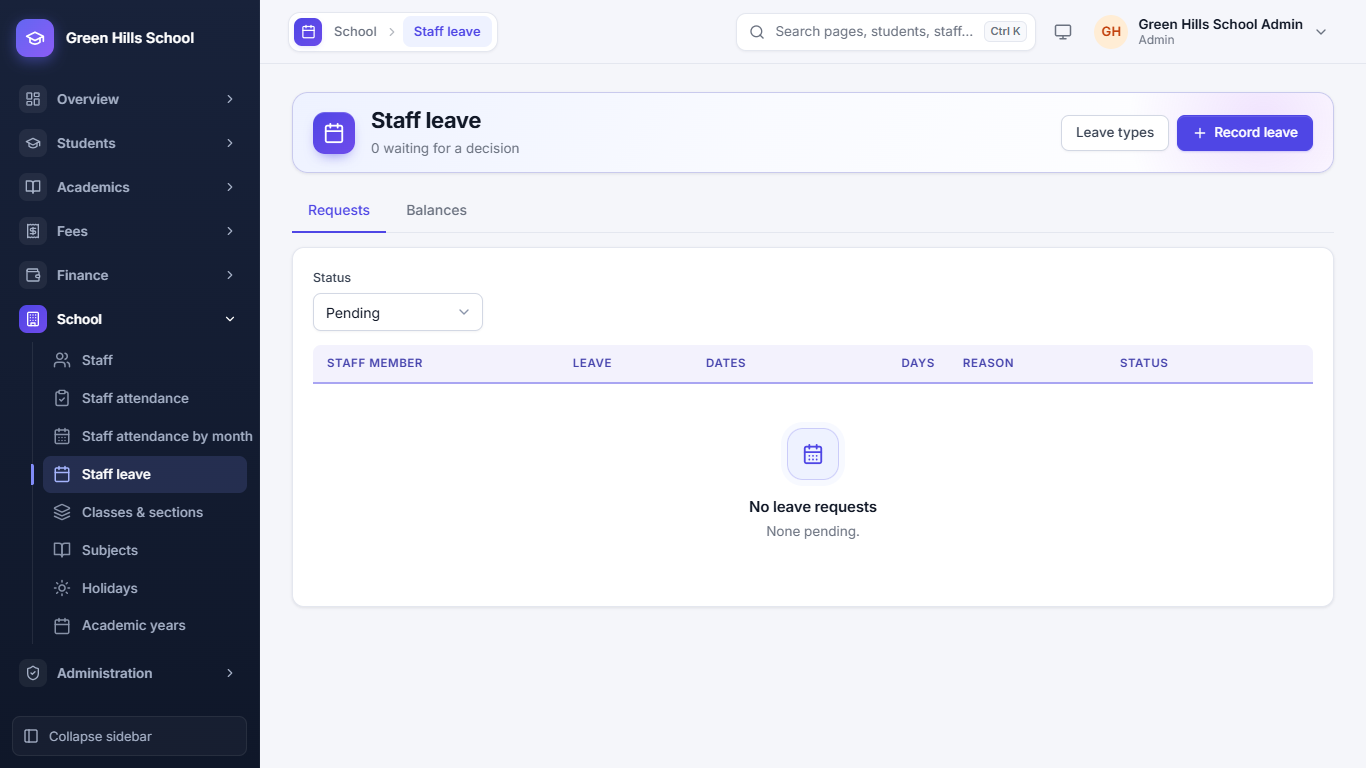
In School → Staff leave, approve or reject leave requests. Each year staff get Casual 10 and Sick 10 days. Without pay leave has no limit, but those days are cut from pay. Staff can send their own request from My leave.
Holidays
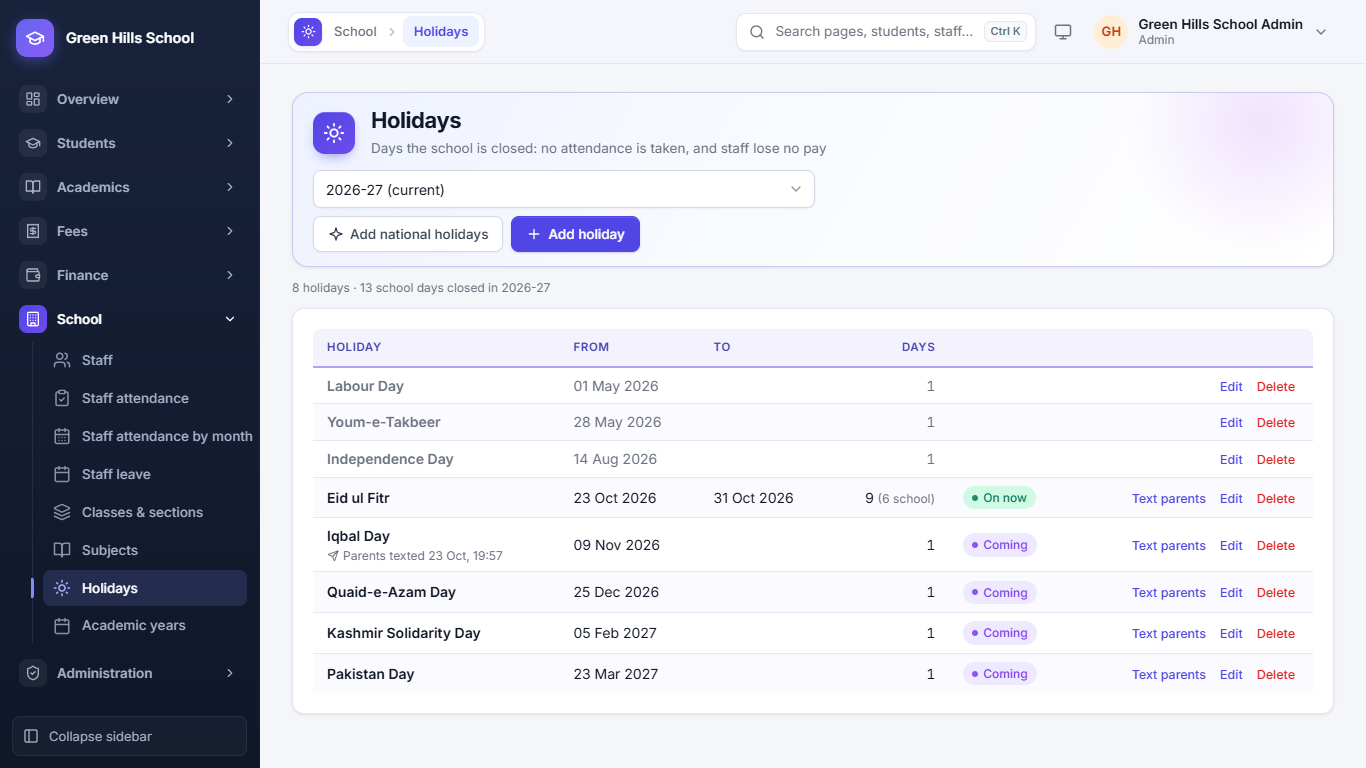
In School → Holidays, enter the days the school is closed. No attendance is taken on those days, and staff lose no pay.
- Add national holidays: adds the 7 fixed national holidays (like Labour Day, Independence Day, Quaid-e-Azam Day) in one click. Eid and Muharram dates change each year, so add them yourself with Add holiday.
- Text parents: send an SMS about the holiday to all parents. The app offers this by itself when you add a holiday that starts within 7 days.
- If an exam paper, fee due date or homework due date falls on a holiday, the app warns you.
Fees
The usual monthly order is: set fees once (Fee setup) → make the month's vouchers → take payments at the counter or from transfer proofs → send reminders to those who have not paid.
Fee setup
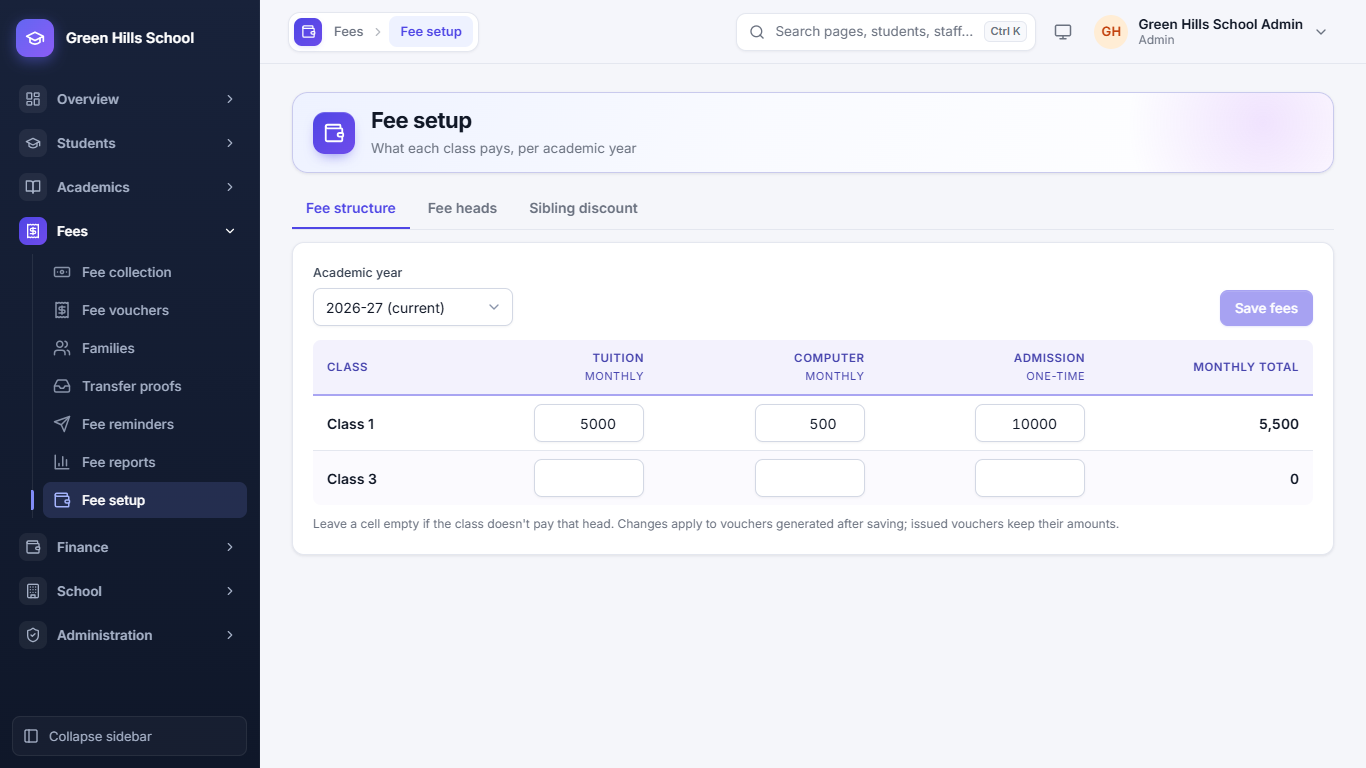
Open Fees → Fee setup. It has three tabs:
- Fee heads: the kinds of fee, like Tuition (monthly), Computer (monthly) or Admission (one-time). The app adds some heads by itself when first needed: Transport with the first van route, Library fine with the first library fine (see Transport and Library), Board fee with the first board exam and Uniform & books with the first sale charged to fees.
- Fee structure: how much each class pays for each head in the academic year. Leave a box empty if a class does not pay that head. Click Save fees. New amounts apply only to vouchers made after saving.
- Sibling discount: younger brothers and sisters pay less. For example, the 2nd child gets 20% off tuition. If a child also has their own concession, the bigger one is used, not both.
Fee vouchers
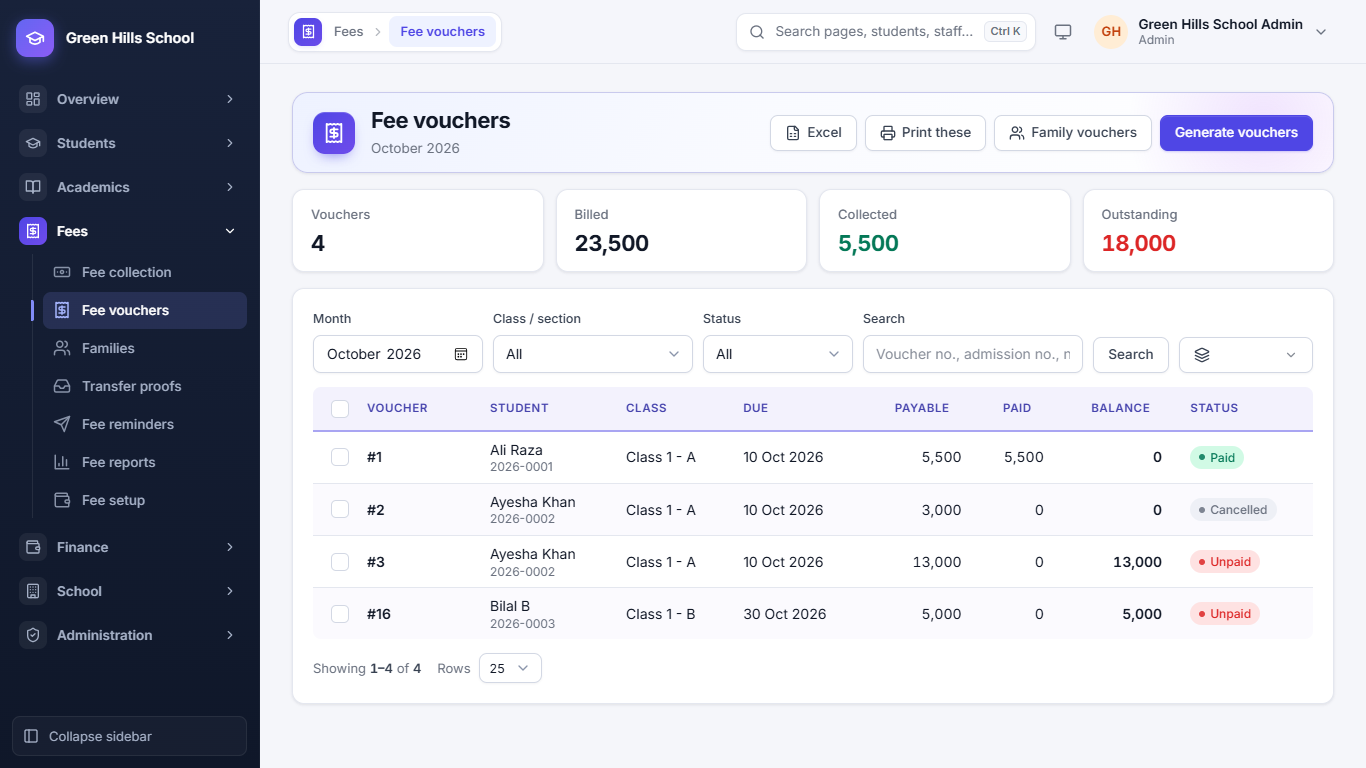
Fees → Fee vouchers shows one month's vouchers. The cards at the top show the number of Vouchers, Billed, Collected and Outstanding. Each row shows the voucher no., student, due date, payable, paid, balance and status (like Paid, Unpaid or Cancelled). Tick several vouchers to cancel them together or send reminders to them. Print these prints the vouchers in the list.
Make the month's vouchers (Generate vouchers)
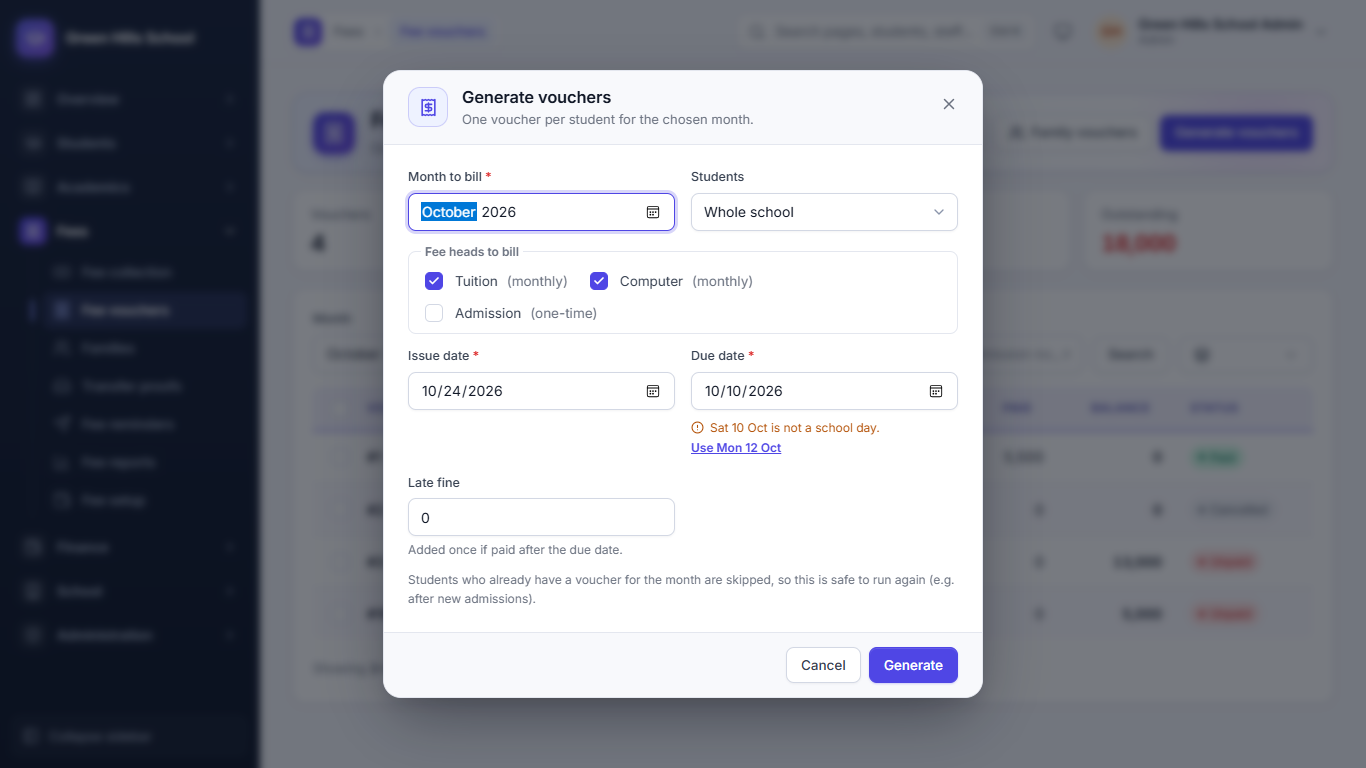
- In Fee vouchers, click Generate vouchers.
- Choose the Month to bill and the Students (whole school or one class).
- Tick the fee heads to bill. Monthly heads are ticked already.
- Enter the Issue date, Due date and Late fine. If the due date is not a school day, the app suggests the next school day.
- Click Generate. Students who already have a voucher for that month are skipped, so it is safe to run again after new admissions.
Some charges go on the voucher by themselves even if their head is not ticked: an installment part due that month, an unpaid board fee, library fines and uniform or book sales charged to fees. Approved scholarships lower the fee. If a voucher is cancelled, these charges go on the next voucher made for the student.
Family vouchers prints all brothers' and sisters' vouchers of one family on one slip.
Take a payment at the counter (Fee collection)
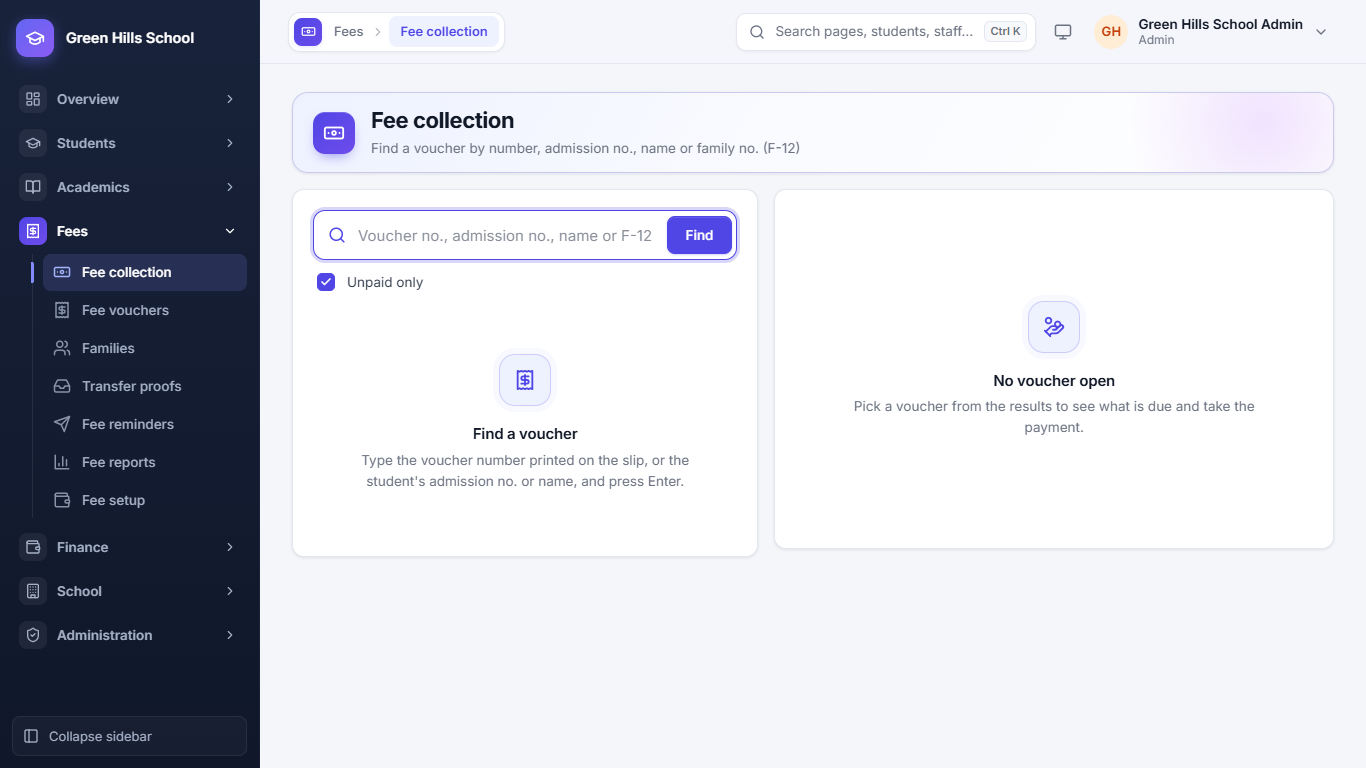
- Open Fees → Fee collection.
- Type the voucher no. printed on the slip, the admission no., the student's name or the family no. (like F-12), then press Enter.
- Pick the voucher. The right side shows what is due today, including any late fine.
- Enter the amount received and save. Print the receipt.
If you type a family no., one payment is shared across all the children's vouchers, oldest due first. The family gets one receipt (like FR-7).
Families
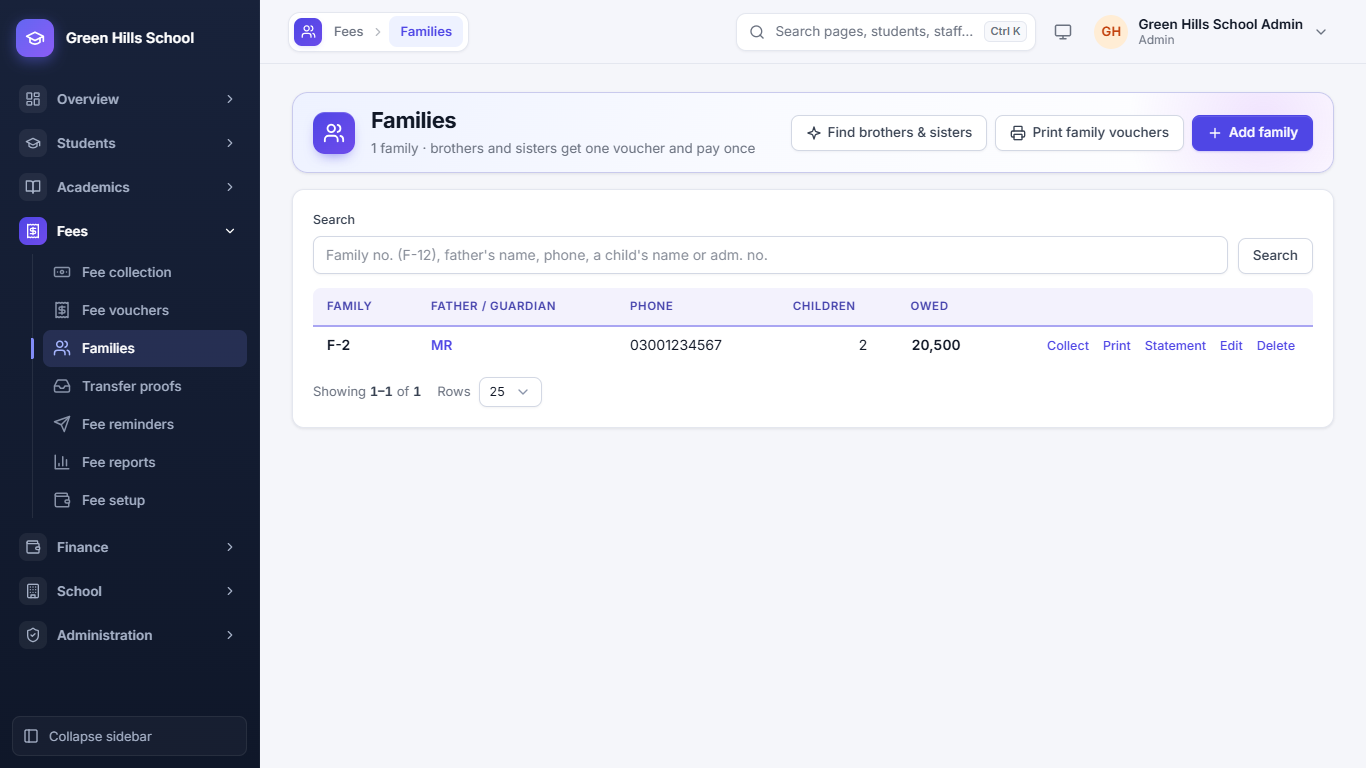
Fees → Families groups brothers and sisters. Click Find brothers and sisters: the app suggests children who share the same guardian mobile number. Each family gets a number like F-12. Statement prints a family's full fee record for the year.
Transfer proofs
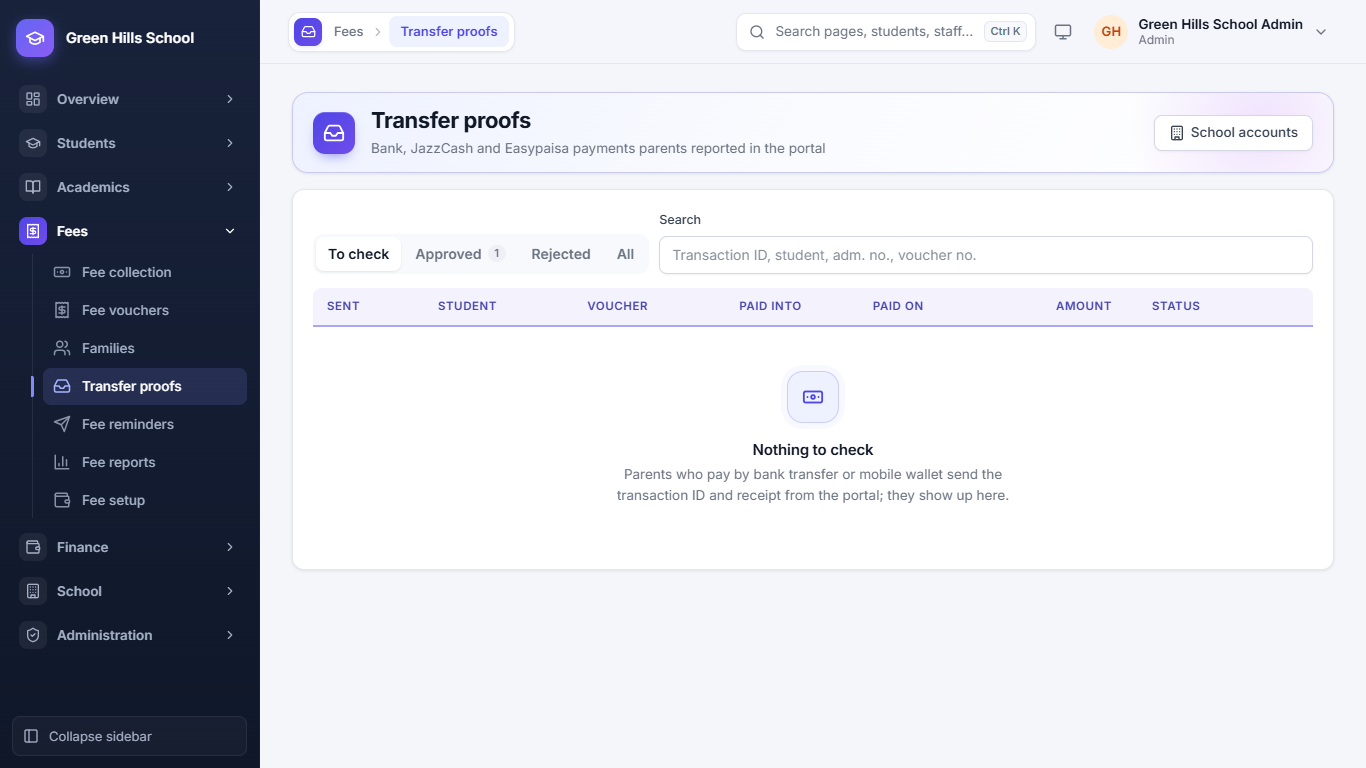
Many parents pay by bank transfer, JazzCash or Easypaisa. They send the transaction ID and a photo of the receipt from the Portal. In Fees → Transfer proofs:
- Approve: the payment is saved on the voucher, with the transaction ID as the reference.
- Reject: write the reason; the parent sees it.
The parent gets an SMS either way. A red badge in the menu shows how many proofs are waiting. The school's bank and wallet accounts are entered by the Admin or Principal with the School accounts button on this page.
Raast QR on vouchers
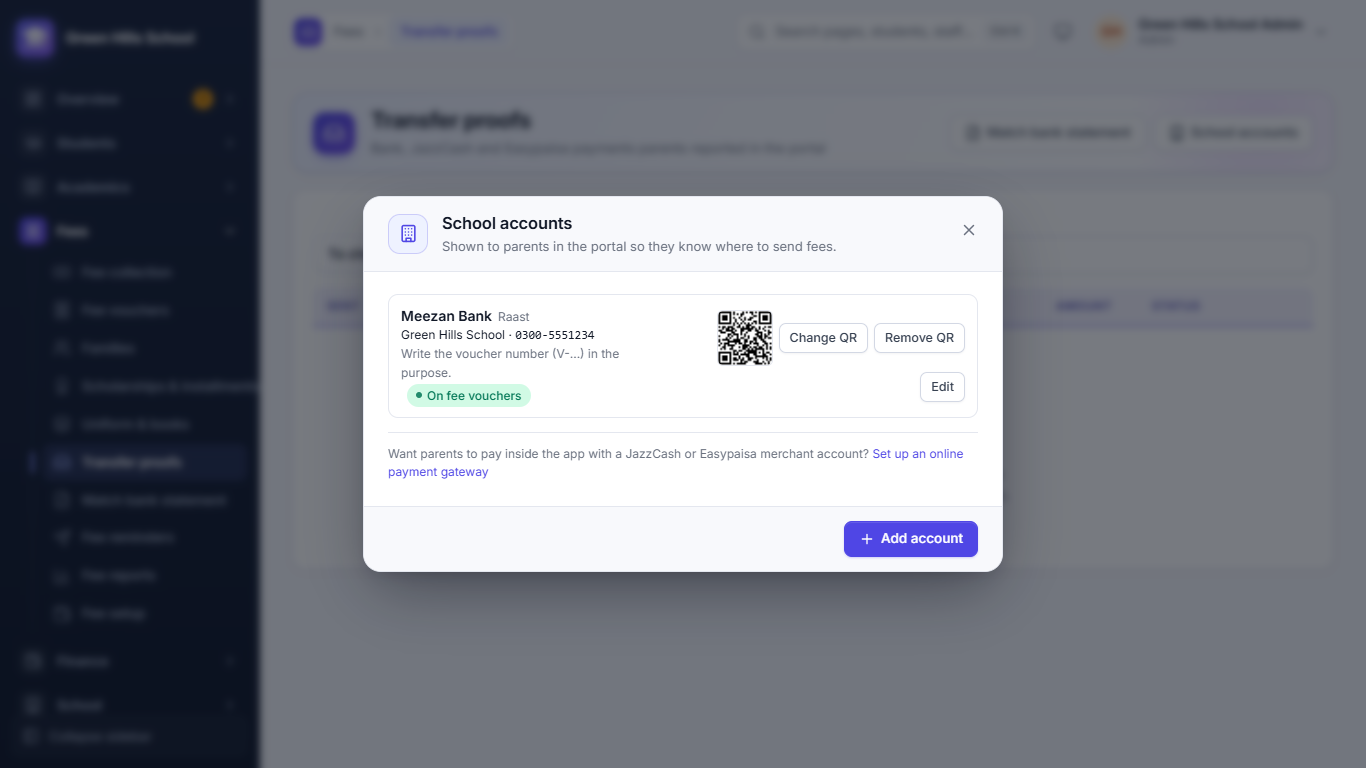
Raast lets a parent pay from any bank or wallet app by scanning a QR code, for free. Get the school's Raast QR from your bank (it is the QR the bank gives for the school's account or Raast ID), then:
- In Fees → Transfer proofs, click School accounts and add the account with the type Raast (or edit the bank account the QR belongs to).
- Click Add QR and choose the picture of the bank's QR code.
- Tick Print on fee vouchers. Only one account can be on the vouchers.
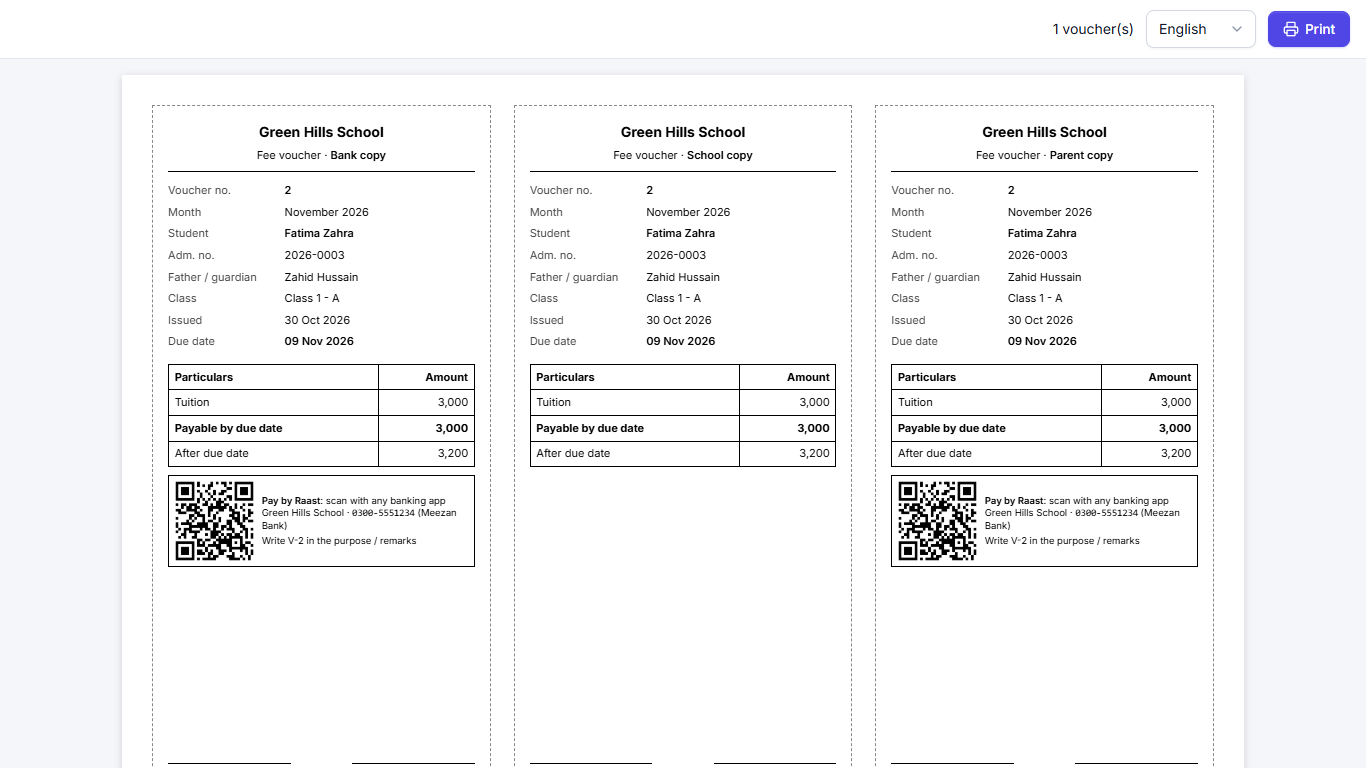
Every printed voucher that still has something to pay now has a Pay by Raast box on the bank and parent copies: the QR code, the account number, and "Write V-123 in the purpose / remarks", with that voucher's own number. The parent portal shows the same QR when a parent chooses to pay by transfer. A parent who pays this way does not need to send a proof: the payment is found on the bank statement (next section).
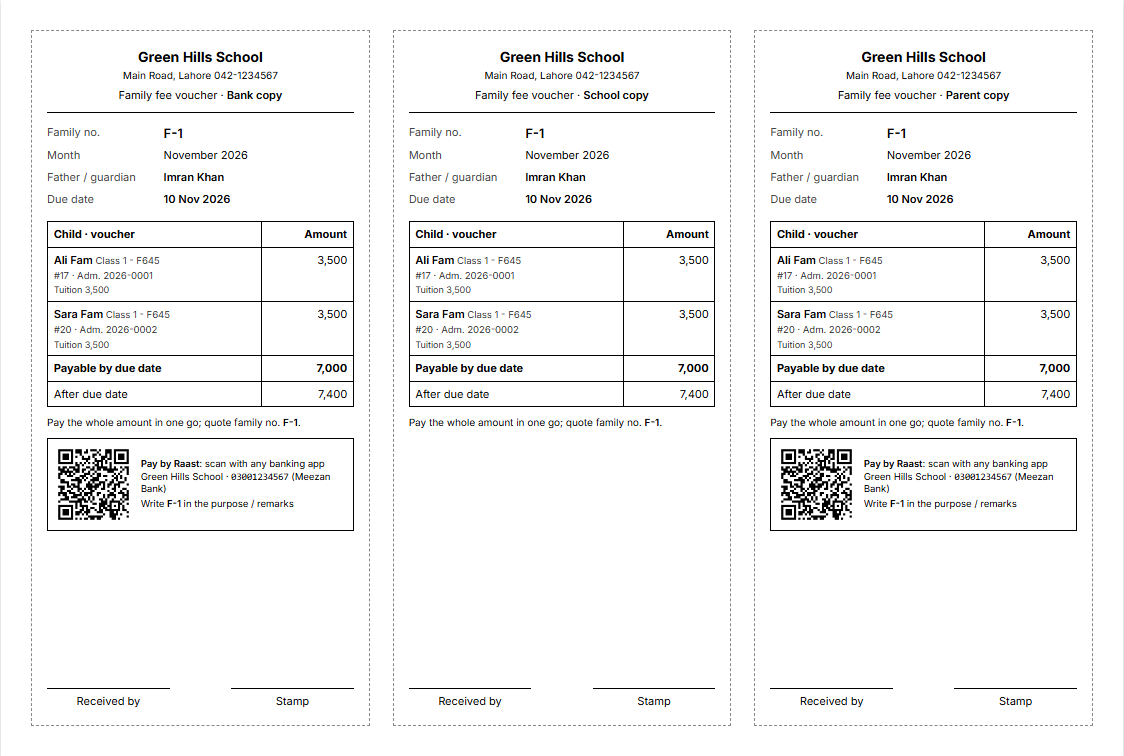
Family vouchers get the same box, but it asks for the family no.: "Write F-12 in the purpose / remarks". The parent pays the whole family's amount in one transfer. A student without a family gets their own slip, which asks for the voucher no. as usual.
Match the bank statement
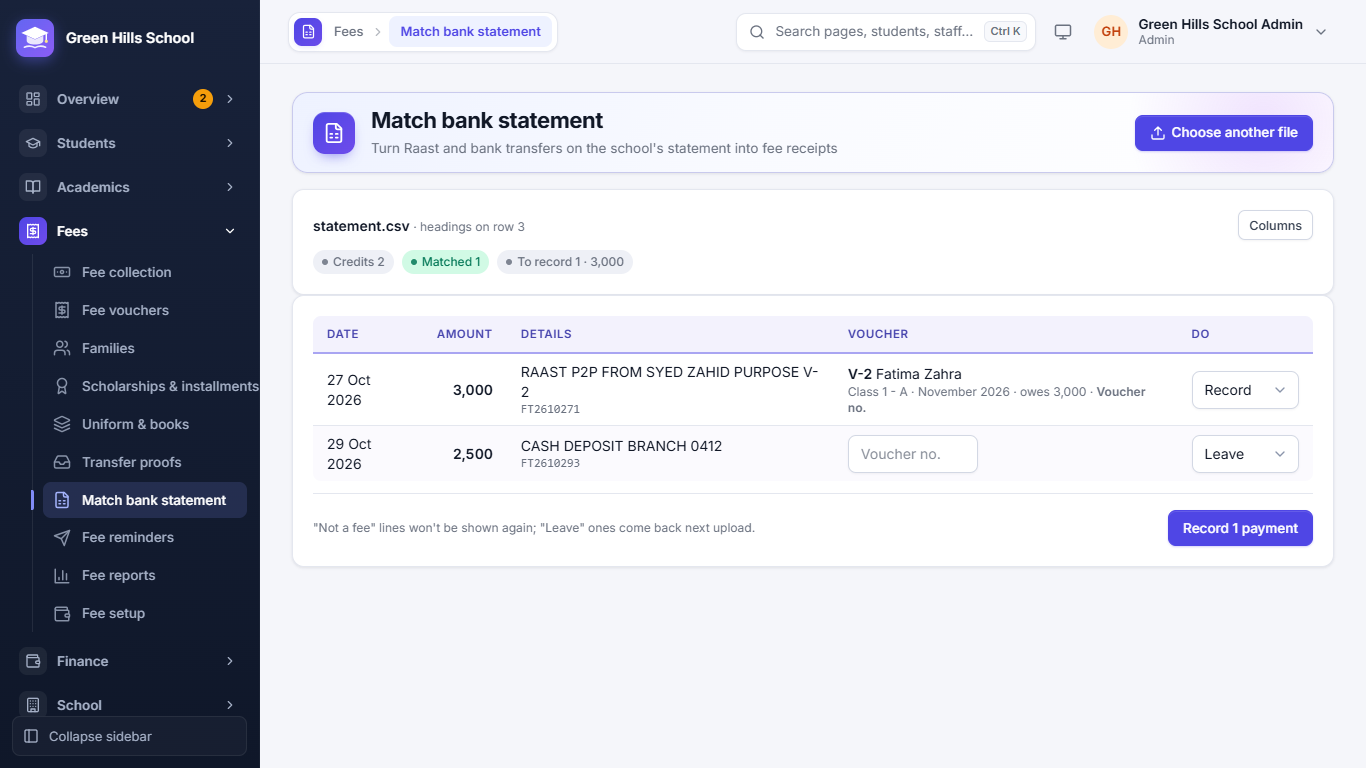
Fees → Match bank statement turns the money that came into the school's account into fee receipts, without typing them one by one.
- Download the account statement from internet banking as Excel or CSV and click Upload statement. The app finds the heading row by itself; if it picks the wrong columns, fix them with Columns.
- Only money coming in (credits) is listed. For each line the app looks for a family no. ("F-12" or "Family 12") in the details first, then the voucher: "V-123" or "Voucher 123", then the admission no., then the amount together with the student's full name. It never matches on the amount alone. "F-12" is never taken as voucher 12.
- Check each match. A family line shows the family's name, how many vouchers it covers and what the family owes. For a line the app could not match, type the voucher no. (like 1187) or the family no. (like F-12). In Do, choose Record, Leave (it comes back next time you upload) or Not a fee (never shown again).
- Click Record payments (it says how many, like "Record 3 payments"). Each one is saved as a bank payment on its voucher. A family payment is shared over the children's vouchers, oldest due first, with one family receipt (like FR-7), as at the counter. If the parent had already sent a proof for the same voucher (or family) and amount, that proof is approved instead.
Lines that were already recorded are skipped if the same statement is uploaded again. A payment bigger than what the voucher or family owes is refused, so the extra is not lost.
Opening balances (fees owed in your old system)
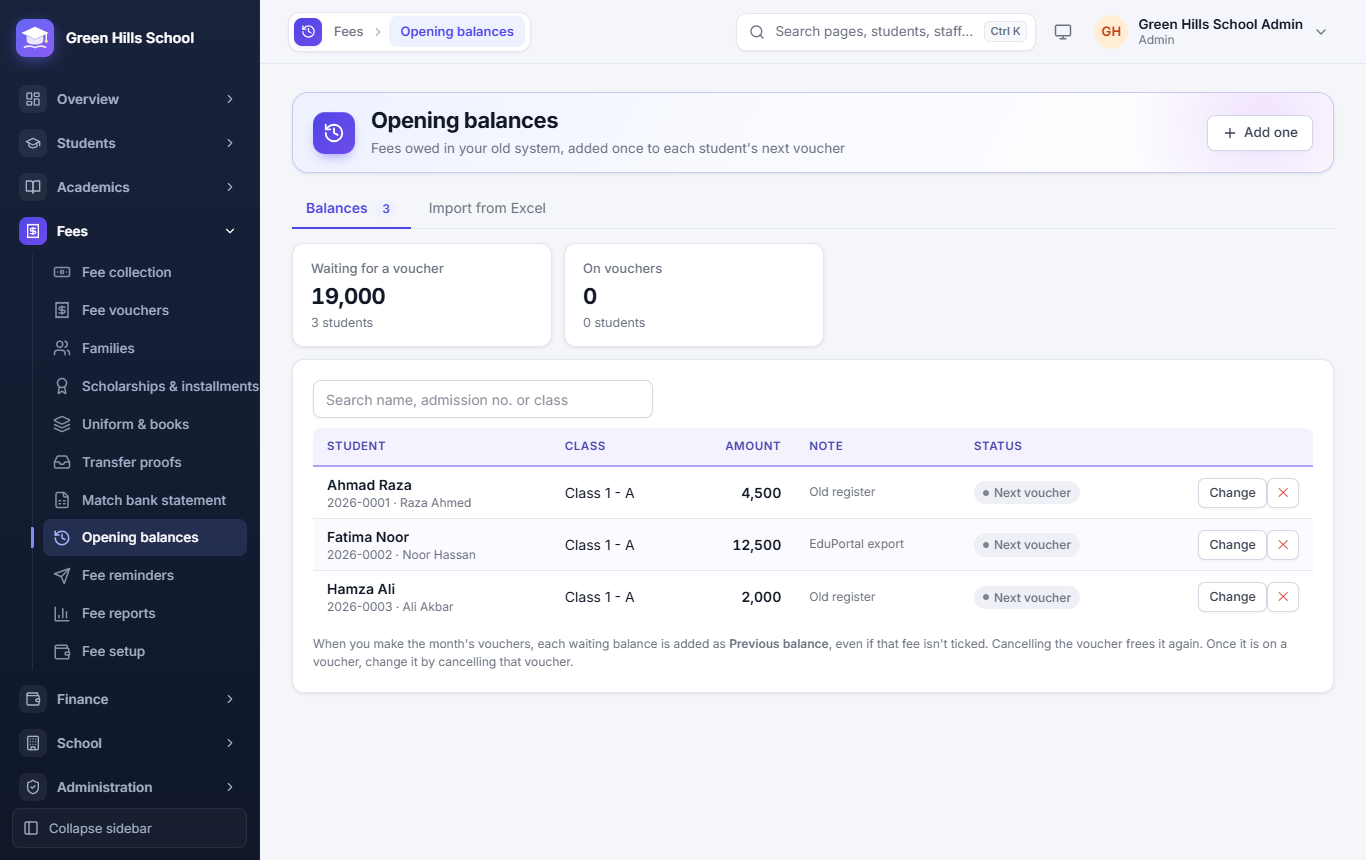
When the school moves to School Hisaab, many students still owe fees from the old software or registers. Fees → Opening balances brings those amounts over. Each one is added once to the student's next voucher as Previous balance, and is then paid like any other fee.
- Add one: choose the student, type the amount owed and a note (like "Old register"). Change or ✕ works until the balance is on a voucher.
- Import from Excel: export the dues, defaulters or balance list from the old software as Excel or CSV and upload it as it is. The file needs an admission no. (or the student's and father's name) and a balance column; headings like "GR No", "Total Dues", "Arrears" or "Balance" are recognised. No export? Click Sheet with my students for a sheet listing every student and type the amounts in it.
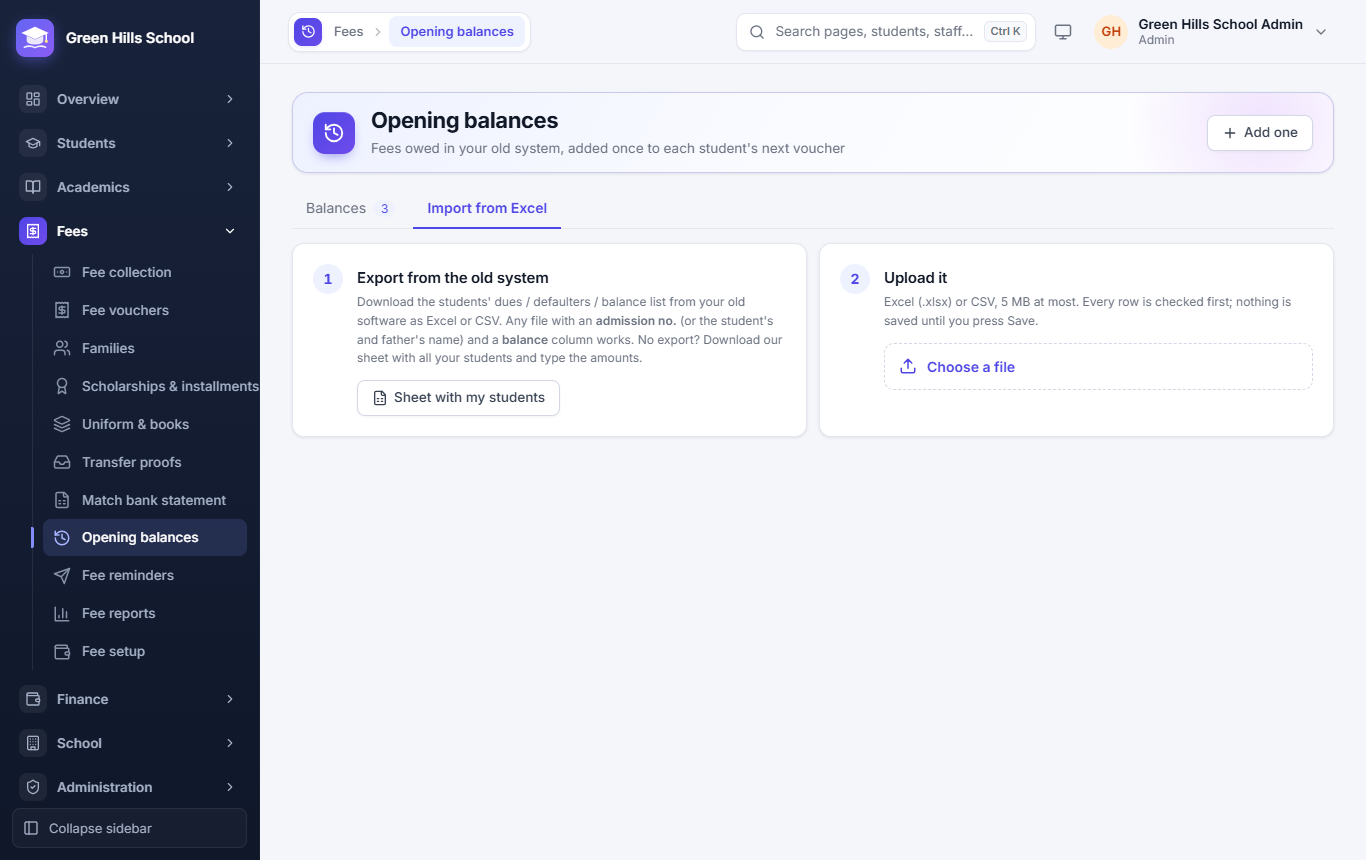
Every row is checked before anything is saved. Students who owe nothing (0 or empty) are left out. An amount in brackets or with a minus means the student paid ahead: it is not brought over, so give a concession on the next voucher instead. A student who is not found, or is in the file twice, is shown in red. Click Save to keep the good rows.
When you Generate vouchers, each waiting balance is added to the student's voucher even if no fee head is ticked for it. If you cancel that voucher, the balance waits for the next one again.
Scholarships and installments
Open Fees → Scholarships & installments. Both are used when the month's vouchers are generated.
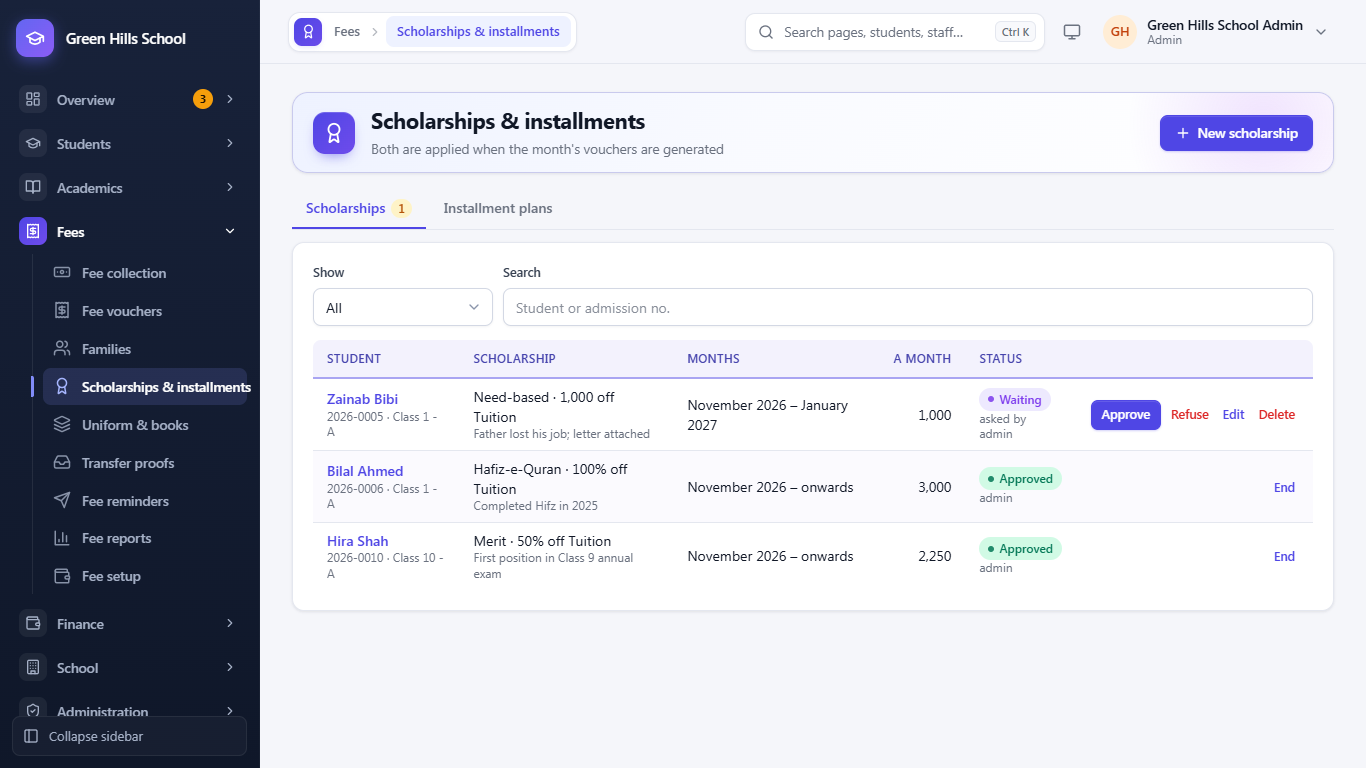
Scholarships
- Click New scholarship and pick the student.
- Choose the Kind (Merit, Need based, Sports, Hafiz-e-Quran, Orphan, Staff child or Other), the Fee it lowers (for example Tuition), and either a Percent off or a Fixed amount a month.
- Enter the From month, and the To month if it ends (empty = until stopped), and the Reason.
- Click Ask for approval. The Accountant can ask; only the Admin or Principal can Approve or Refuse.
An approved scholarship lowers every voucher from its first month. If the student also has a concession or a sibling discount on the same fee, the bigger one is used, not both. End stops a scholarship: enter the last month it applies.
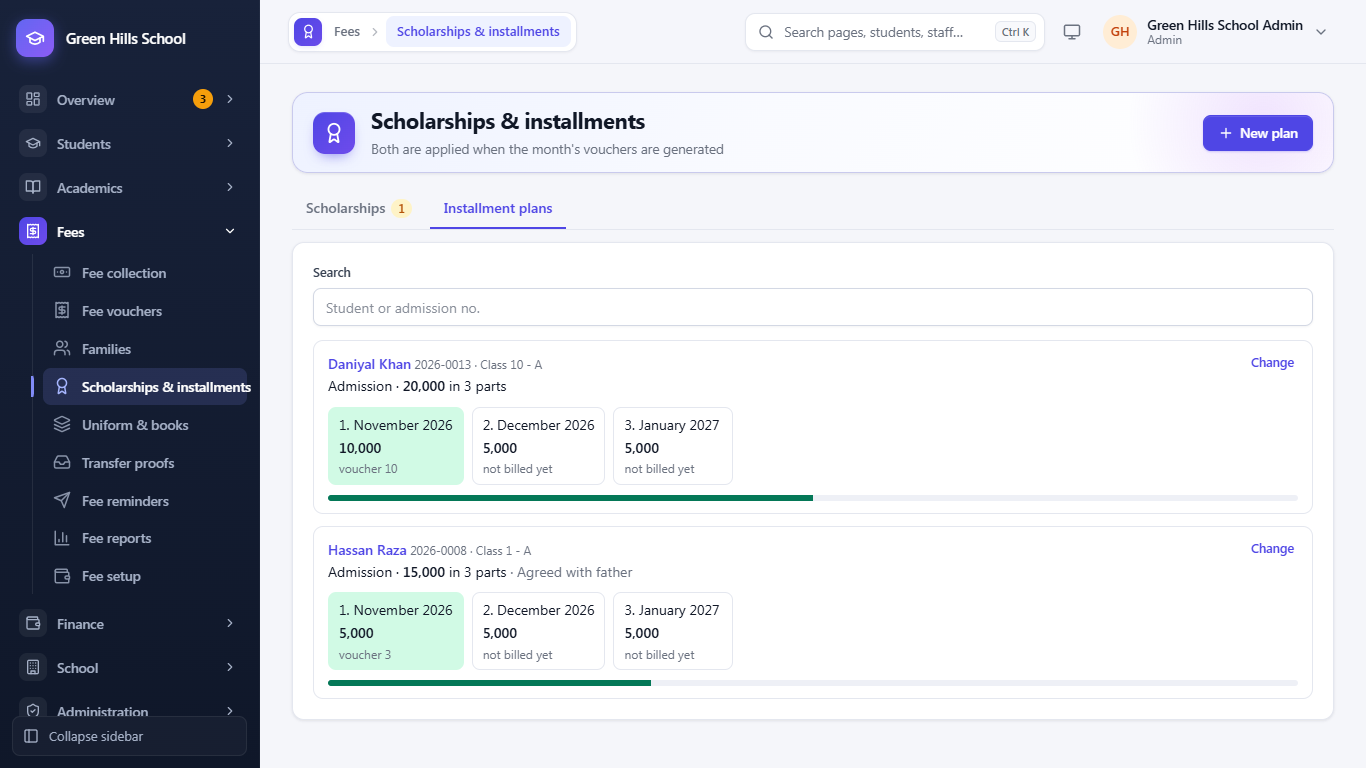
Installment plans split a big fee, like the admission fee, into parts over several months.
- On the Installment plans tab click New plan and pick the student.
- Choose the Fee. The Total is filled in from the class's fee (less any concession); change it if needed.
- Enter the number of Parts (2 to 12) and the First month. The app divides the total into monthly parts; change any part's month or amount if the parent agreed otherwise. The total of the parts is shown below them.
- Click Save plan.
Each part goes on the voucher of its month, named like "Admission (2 of 4)", even if the fee head is not ticked when generating. The plan card shows which parts are on which voucher and which are not billed yet. Change edits the parts that are not on a voucher yet.
Uniform & books
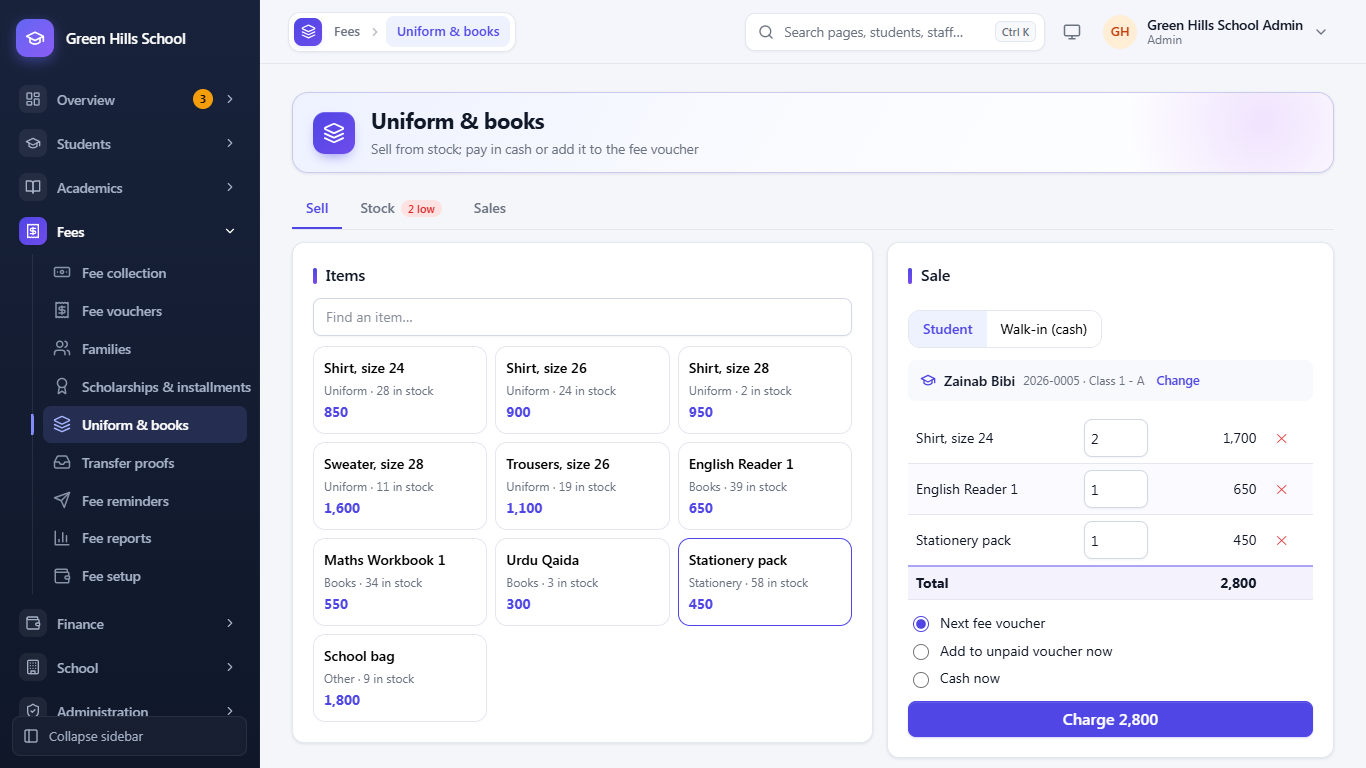
Schools that sell uniforms, books and stationery keep the stock and the sales in Fees → Uniform & books (Admin, Principal and Accountant). It has three tabs.
Stock: click Add item for each thing you sell. Make one item per size (for example "Shirt, size 24") with its Price, and set Warn when stock is at or below. Then:
- Receive when a delivery comes in: the pieces received, the cost per piece and the supplier (optional).
- Count when you count the shelf: enter the pieces there now and say why it differs (damaged, lost).
- History lists every change: received, sold, returned on a cancelled sale, counted.
Items running low show in red, and the Stock tab shows how many are low. An item that was ever stocked cannot be deleted; untick For sale to hide it instead.
Sell:
- Choose Student and pick the student, or Walk-in (cash) for someone else (the buyer's name is optional).
- Tap the items on the left. Tap again to add one more, or change the quantity in the sale. The app does not let you sell more than is in stock.
- For a student, choose how it is paid:
- Next fee voucher: the sale goes on the next voucher generated, as "Uniform & books (S-12)".
- Add to unpaid voucher now: pick one of the student's unpaid vouchers; the sale is added to it straight away.
- Cash now: paid at the counter.
- Click Take (cash) or Charge. A slip opens to print.
Sales: every sale between two dates, with the number of sales and the totals in cash and on fees. Each row shows how it is paid ("Paid in cash", "Next fee voucher", "On voucher 123"). Slip prints it again. Cancel (with a reason) puts the pieces back on the shelf. A sale that is already on a voucher can only be cancelled after cancelling that voucher.
Fee reminders
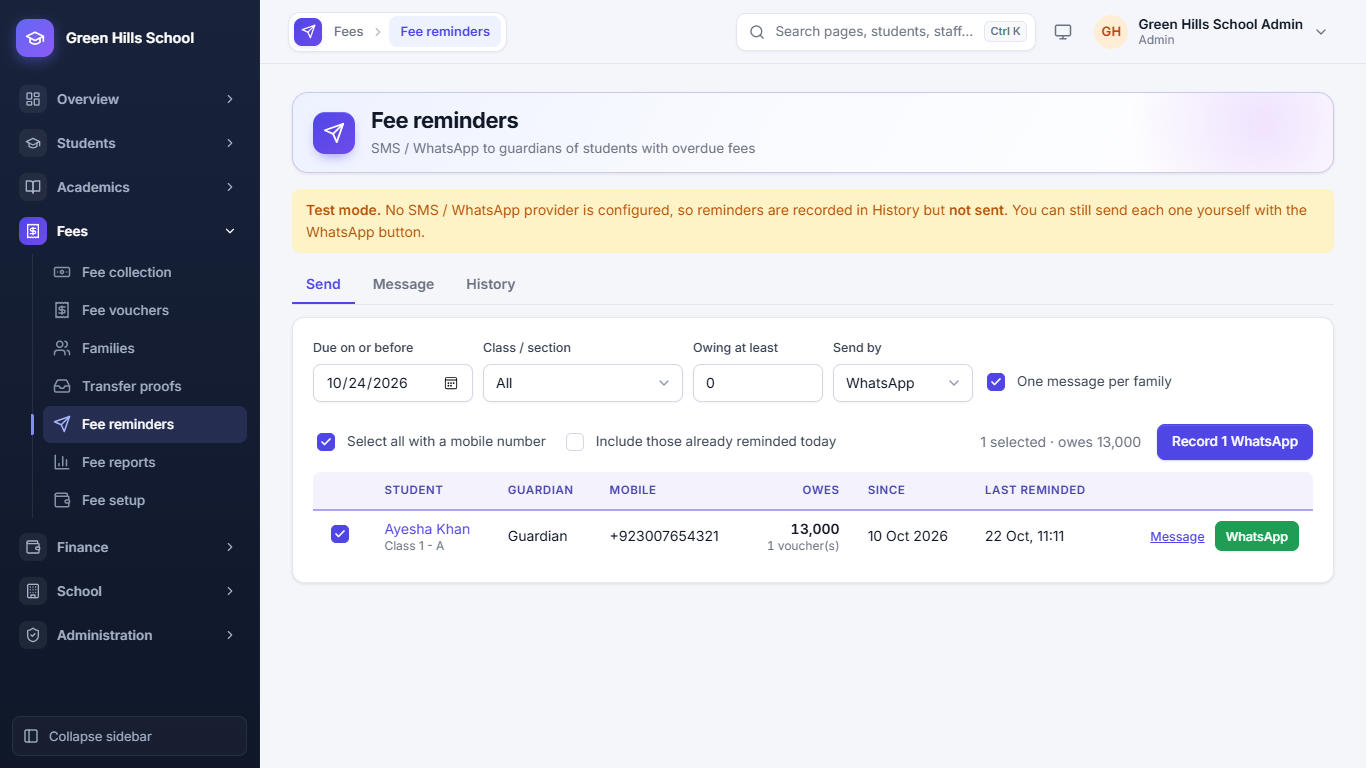
Fees → Fee reminders sends an SMS or WhatsApp message to parents who still owe fees. Check the preview first, then send. Children of one family are joined into one message, so a parent does not get several texts.
Choose how to send: SMS, WhatsApp, or WhatsApp, then SMS (the choices depend on the message service the school has set up). With the last one each reminder goes by WhatsApp first; if WhatsApp cannot deliver it (the number is not on WhatsApp, or WhatsApp refuses it), the same text goes by SMS. The Message tab changes the wording, and the History tab shows each message and how it went. The WhatsApp button next to a parent opens WhatsApp on this computer or phone with the message typed in, ready to send yourself.
Fee reports
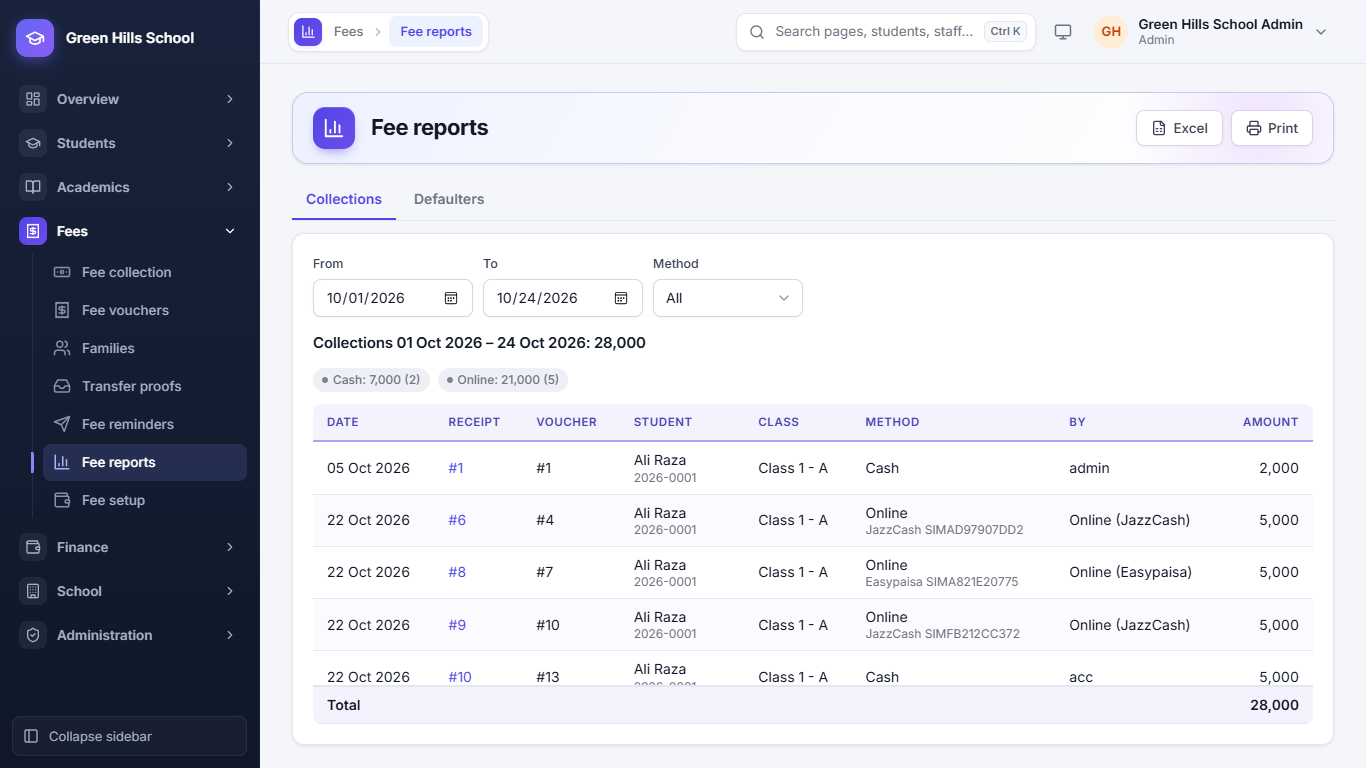
Fees → Fee reports has two tabs. Collections lists every payment between two dates (From, To), with totals for cash and online, and can be filtered by Method. Defaulters lists students who owe fees; you can filter by how many months are unpaid, and managers can Strike off several defaulters at once. Use Excel or Print at the top to download or print a report.
Exams, Timetable, Homework, Certificates and Promotion
Exams
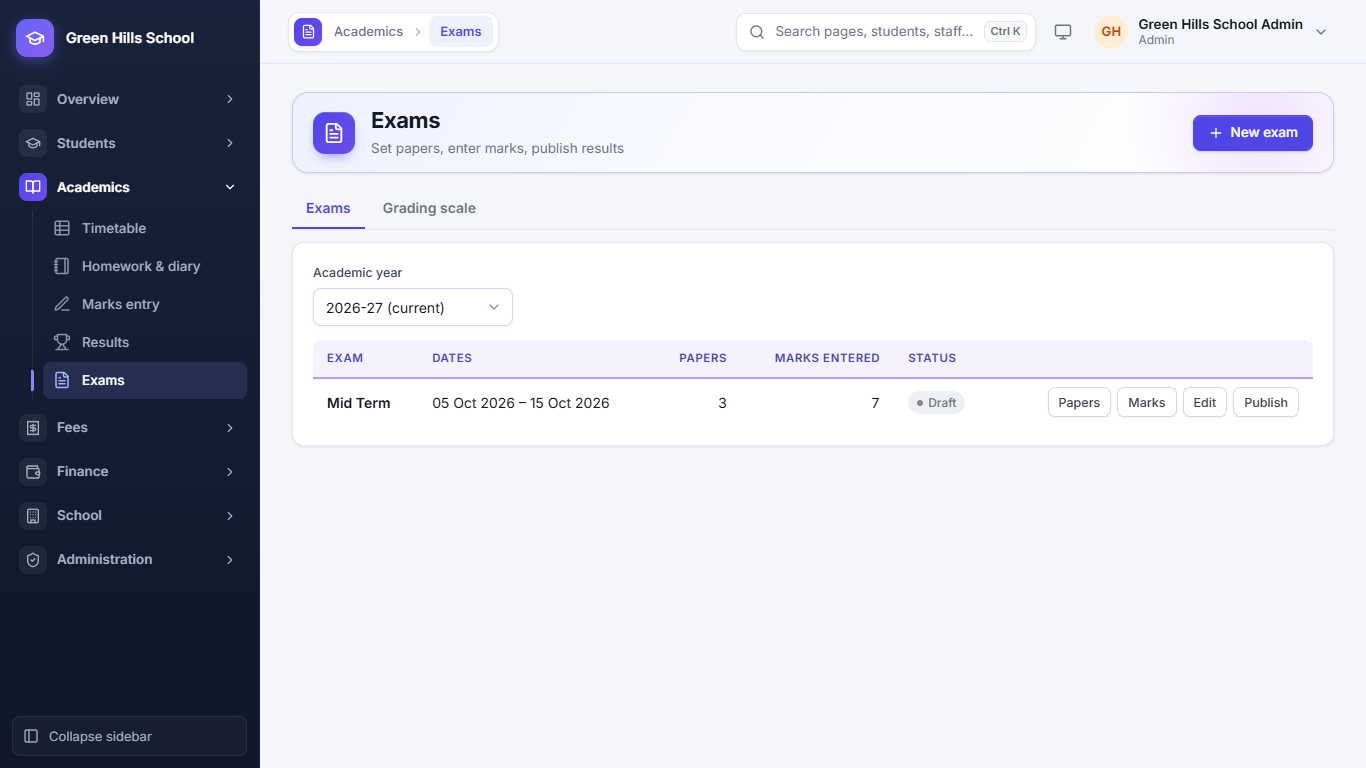
Open Academics → Exams.
- Click New exam and enter its name and dates (for example Mid Term, 05–15 Oct).
- Click Papers to add each subject's paper with its date and total marks.
- Click Marks to enter marks (or use Marks entry, below).
- When all marks are in, click Publish. Results and report cards can then be seen by staff and by parents in the Portal.
The Grading scale tab sets the grades (A+, A, B and so on) by percentage.
Marks entry
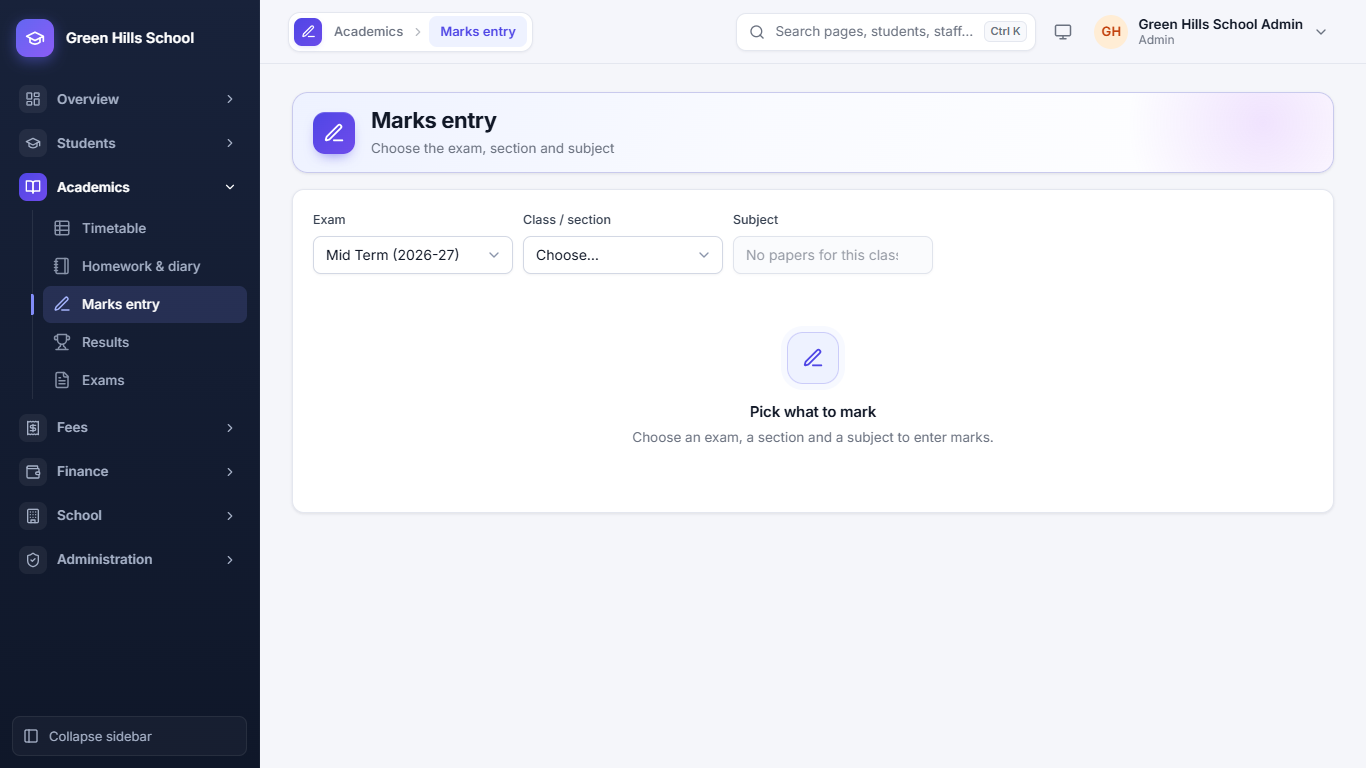
Academics → Marks entry: choose the exam, class and subject, then type each student's marks and save. A teacher sees only their own classes and subjects.
Results and report cards
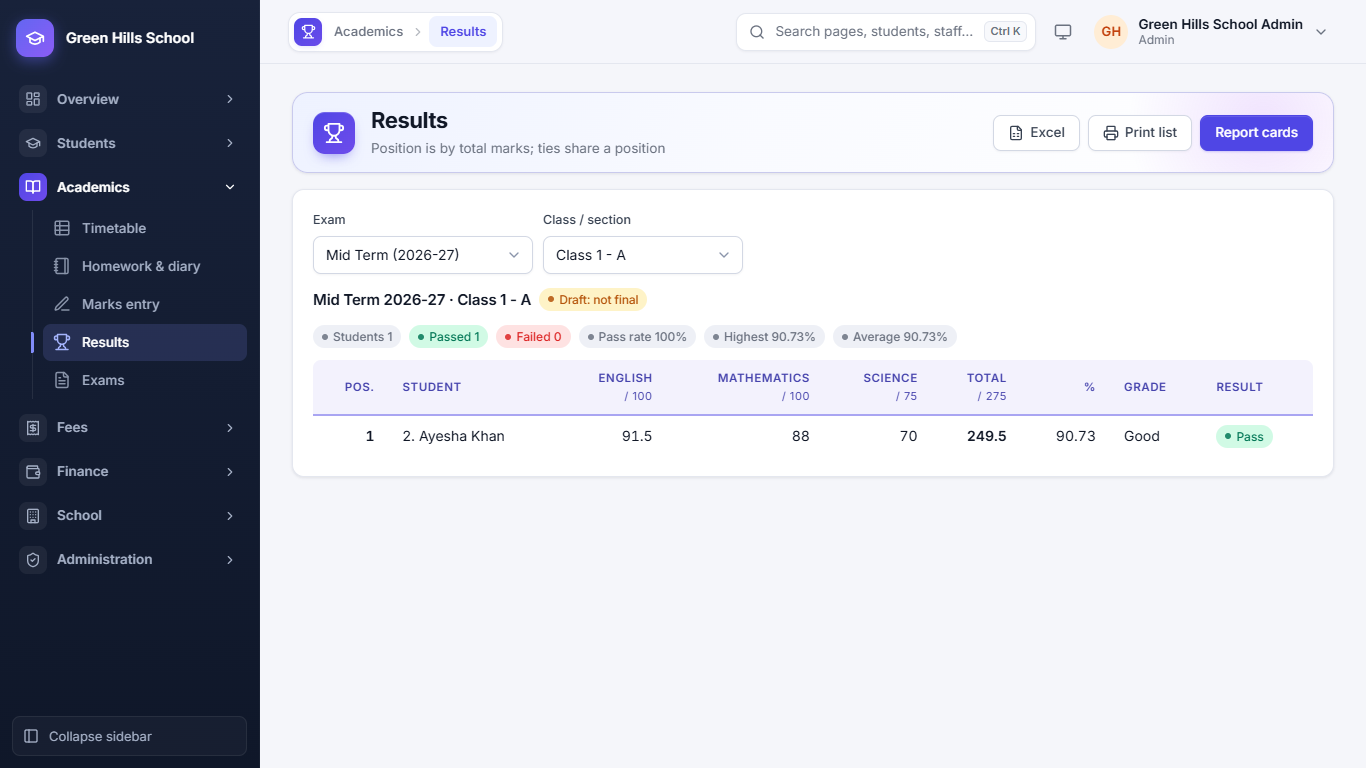
Academics → Results shows each student's total, percentage, grade and position in the class. From here you can print report cards for the whole class. Choose the exam and class / section, then use the tabs:
- Marks sheet: every student's marks in every subject, with total, percentage, grade, result and position.
- Subject analysis: for each subject the class average, highest, lowest, pass rate and the subject topper; how many students got each grade; and the top of the class.
- Term comparison: each student's percentage in every published exam of the year side by side, with the rise or fall since the last one.
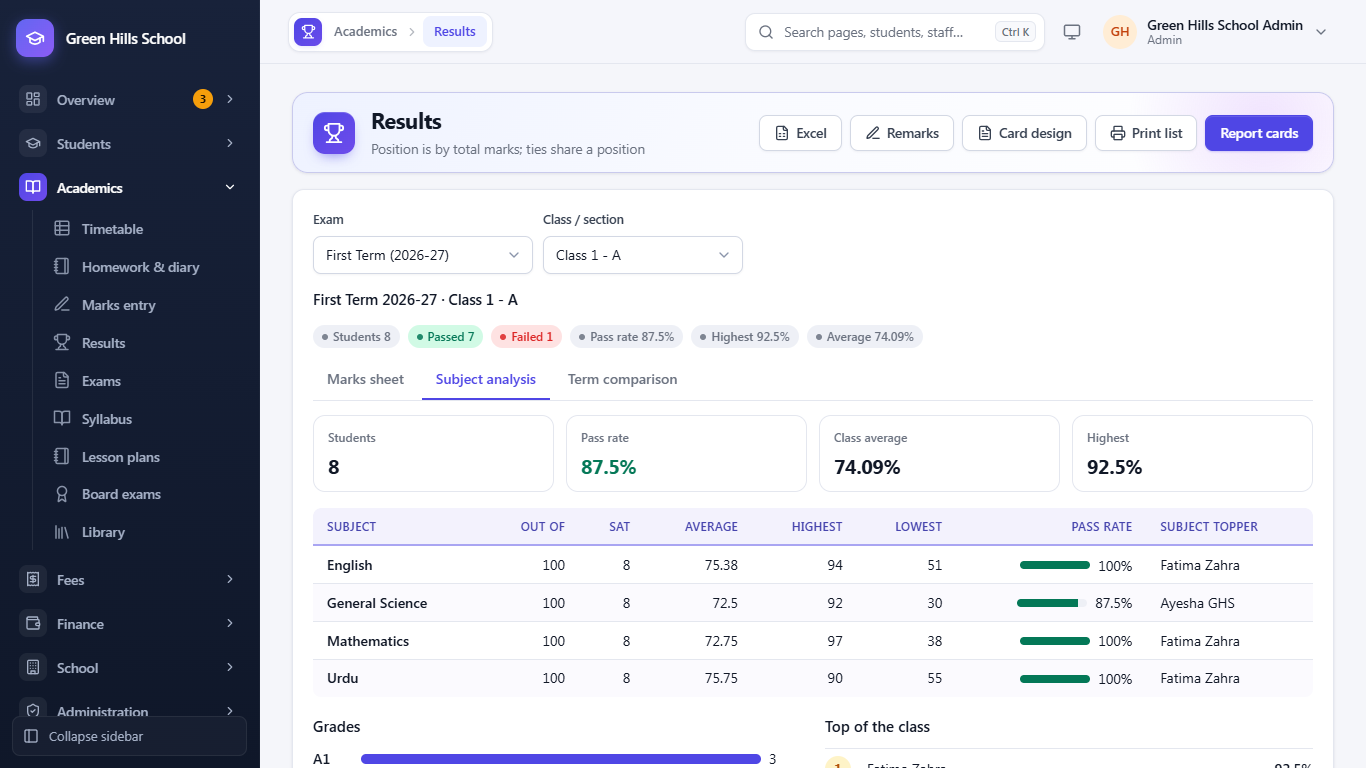
Remarks: the class teacher (or the Admin / Principal) writes a short remark for each student, like "Hard working; needs to improve handwriting". It is printed on the report card.
Card design (Admin and Principal) sets how every report card looks, printed or in the parent portal:
- Layout: Classic (bordered A4 sheet, black and white), Modern (coloured header, rounded boxes) or Compact (two report cards on each A4 page).
- What to show: position in class, attendance, the class highest in each subject, earlier exams of the year (term comparison) and the grading scale.
- The Principal's name under the signature, and a Note at the bottom (for example "School reopens on 1 April").
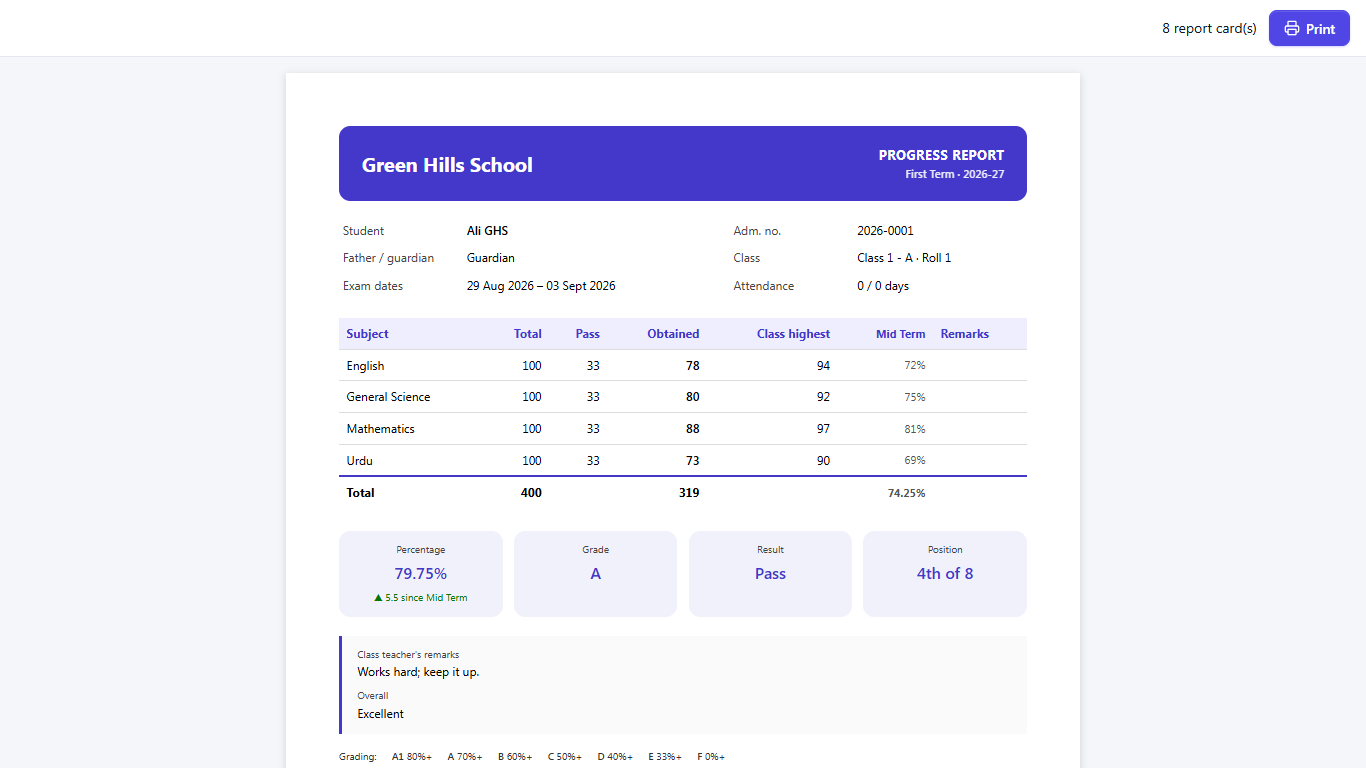
When a class has more than one section, the report card also shows the student's position in the class across all its sections (for example 3rd of 64), besides the position in the section.
Date sheet
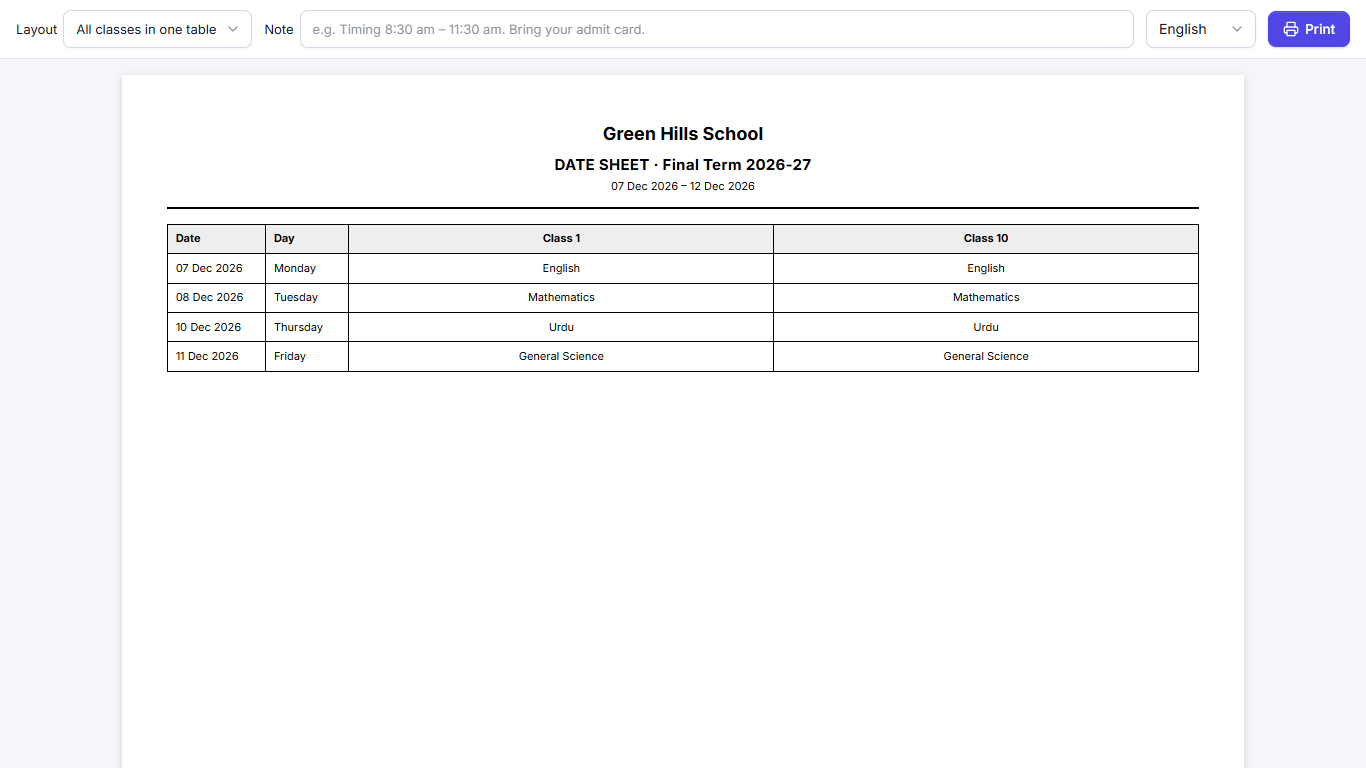
The date sheet is made from the exam's papers, so there is nothing extra to type. In Academics → Exams, click Date sheet on an exam (or the Date sheet button on Results). It opens a print page:
- Layout: All classes in one table (dates down the side, one column for each class; printed landscape) or Class by class.
- Note: a line printed at the bottom, like "Timing 8:30 am – 11:30 am. Bring your admit card." It is not saved.
- English / اردو: print it in Urdu if you like.
Parents see the date sheet of every upcoming exam on the child's Results tab in the portal, and can print it.
Toppers
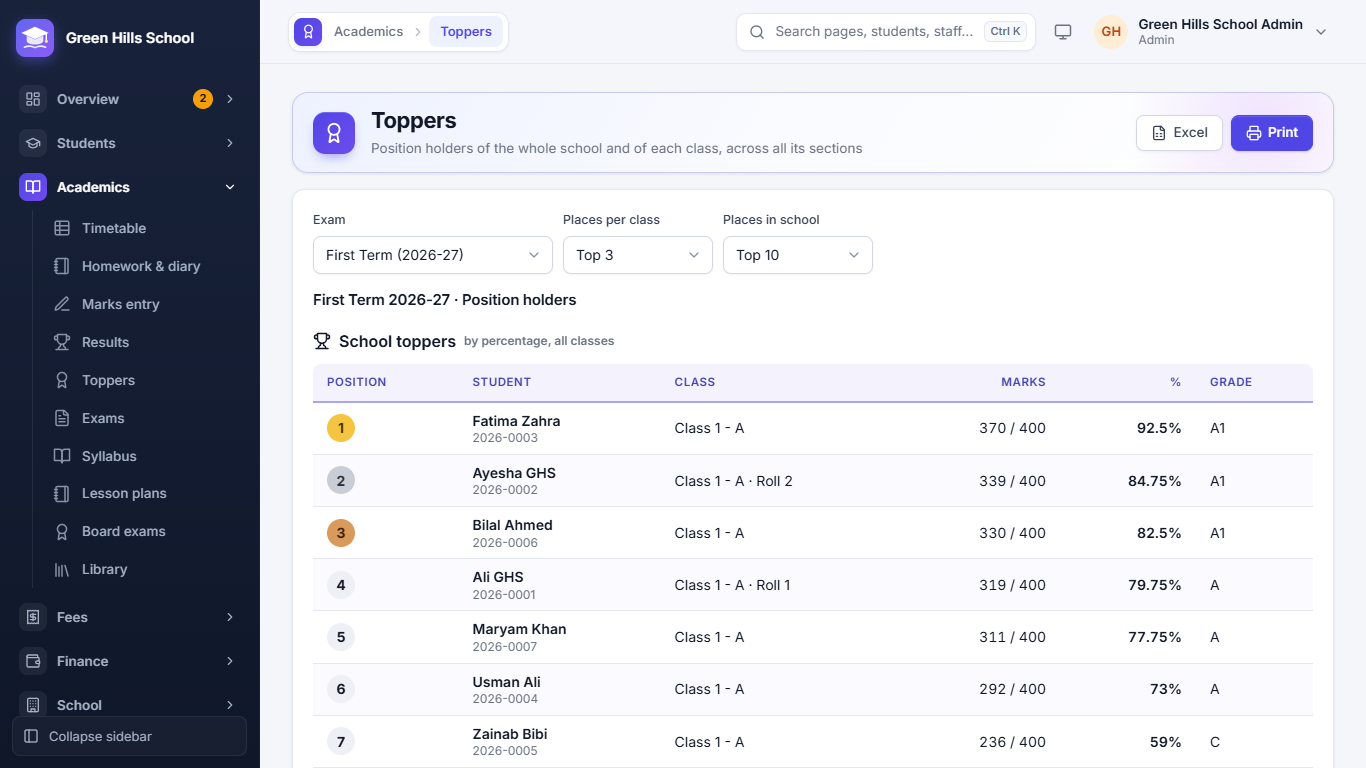
Academics → Toppers lists the position holders of an exam:
- School toppers: the best students of the whole school by percentage, so different classes can be compared. Choose Places in school (top 3, 5, 10 …).
- Class toppers: for each class, the best students across all its sections by total marks. Choose Places per class.
Students with the same marks share a position. Print makes a page for the notice board or prize day; Excel downloads the list.
Board exams
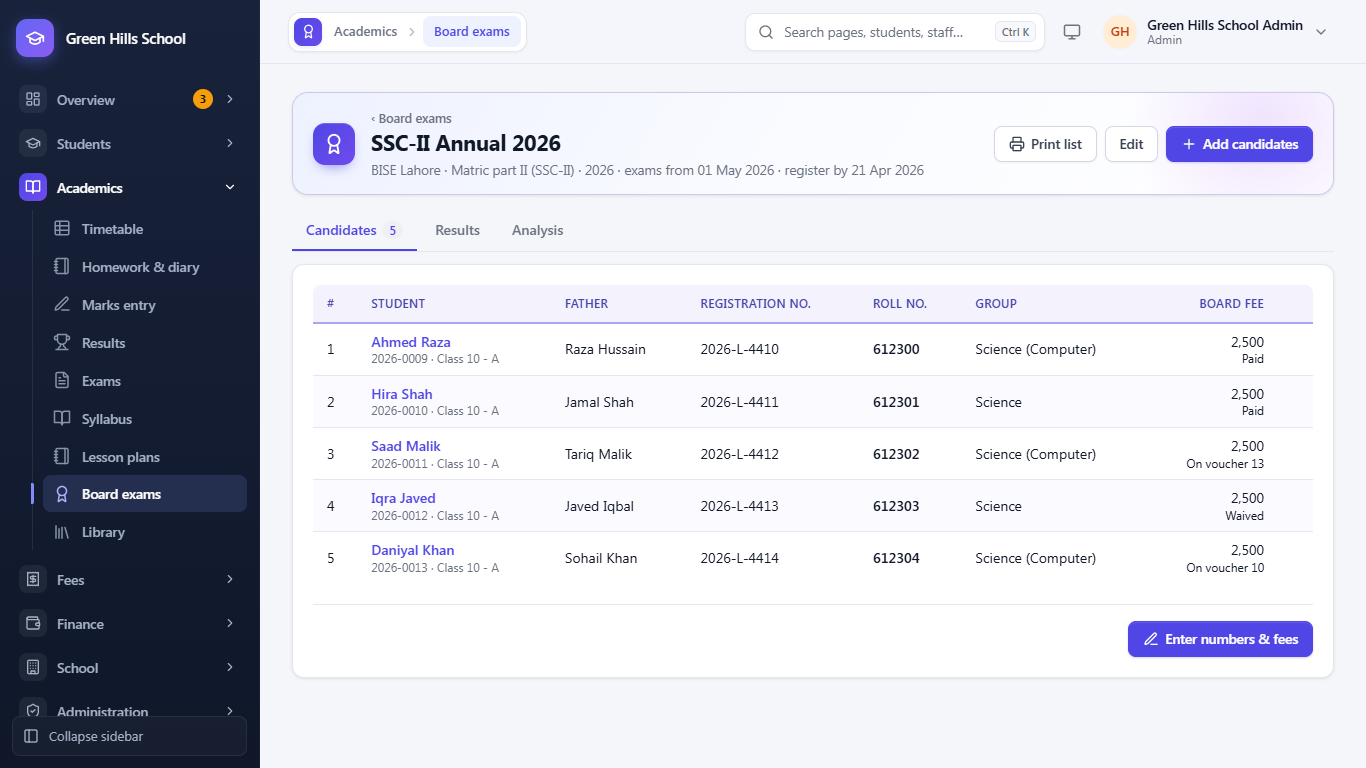
Academics → Board exams keeps track of students sitting Matric, Inter, O Level or A Level board exams. All staff can look at it; the Admin and Principal make changes, and the fee office settles board fees.
- Click New board exam. Enter the name (for example SSC-II Annual 2027), the Board, the Level (Matric Part 1 or 2, Inter Part 1 or 2, O Level, A Level or other), the Year, the Register by date, when the exams start, and the Board fee (each).
- On the Candidates tab, click Add candidates and choose a whole section or single students. Each one owes the board fee.
- Click Enter numbers & fees to type each candidate's Registration no., Roll no. and group. A fee can be changed for one student; a fee of 0 means nothing is owed. The same roll no. cannot be given twice.
- Board fee: click Paid if the parent paid at the office, or Waive. Otherwise an unpaid board fee goes on the student's next fee voucher by itself, as "Board fee (SSC-II Annual 2027)".
- When the result comes, open the Results tab and enter each candidate's marks (use Same "out of" for all), grade and result. Click Save results.
- The Analysis tab shows how many appeared and passed, the pass percentage, the average marks, the grades, and the top positions.
Results stay hidden from parents until you click Show to parents. Then the parent portal shows the board exam, the roll no. and the result on the child's Board exams tab. Print list prints the candidate list.
Syllabus and lesson plans
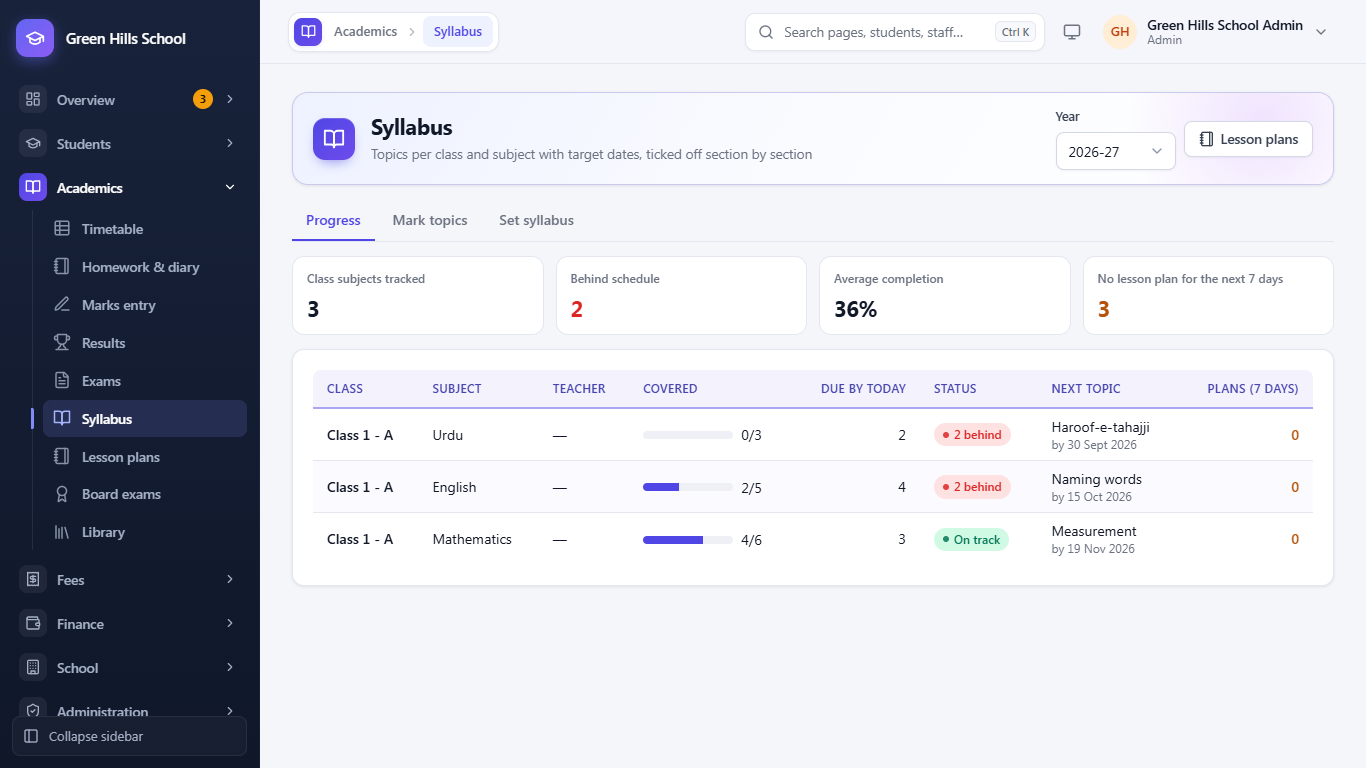
Academics → Syllabus shows how far each class has got with each subject. It has three tabs:
- Set syllabus (Admin and Principal): choose the year, class and subject, then list the topics in teaching order,
each with a Target date to finish it. You can add them one by one or paste a list: one topic per line, with the
target date after a | if you like (for example
Number system | 2026-05-15). Click Save syllabus. - Mark topics: the teacher chooses their class / section and subject and ticks each topic as it is taught, with the date. Click Save progress. A teacher can mark only the subjects they teach (from the timetable) or their own class.
- Progress: every class subject with the topics Done, the topics Due by today, the Next topic and the teacher. The most behind are at the top. The cards show how many class subjects are tracked, how many are Behind schedule, the Average completion, and how many have No lesson plan for the next 7 days. A teacher sees only their own classes.
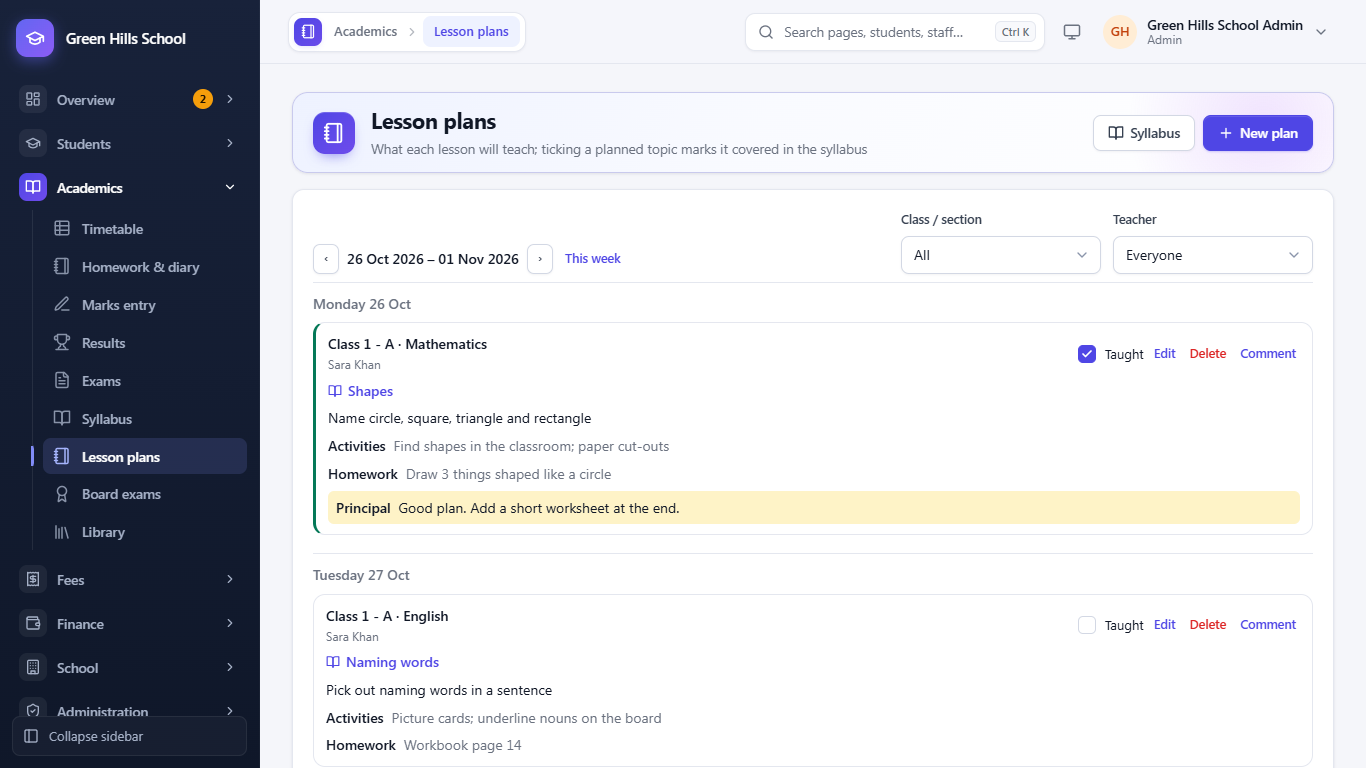
Academics → Lesson plans shows a week of plans (use ‹ and › or This week). Click New plan and enter the Date, Class / section, Subject, the Syllabus topic it covers, What the lesson will teach, Activities / method and Homework. After the lesson, tick Taught on the plan: its syllabus topic is marked covered on that date. The Principal sees every teacher's plans and can add a Comment for the teacher, shown under the plan.
Timetable
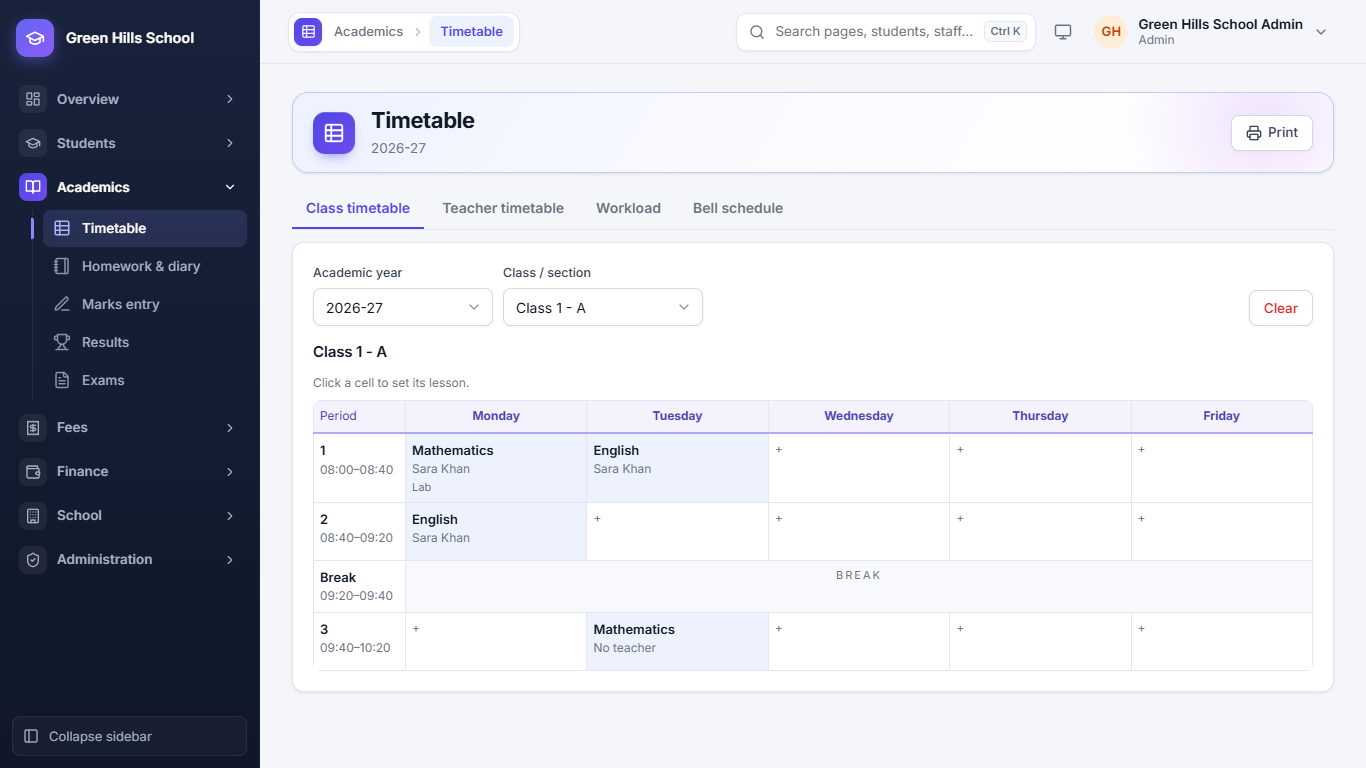
Academics → Timetable has four tabs:
- Bell schedule: set the periods and break times first.
- Class timetable: choose a class / section, then click a box to set the subject and teacher for that period. The app warns you if a teacher is already busy in another class at that time.
- Teacher timetable: one teacher's whole week.
- Workload: how many periods each teacher has.
Click Print to print a timetable. Teachers see their own timetable in My timetable.
Homework and diary
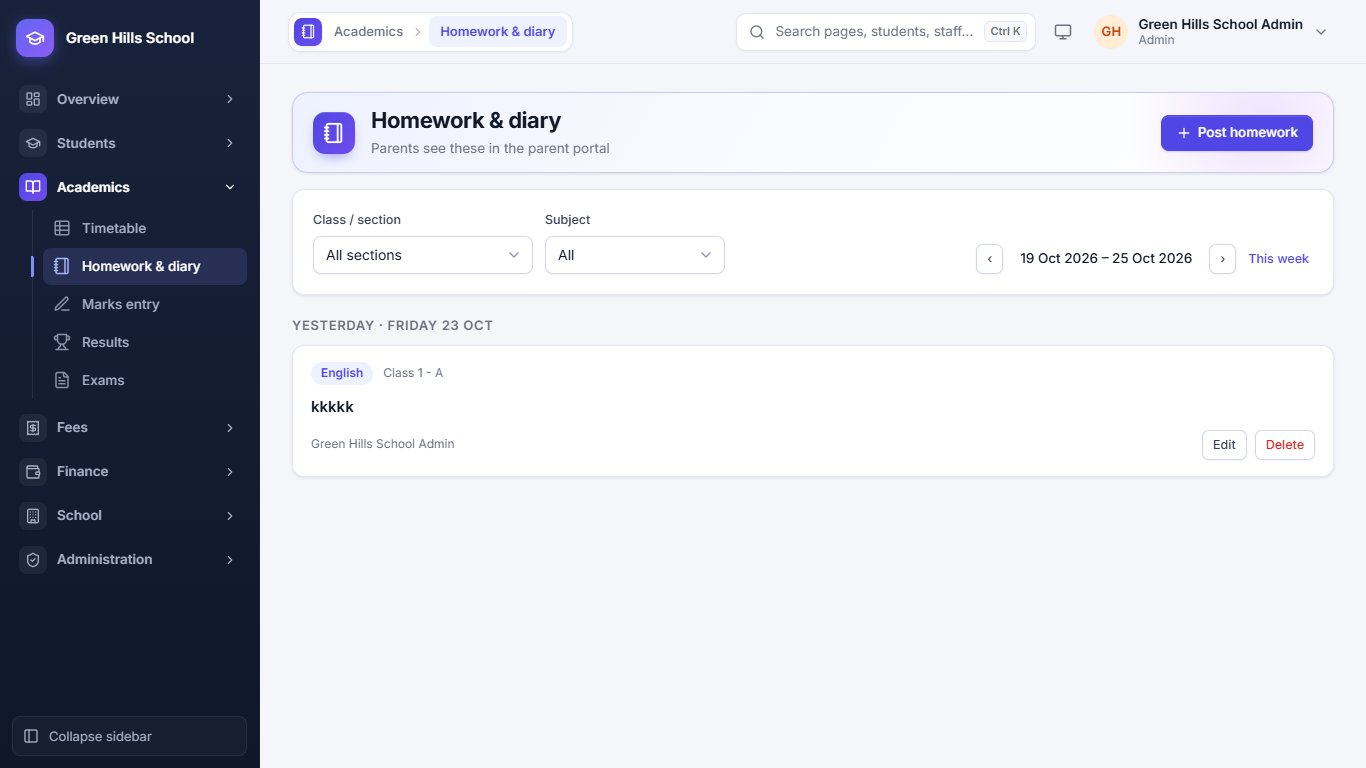
Academics → Homework & diary: choose a section and date, write the homework for each subject, and set a due date. Parents see it in the Portal's Homework tab. Teachers can post only for their own classes.
Certificates
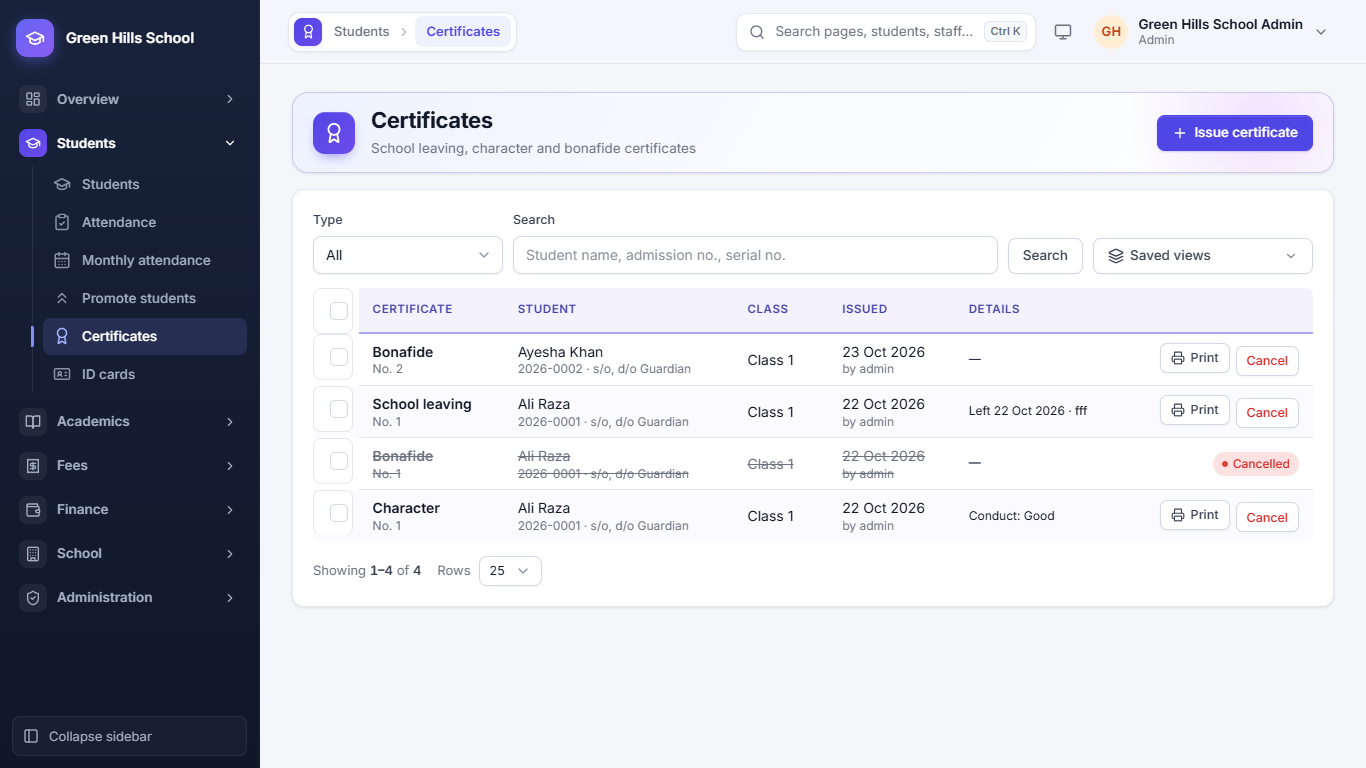
Students → Certificates lists the certificates already issued. To make a new one, open the student's page and click Issue certificate. Choose School Leaving, Character or Bonafide, check the details and print. Each certificate gets its own number and keeps the details as they were on the day it was issued.
Promote students (end of the year)
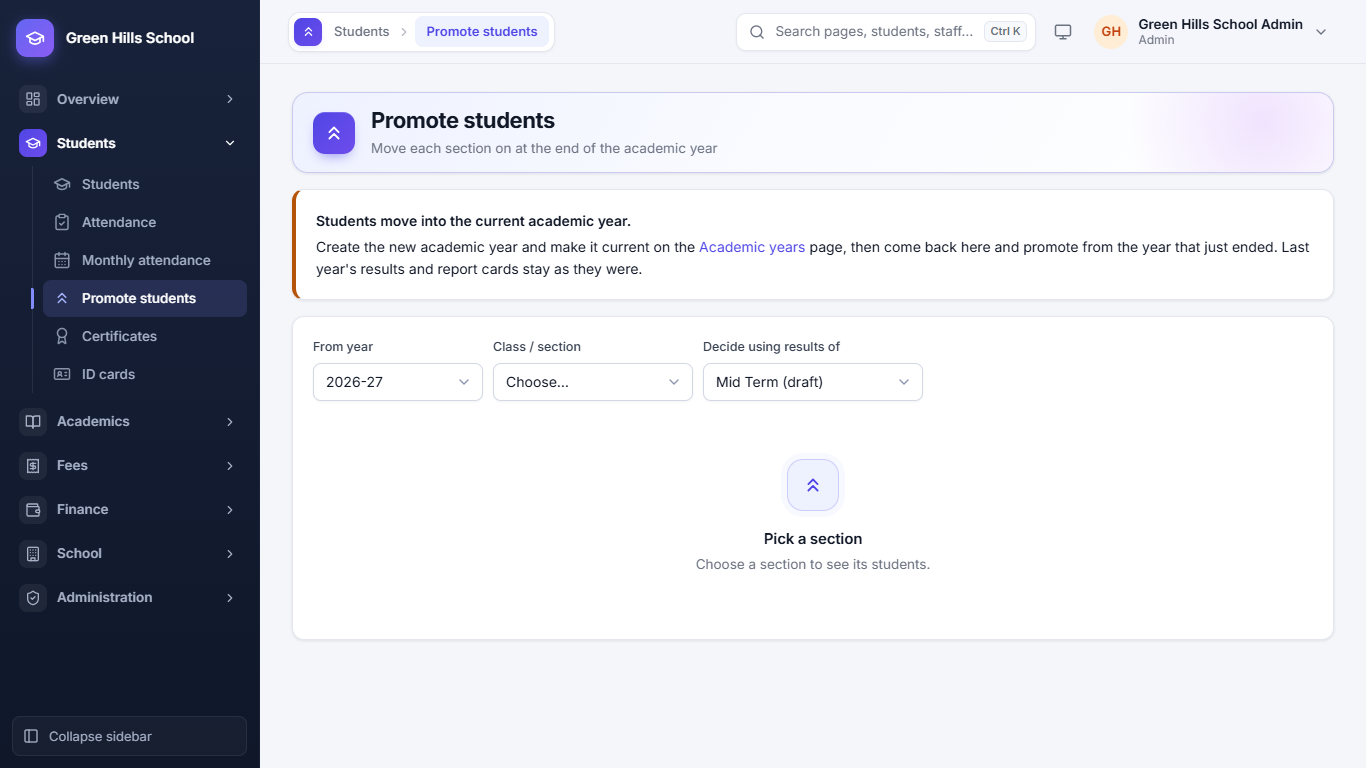
- First go to School → Academic years, create the new year and make it current.
- Open Students → Promote students.
- Choose the From year, the Class / section, and the exam whose results decide promotion.
- For each student choose Promote, Repeat class, Graduate or Leaves school. For Promote and Repeat class, pick the new section. Then save.
Last year's results and report cards stay as they were.
Staff, Payroll and Expenses
Staff
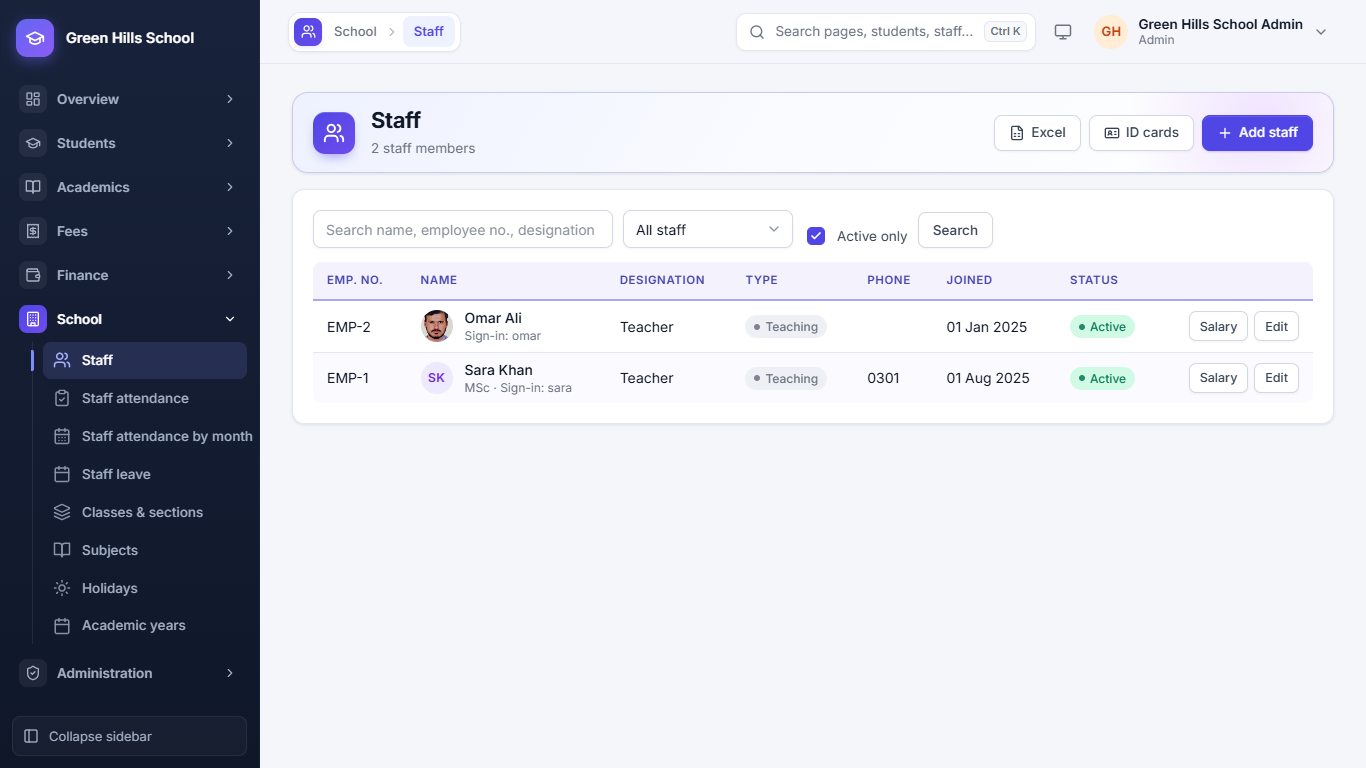
Open School → Staff. It lists everyone who works at the school: teachers and other staff (like accountant, guard or driver).
- Add staff: name, designation, type (Teaching or Non-teaching), phone, joining date and photo.
- Salary: set the person's basic pay and allowances. Payroll uses these amounts every month.
- Edit: change details, or mark the person inactive when they leave.
- A staff member who needs to use the app gets a login from Administration → Users; the list then shows their sign-in name.
Payroll (monthly payslips)
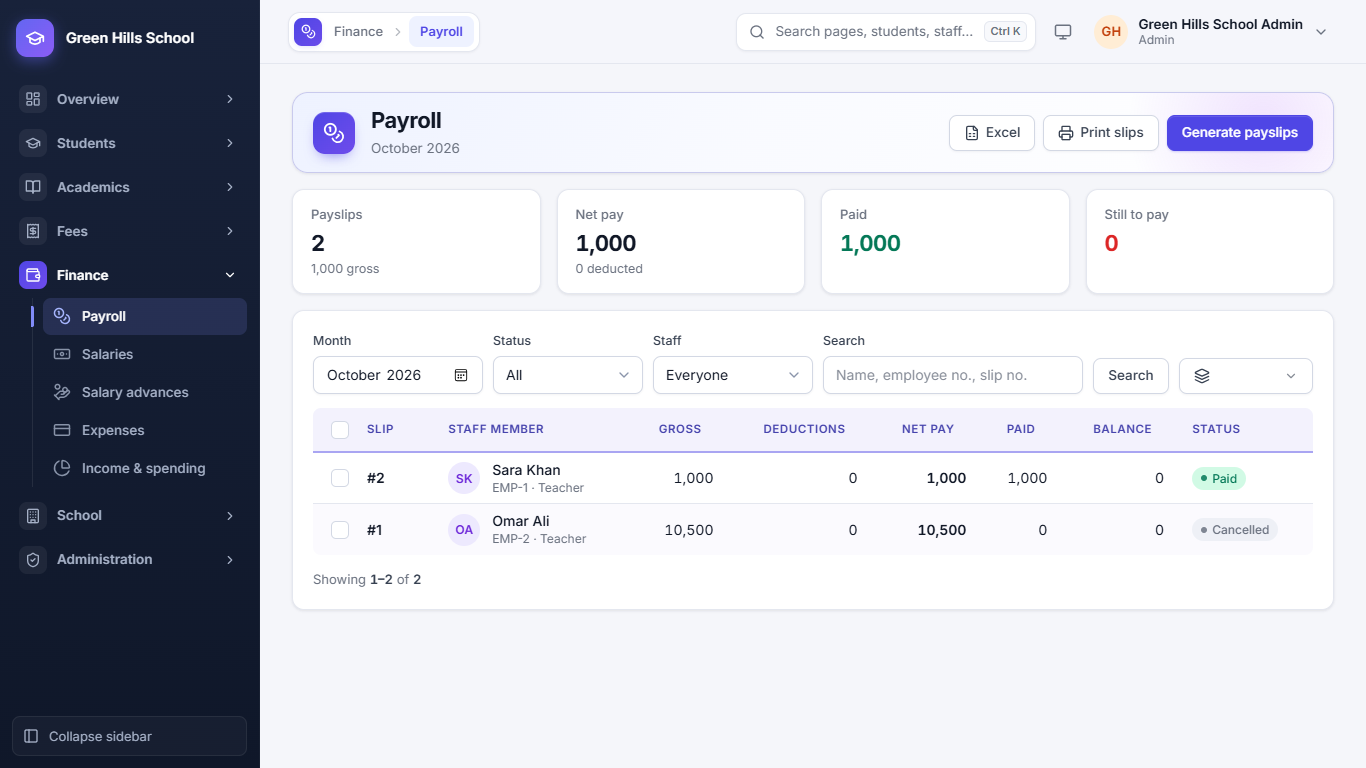
- Open Finance → Payroll and choose the month.
- Click Generate payslips. Each payslip uses the person's salary, cuts absent days (if you choose that), and takes back salary advance instalments.
- Check the list: Gross, Deductions, Net pay, Paid and Balance.
- Mark a payslip paid when the salary is given. Print slips prints the payslips.
The cards at the top show the month's payslips, net pay, amount paid and amount still to pay. Staff can see their own payslips in My payslips.
Salary advances
Finance → Salary advances: record money given to staff before payday, and how much to take back each month. Payroll takes it back by itself.
Expenses
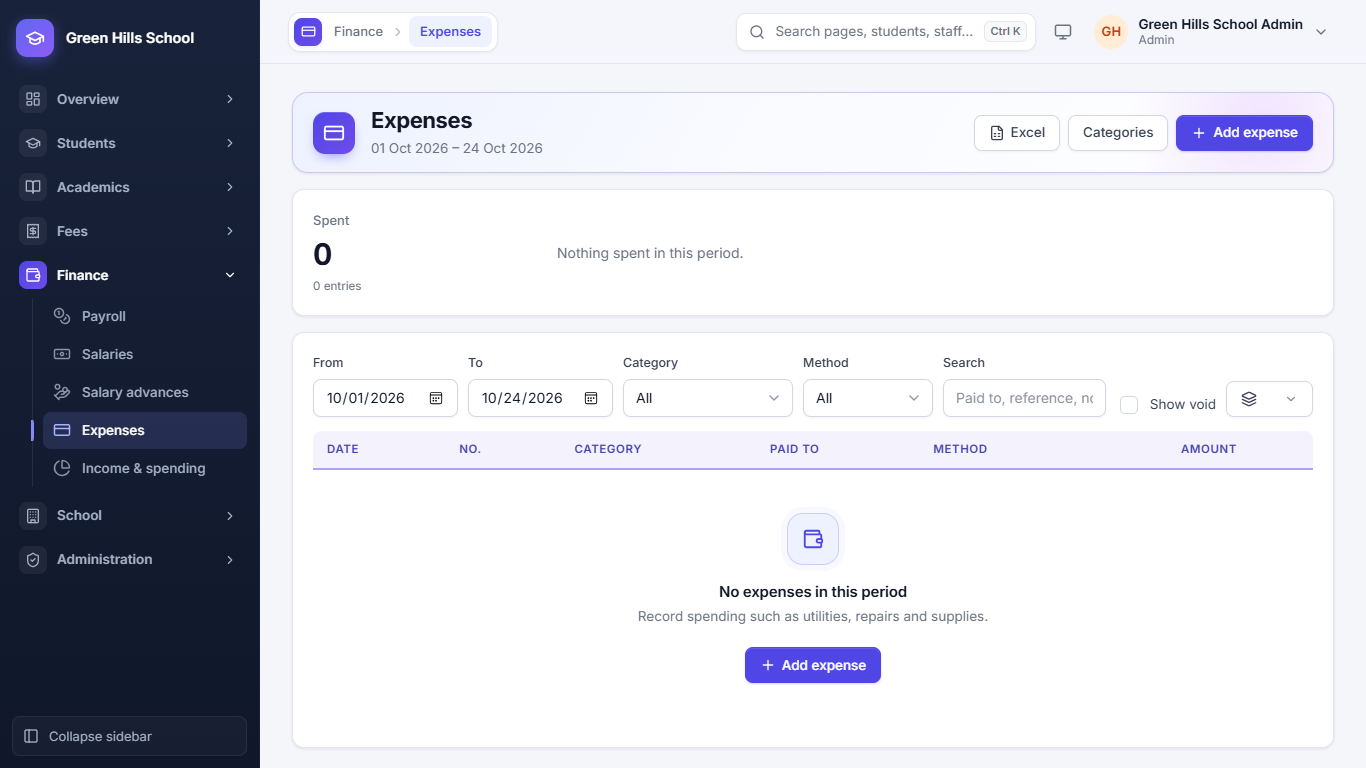
Finance → Expenses: record the school's spending, like electricity, rent, repairs or stationery. Choose a category, enter the amount and date, and attach the bill if you have it.
Income and spending
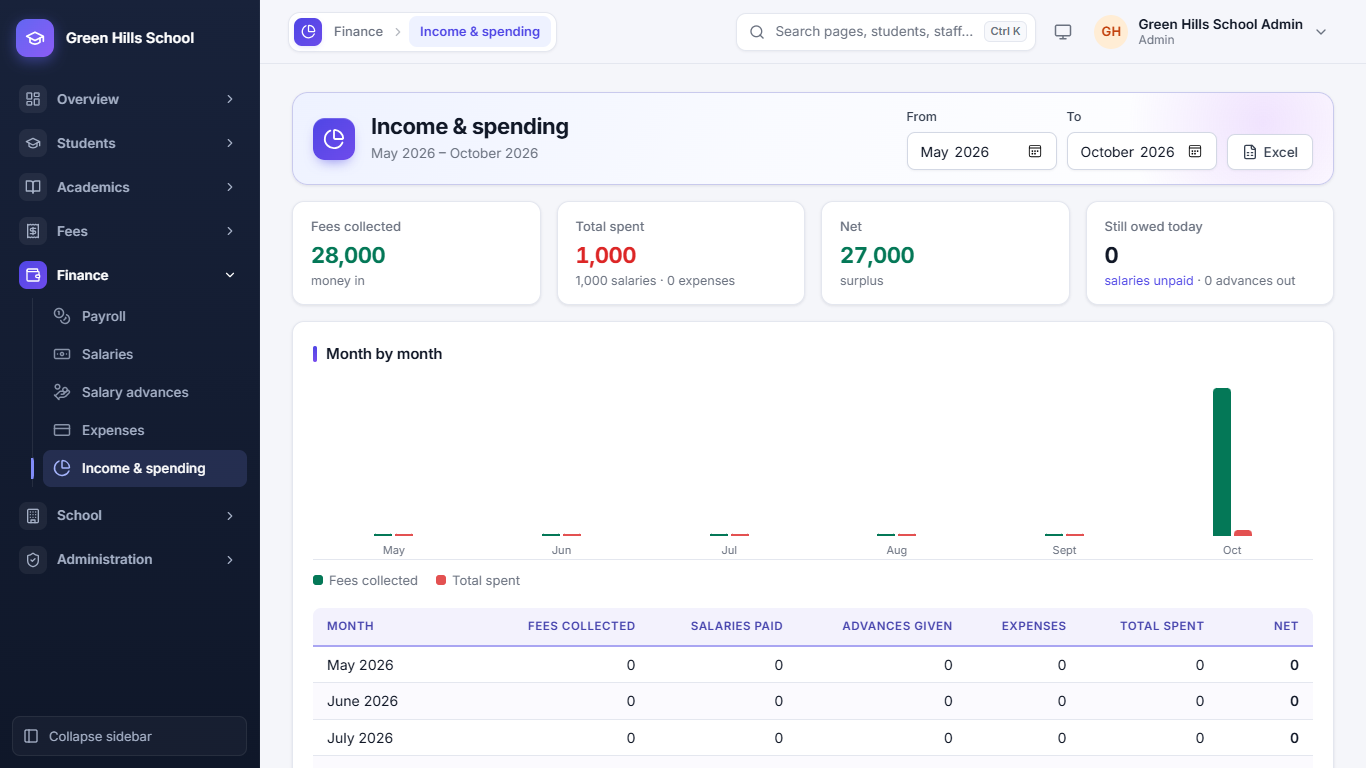
Finance → Income & spending puts fee income next to salaries and expenses, month by month, so you can see whether the school is making or losing money.
School Groups (Branches) and Transfers
An owner with several branches can join them in one School Group. The Owner (Super Admin) makes the group and puts the branches in it. Each branch still keeps its own students, fees and staff.
One login for all branches
A group login (Admin, Principal or Accountant of the group) first opens the group pages:
- All branches: students, attendance and fees of every branch side by side.
- Fees across branches: collections and defaulters of all branches together.
- Group sign-ins: make group logins (for example a head office accountant). Admin only.
To work inside one branch, pick it from the branch switcher at the top of the sidebar. The whole app then works for that branch. Pick the group again to go back.
Move a student or staff member to another branch (Branch transfers)
- Open Branch transfers and click Move student or Move staff member.
- Choose the From branch, the person, the To branch, the date and (for a student) the new class / section.
- The app shows what the student still owes at the old branch. You must agree to leave these dues there, or clear them first.
- Click Move student (or Move staff member) to finish.
What happens:
- Student: the old record is marked Left, and a new record with a new admission no. is made at the new branch. Unpaid vouchers for months after the move are cancelled at the old branch. The photo is copied.
- Parent login: the parent's Portal login moves with the child. If a brother or sister stays at the old branch, the parent can see both branches and switch between them in the Portal.
- Staff: the old record becomes inactive and stops being a class teacher. Their login and salary move to the new branch. A teacher who still has lessons on the old branch's timetable cannot be moved until those lessons are given to someone else.
The student's page at both branches shows a note about the transfer.
Parent Portal
Parents sign in on the same login page with the username and password the school gives them (usually the guardian's mobile number). At first login they must choose a new password.
My children
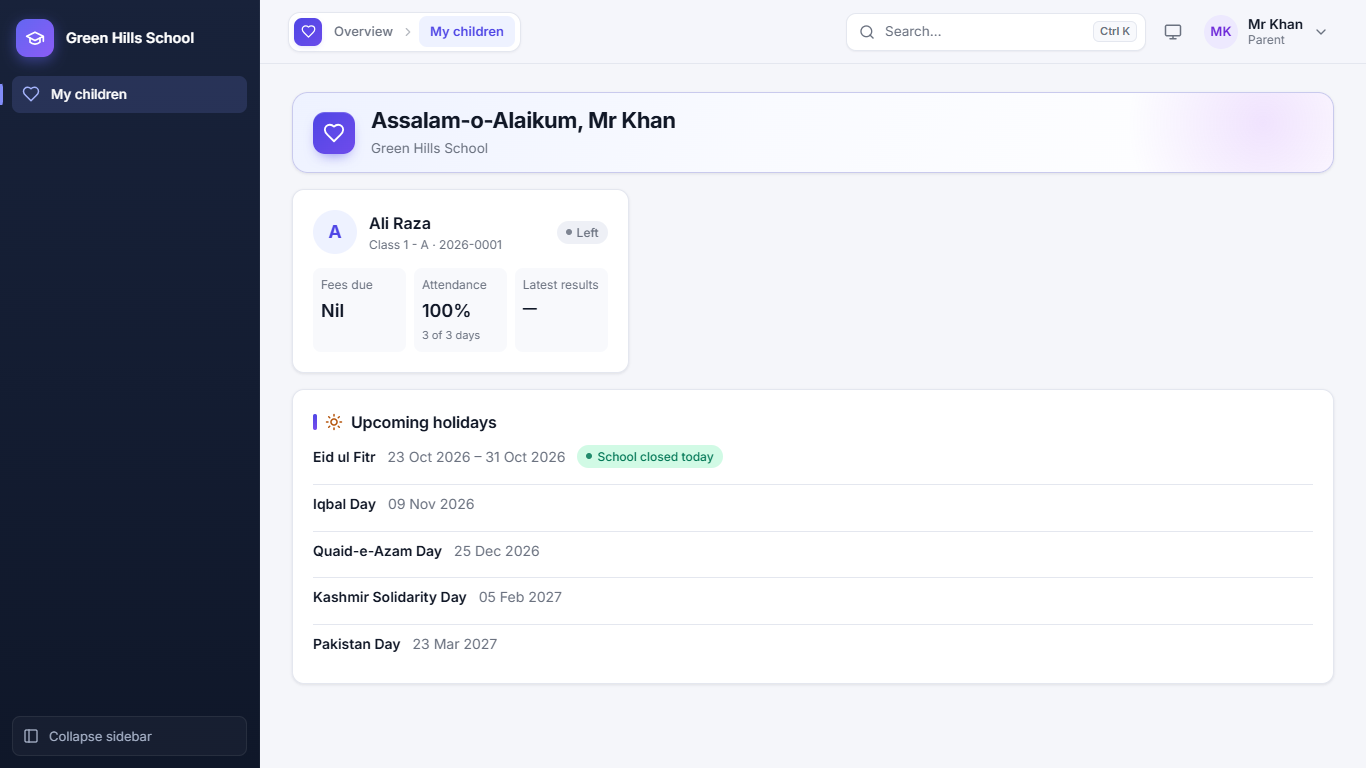
The first page shows a card for each child: class, admission no., Fees due, Attendance (%) and Latest results. Upcoming holidays are listed below. If the family has children at other branches of the same group, a box shows them with an Open button to switch branch.
A child's page
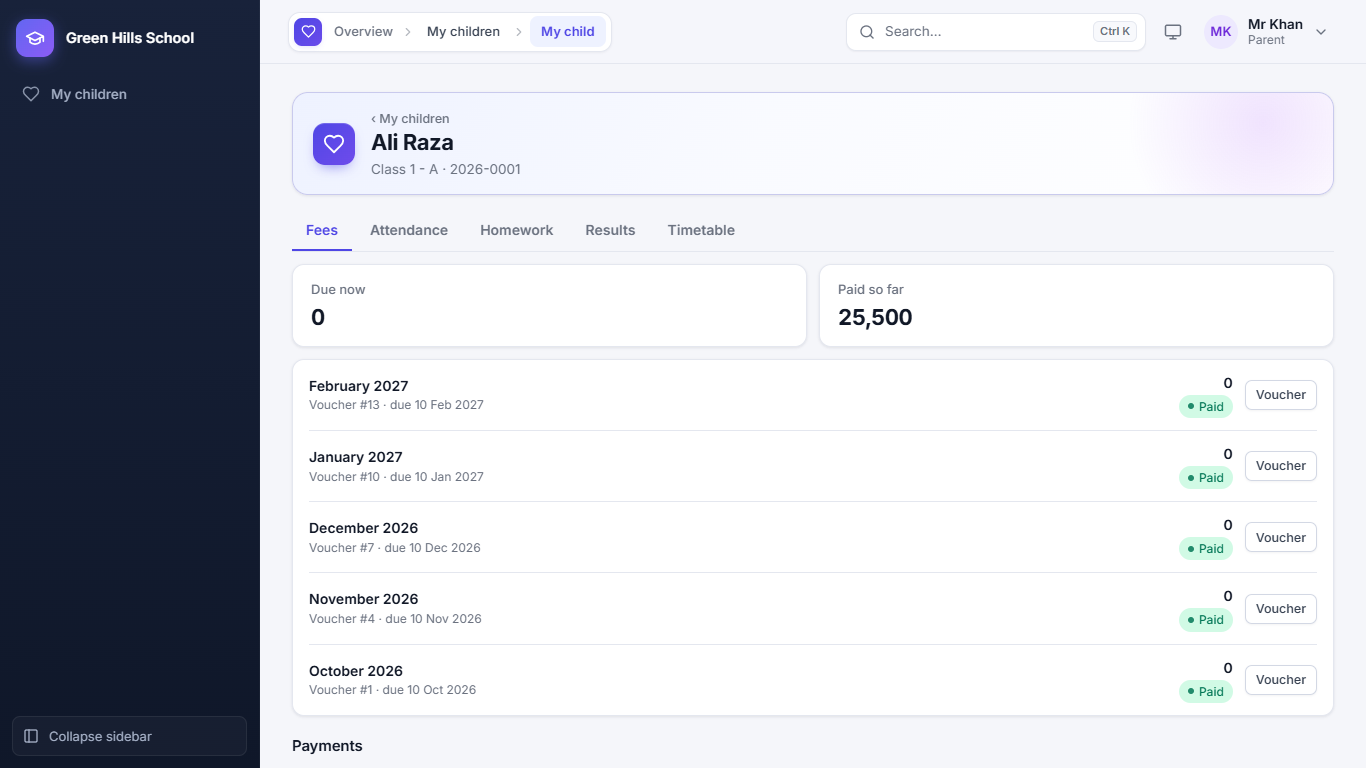
Click a child's card to open their page. It has these tabs:
- Fees: amount Due now and Paid so far, every month's voucher with its status, and past payments. Click Voucher to see or print it.
- Attendance: the month's present, absent, late and leave days.
- Homework: homework set by the teachers, with due dates.
- Results: exam results and report cards (after the school publishes them), and the date sheet of every upcoming exam, which can be printed.
- Timetable: the class's weekly timetable.
- Transport: only for a child on school transport: route, stop, times, fee and the driver's number. See Transport.
- Library: only for a child who has borrowed library books: each book, its return date, and any fine.
- Board exams: only for a child entered for a Matric, Inter, O or A Level board exam: the exam, registration and roll no., and the result once the school shows it.
Message the school on the child's page starts a message about that child (see below).
Paying fees by bank transfer, JazzCash or Easypaisa
- Pay the fee to one of the school's accounts (shown in the app).
- On the voucher, click I've paid.
- Choose the account you paid into, type the transaction ID (TID) and upload a photo of the receipt.
- The school checks it. When it is approved, the voucher shows Paid and the parent gets an SMS. If it is rejected, the reason is shown.
A parent with two or more children can use Pay for all your children to send one proof for all of them. Pay online appears only if the school has turned on an online payment gateway.
Messages and complaints
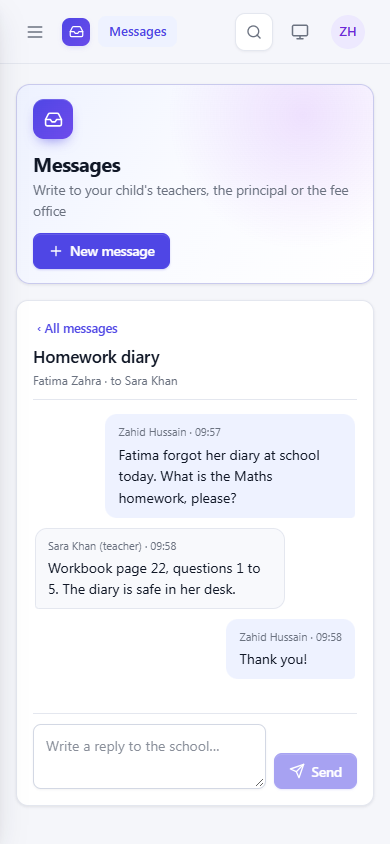
Parents can write to the school from Messages in the portal menu, instead of calling or sending a note in the bag.
- Click New message.
- Choose the child it is About, and To whom: the class teacher, a subject teacher of the child's class, the Principal or the Fee office.
- Choose Message / question or Complaint. A complaint has a category: teaching, behaviour, fees, transport, facilities, bullying or other.
- Write the Subject and the Message, then Send.
Each message is a conversation: the school's replies appear under it, and a badge in the menu shows unread replies. When the school marks it Resolved, the parent can still write again, which opens it again. A parent can start up to 10 new conversations a day.
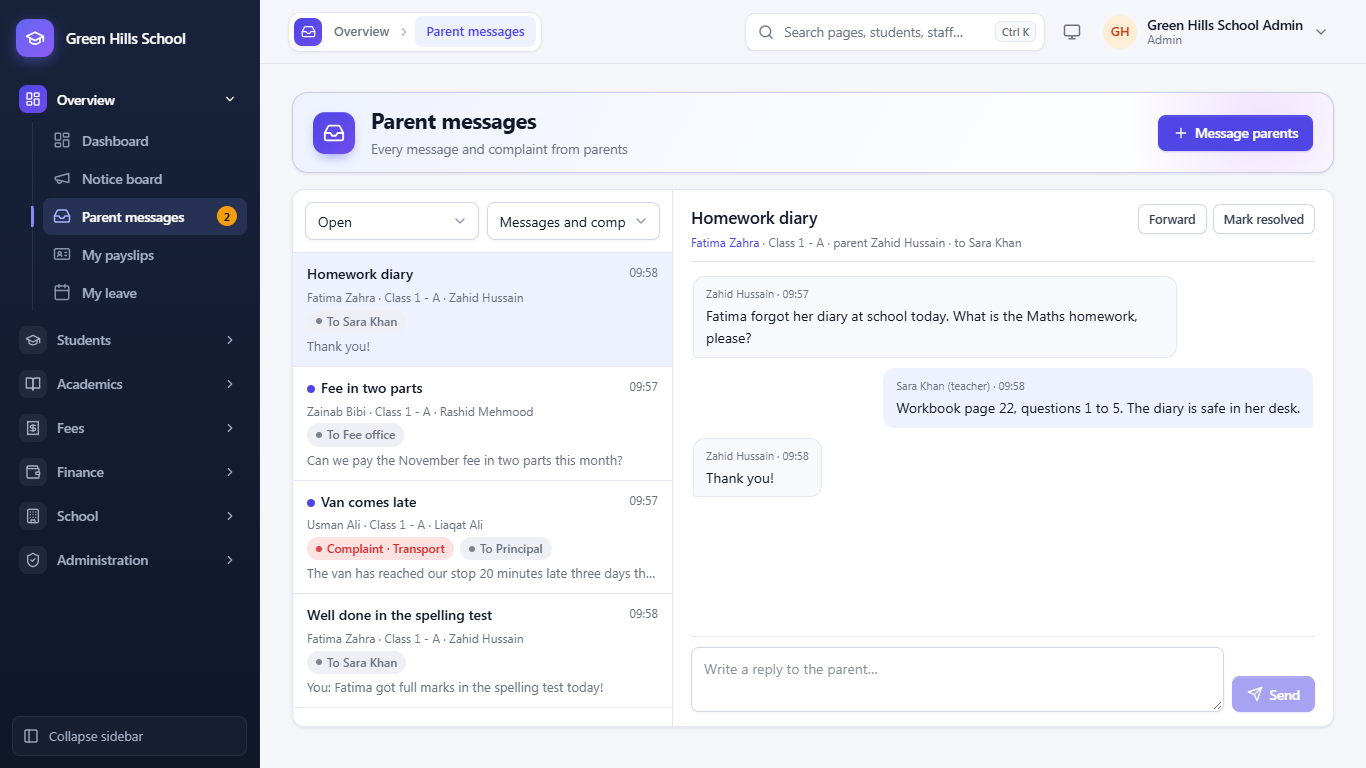
At the school: staff read and answer them in Overview → Parent messages. A teacher sees the messages sent to them; the Accountant sees those for the Fee office; the Admin and Principal see all of them and can Forward one to someone else (the parent's view does not change). Filter by Open / Resolved and by Messages / Complaints. Mark resolved closes a conversation. Message parents lets staff start a conversation about a student; it goes to every parent login of that child. A teacher can write only to parents in the sections whose attendance they mark.
Urdu
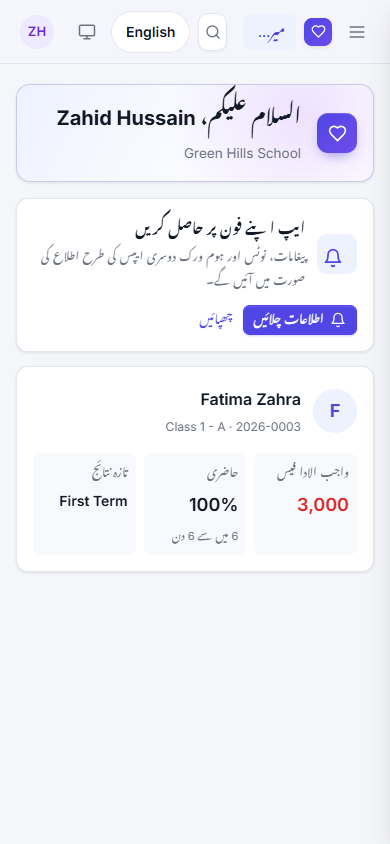
The اردو button at the top of the portal shows the whole portal in Urdu, written right to left in Nastaliq: menus, fees, attendance, results, report cards and vouchers. Click English to go back. The app remembers the choice on that phone or computer.
Staff pages stay in English. On print pages (fee vouchers, report cards, date sheets) staff can choose English or اردو in the toolbar before printing, for example to give a parent an Urdu voucher.
On a mobile phone
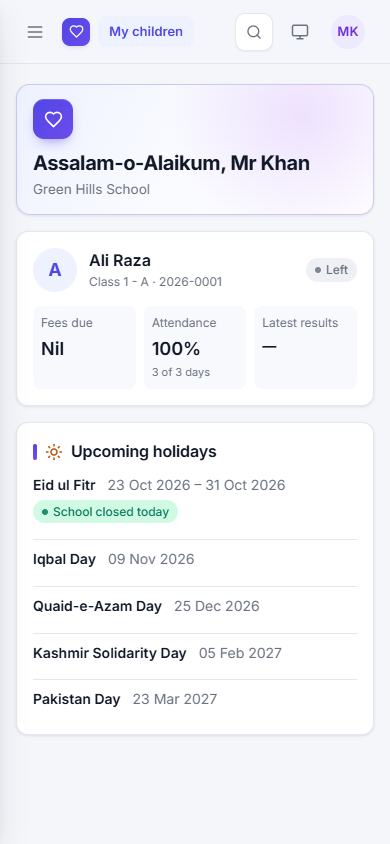
The portal works on any phone browser. The menu folds away; tap the menu button at the top to open it.
Install it as an app. The first page shows a Get the app on your phone card:
- On Android (Chrome) and on a computer (Chrome, Edge), click Install. The school's app icon appears on the home screen and opens without the browser bar.
- On an iPhone, open the portal in Safari, tap Share, then Add to Home Screen. Open it from there.
Then click Turn on notifications and allow them. New messages from the school, notices and homework arrive as notifications, like any other app. Send a test checks that they work. Turn off stops them on this phone; signing out also stops them. Staff get the same card on their Dashboard, for parents' messages.
Users, Audit Log, School Setup and Common Questions
Users
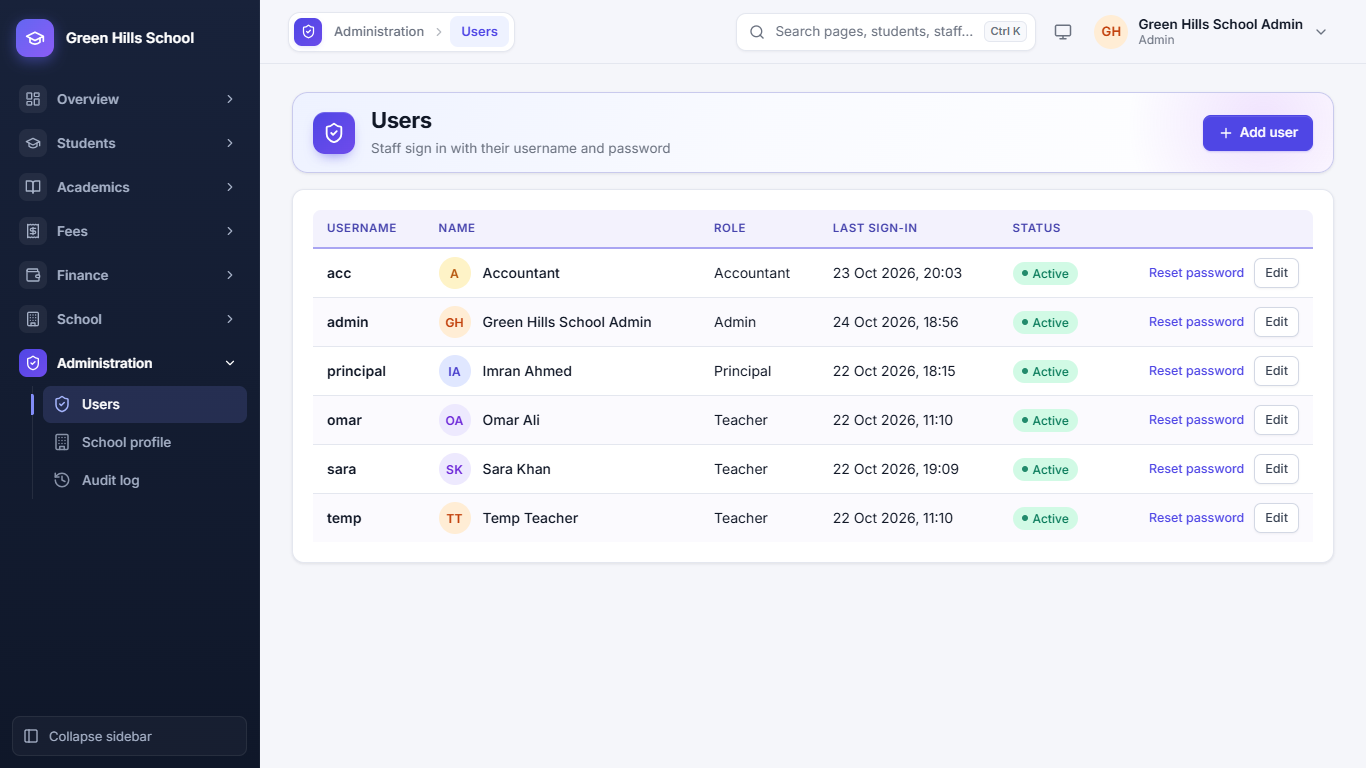
Administration → Users is where the Admin or Principal makes logins for staff. Enter the name, username, role (Admin, Principal, Accountant or Teacher) and a password. A teacher's login is linked to their staff record so they see only their own classes. You can reset a password or switch a login off here. Parent logins are made from the student's page, not here.
Audit log
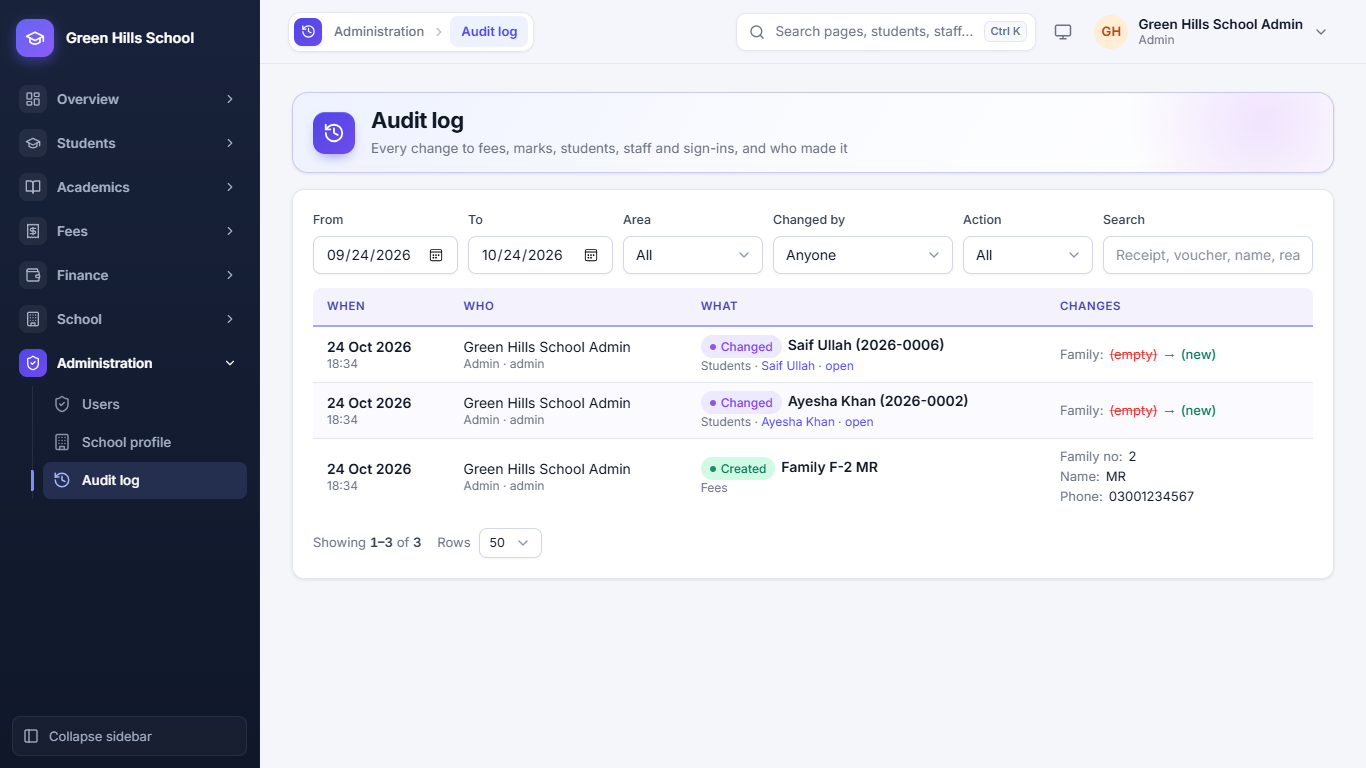
Administration → Audit log records every change to fees, marks, students, staff and sign-ins: who did it, when, and the old and new values. Filter by date, Area, Changed by and Action, or search for a receipt, voucher or name.
School setup
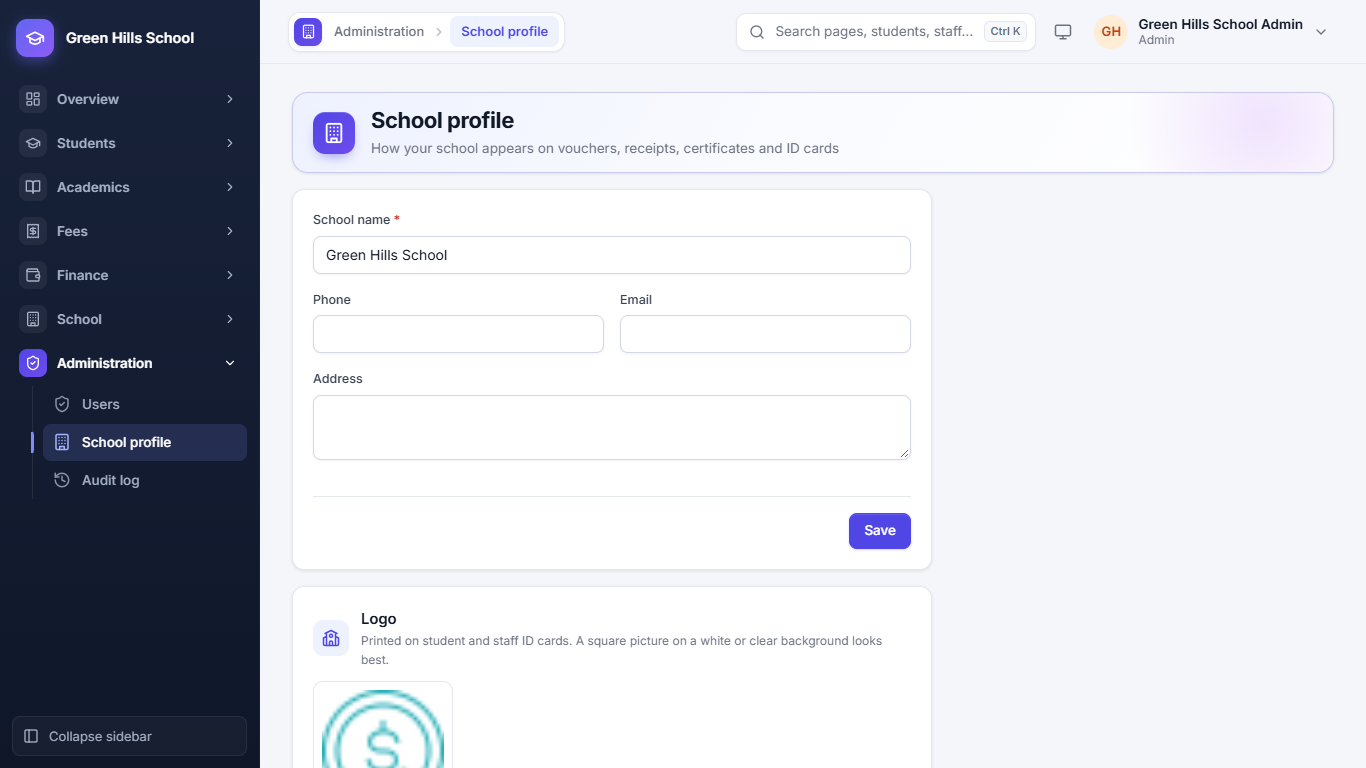
Do these once when you start, and again at the start of each year:
- Administration → School profile: school name, phone, email, address and logo. These are printed on vouchers, receipts, certificates and ID cards.
- School → Academic years: add the year (for example 2026-27) and make it current.
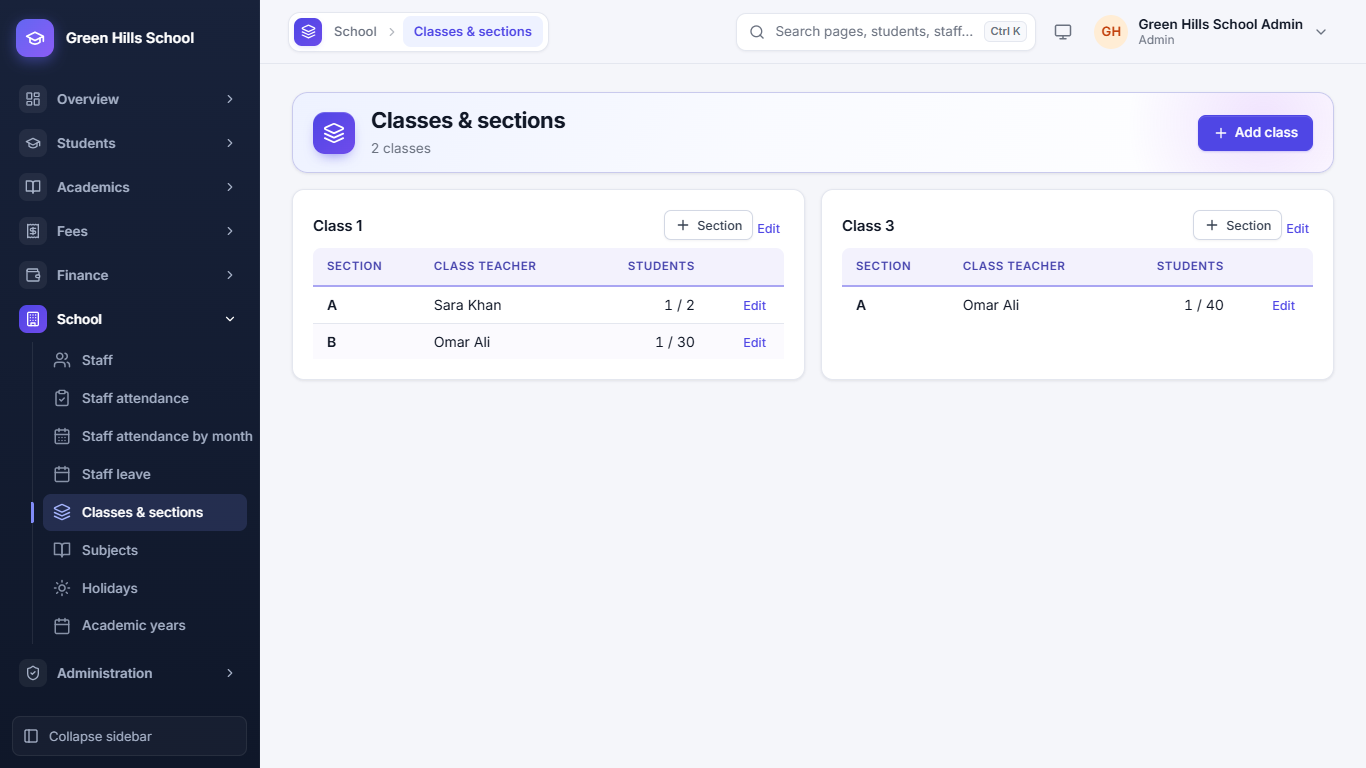
- School → Classes & sections: add classes (Class 1, Class 2 …) and their sections (A, B) with how many students fit.
- School → Subjects: add the subjects taught.
- School → Staff, then Fees → Fee setup, then admit students.
Messages to parents
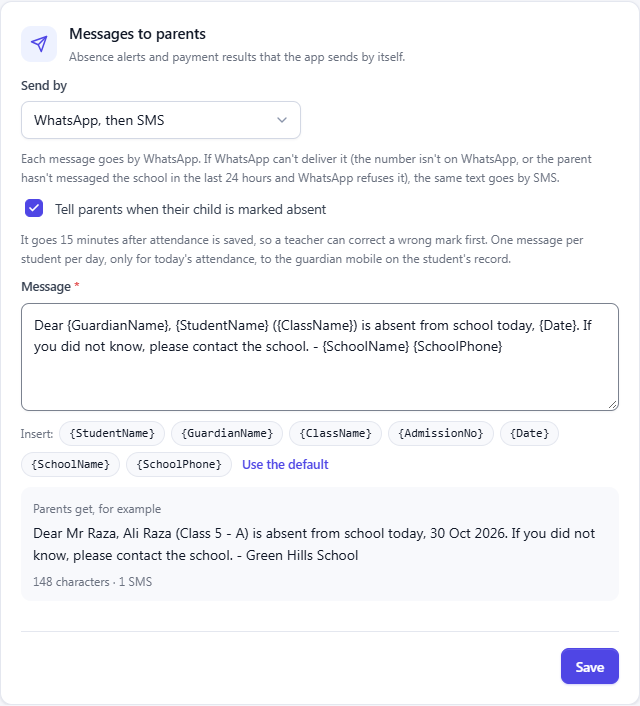
The Messages to parents card on the School profile sets how the app's own messages (absence alerts and payment results) reach parents. Send by is SMS, WhatsApp, or WhatsApp, then SMS: each message goes by WhatsApp, and if WhatsApp cannot deliver it (the number is not on WhatsApp, or the parent has not messaged the school in the last 24 hours and WhatsApp refuses it) the same text goes by SMS. Tick Tell parents when their child is marked absent to send absence alerts, and change the wording of the message if you like; the preview shows its length.
School website
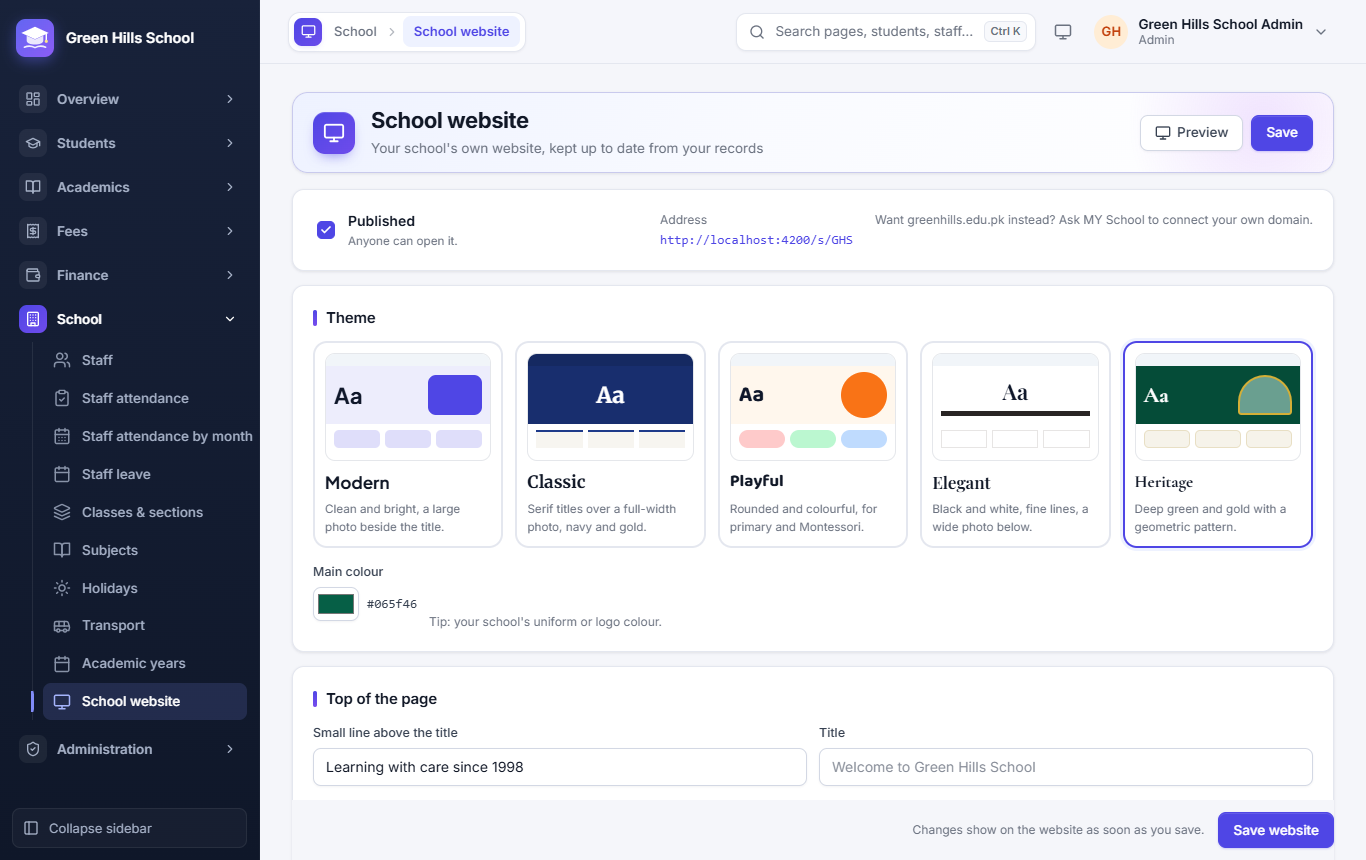
The school can have its own public website: a front page for parents and new families, kept up to date from the school's records. The platform owner switches it on for the school (it is a paid service); until then the page can be set up and previewed but not published. Open School → School website (Admin and Principal).
- Address: the website is always at
…/s/CODE(your school code, for example/s/GHS). If the school has its own domain, like greenhills.edu.pk, ask the platform owner to connect it; the site then also shows there. - Published: tick it and click Save to let anyone open the site. Untick it to take the site down.
- Preview shows the page exactly as visitors will see it, published or not.
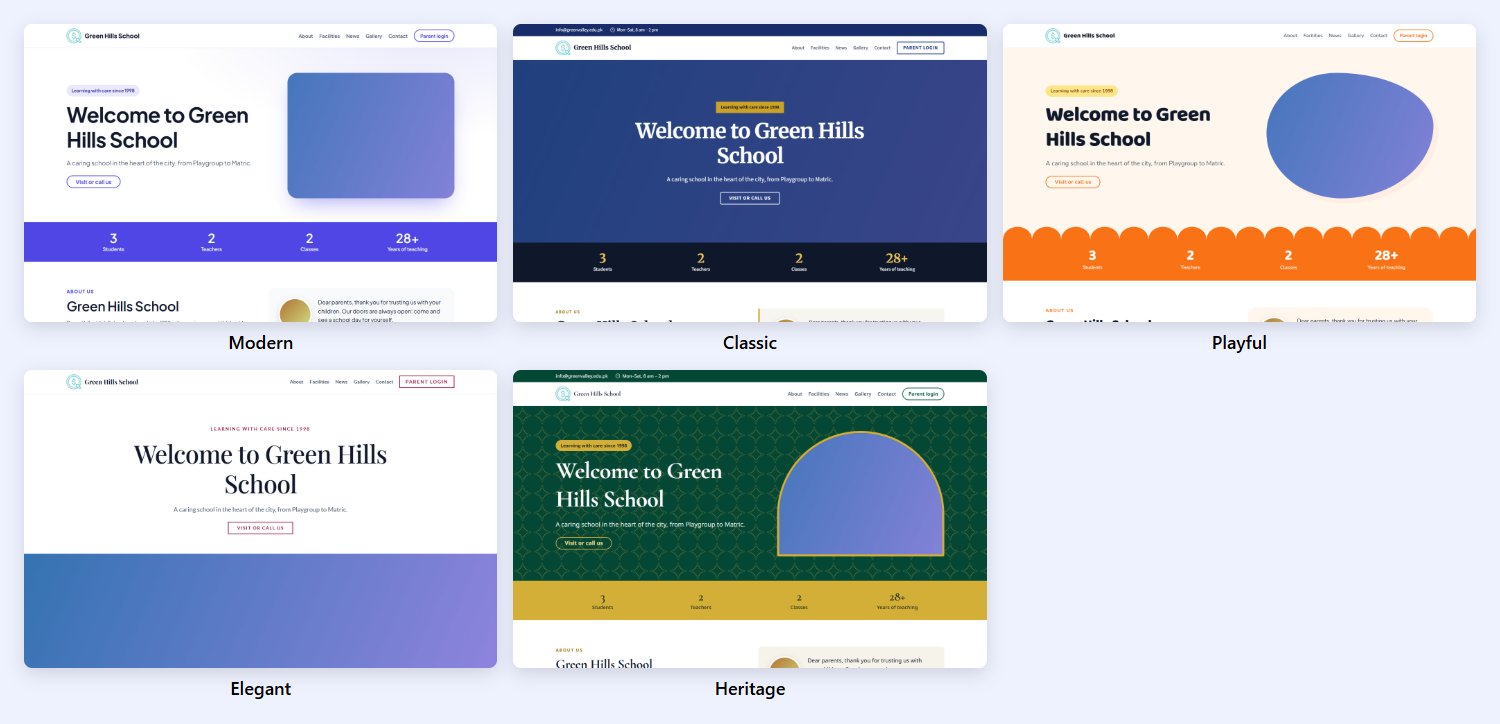
Theme: five designs, each with its own layout and lettering, not only a colour:
| Theme | Looks like |
|---|---|
| Modern | Clean and bright, a large photo beside the title |
| Classic | Serif titles over a full-width photo, navy and gold |
| Playful | Rounded and colourful, for primary schools and Montessori |
| Elegant | Black and white with fine lines, a wide photo under the title |
| Heritage | Deep green and gold with a geometric pattern |
Main colour changes the theme's colour to your uniform or logo colour.
What you write:
- Top of the page: a small line above the title, the title (empty = "Welcome to school name"), a short text and the top picture. Wide photos work best; pictures are made smaller before they are uploaded.
- About and principal's message: about the school, the year it was founded (shown as "Years of teaching"), and the principal's name, title, photo and message.
- Facilities: up to 12 cards with an icon, a title and a line of text (transport, library, labs …).
- Gallery: up to 40 photos with captions; use the arrows to change their order. Visitors can click a photo to see it large.
- Contact and social: email, WhatsApp number, office hours, a Google Maps link and Facebook, Instagram and YouTube pages. The phone and address come from the School profile.
Filled in from your records (switch off any part you don't want to show):
- Numbers: active students, teachers, classes and years of teaching.
- News: notices for everyone that were ticked Also show on the school website, while they are live.
- Calendar: holidays and events in the next four months.
- Admissions: shown while the online admission form is open, with the open classes and a button to apply.
- Toppers: the school's and each class's top students in the latest published exam.
- Board results: pass rate and top three of declared board exams.
- Our faculty: teaching staff with their designation, qualification and photo.
Nothing private is ever shown: no fees, phone numbers of parents or student photos.
Paid services
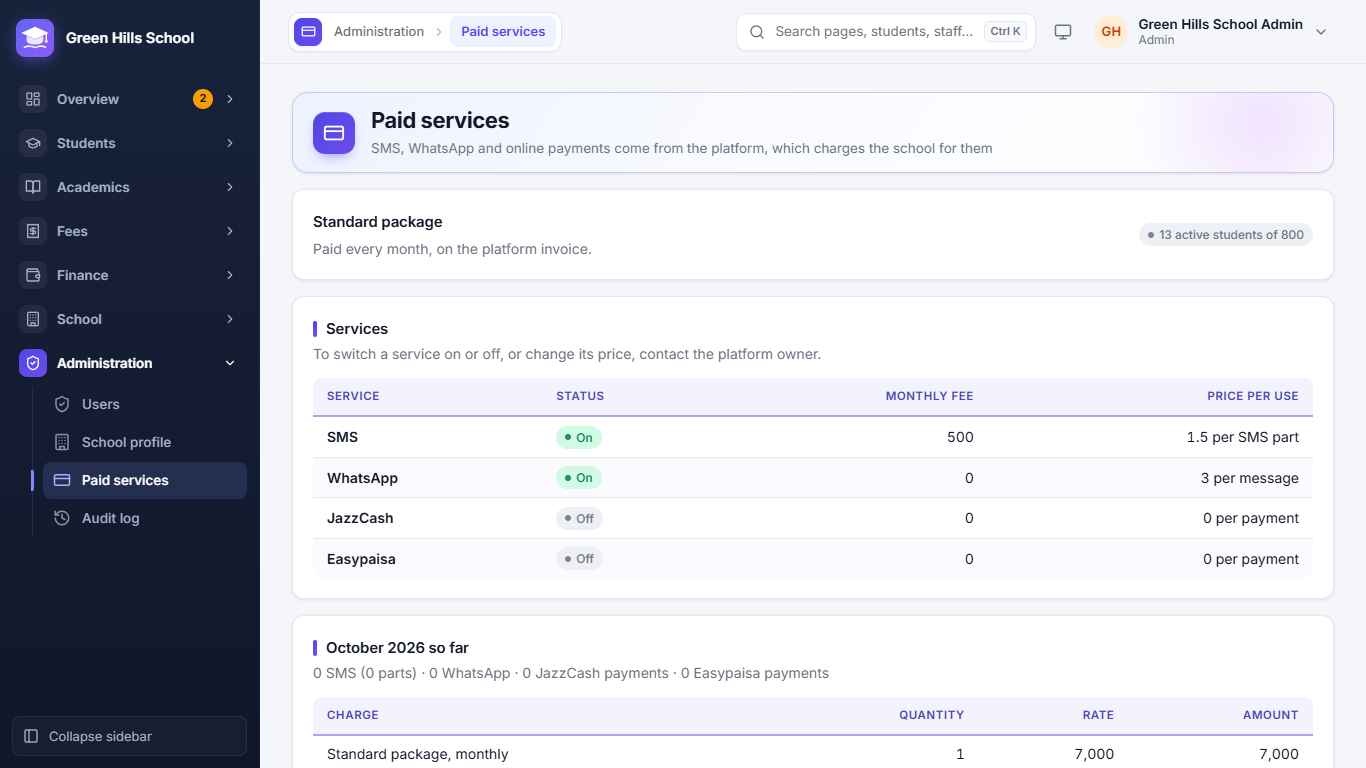
SMS, WhatsApp, online payments (JazzCash, Easypaisa) and the school website cost money, so the platform owner switches them on for each school and charges for them. Administration → Paid services (Admin and Principal) shows:
- The school's package, how it is paid (monthly, yearly or once) and the student limit, like "13 active students of 800". When the limit is reached, no more students can be admitted, imported or promoted into the school until the owner moves it to a bigger package.
- Each service, whether it is on, its monthly fee and its price per use (per SMS part, per WhatsApp message, per payment).
- This month so far: how many messages and payments were used and what they cost.
- Invoices from the platform, which can be printed.
To switch a service on or off, or to change a price, contact the platform owner. See For the platform owner.
Schools (Owner only)
The Owner (Super Admin) sees the Schools page. Here they add a new school with its first Admin login, switch a school on or off, and put branches into a School Group. Everything else the owner does is in For the platform owner.
Common questions
- I forgot my password. Ask the Admin to reset it. Parents ask the school office.
- A parent says they get no SMS. Check the guardian phone number on the student's page.
- Can I change a fee after vouchers are made? Change it in Fee setup. Old vouchers keep their amounts; new vouchers use the new amount.
- I made the vouchers twice. That is fine: a student who already has a voucher for that month is skipped.
- A student was marked absent by mistake. Correct it within 15 minutes and the parent gets no SMS.
- Who changed this record? Open the Audit log, or the Audit log button on the student's page.
- Can I use it on my phone? Yes, every page works in a phone browser, and it can be installed as an app with notifications (see On a mobile phone).
- A parent gets no WhatsApp message. If the number is not on WhatsApp, choose WhatsApp, then SMS so the SMS goes instead. The Fee reminders History shows what happened to each message.
- A fingerprint machine is not marking attendance. Check Last heard from on Attendance devices, and that the person is enrolled on the machine under the PIN shown on the Fingerprint PINs tab.
- SMS or WhatsApp is not going at all. Look at Administration → Paid services: the service may be off for your school. Ask the platform owner to switch it on.
- "Student limit reached" when admitting. The school's package allows only so many active students. Strike off students who have left, or ask the platform owner for a bigger package.
- A bank payment was not matched. In Match bank statement, type the voucher no. on that line and Record it. Ask parents to write V- and the voucher no. in the purpose of the transfer.
- A uniform sold on fees is not on the voucher. It goes on the next voucher generated for that student. If it was added to a voucher that was later cancelled, it goes on the next one.
Transport, Library and Notice board
Transport
Open School → Transport. Every staff member can look at it (so the office can answer a parent's call); only Admin and Principal can change it. It has three tabs: Routes, Riders and Vehicles.
The usual order is: add the vehicles → add a route with its stops → add the students who ride it. After that the transport fee goes on each rider's monthly fee voucher by itself.
Vehicles
Click Add vehicle and enter the Registration no., number of Seats, the Driver and the driver's mobile. The model, driver's CNIC and an attendant (with mobile) are optional. A vehicle that no longer runs can be marked inactive (untick Vehicle in use). A vehicle that runs a route cannot be deleted until the route gets another vehicle.
Routes and stops
- On the Routes tab click Add route.
- Enter the Route name and pick the Vehicle.
- Add the stops in the order the van reaches them: the stop name, Pick-up and Drop time, and the Monthly fee a student from that stop pays. Use Add stop for more.
- Click Save.
Each route card shows the vehicle and driver, how many riders it has against the seats (the bar turns red when there are more riders than seats), every stop with its riders and fee, and the route's total each month.
- A stop that students still ride from cannot be removed. Move them to another stop first.
- A stop or route that students have ridden in the past is kept for their fee history: mark the route inactive (untick Route in use) instead of deleting it.
Route sheet opens a page to print for the driver and attendant: every stop in order with its time, and under each stop the students waiting there with their class, guardian, mobile and address, plus Am / Pm boxes to tick.
Riders
The Riders tab lists the students on school transport this month, with their route and stop, pick-up time, monthly fee, the month they started and their guardian. Pick a route or search a name to narrow the list.
Add a rider
- Click Add rider and type the student's name or admission no.
- Choose the Route, the Stop and the From month (the first month the fee is charged).
- Leave Monthly fee empty to charge the stop's fee, or type another amount if the school agreed one.
- Click Save. If the route now has more riders than seats, the app tells you (it is still saved).
Change stop: click Change on the rider and choose the new stop and the month it starts. The old stop is charged up to the month before, so past vouchers still show what was charged and why.
Stop transport: click End and choose the Last month the fee is charged. Entered by mistake? Remove deletes the entry, but only if no voucher has charged it yet.
A month that is already billed cannot be changed: cancel that voucher first, or make the change from the next month.
The transport fee on vouchers
The first route you add makes a monthly fee head called Transport (see Fee setup). When you generate the month's vouchers, riders get a Transport line with their own monthly fee. Students who don't ride get no Transport line (unless the class has a Transport amount in the fee structure). Concessions and the sibling discount on the Transport head work as for any other fee.
What parents see
In the Parent Portal, a child who rides school transport has a Transport tab: the route and stop, pick-up and drop times, the monthly fee, the vehicle, and the driver's and attendant's phone numbers (tap to call).
Library
Open Academics → Library. Every staff member can look up books and loans; Admin, Principal and teachers run the desk and add books; only Admin and Principal change the library rules and waive fines. The cards at the top show the number of titles, books on loan, overdue books and fines owed (click one to see the list). The page has three tabs: Desk, Loans and Books.
Library rules
Click Library rules (Admin / Principal) to set how many days a student and a staff member keep a book, how many books each may have at a time, the fine for each late day and the most fine on one book (0 = no limit). The rules start at 14 days and 2 books for students, 30 days and 5 books for staff, and a fine of 10 a day up to 500.
Adding books
- On the Books tab click Add book.
- Enter the Title. Author, category, shelf, publisher, ISBN and price are optional. The Price is what a borrower pays if they lose a copy.
- Enter how many Copies the library has. Each copy gets a number, from the next free number, or from the First book no. you type (useful when your register already has numbers).
- Click Save. The app tells you the numbers given; write each one inside its copy.
Copies on a book's row lists every copy with its number, whether it is on the shelf, on loan (and with whom) or lost. From there you can add more copies, Withdraw a worn-out copy, or put a lost copy that was found Back on shelf. A book that was never lent can be deleted; one that was lent is kept for the loan history.
Lending a book (Desk)
- On the Desk tab type the Book no. written in the book and click Find.
- Choose Student or Staff and type a name. The app shows how many books they have, and any overdue book or fine.
- Check the Return by date (it comes from the library rules) and click Lend.
Nobody with an overdue book can borrow another, and nobody can go over their number of books.
Taking a book back
Type the book's number on the Desk and click Find. The app shows who has it, when it was due, and the fine if it comes back today.
- Take back: the book is back on the shelf today. A late book gets its fine.
- Renew: the borrower keeps it for another loan period from its return date (up to 3 times; not when it is already late).
- Other date or lost…: take it back on an earlier date, or tick The book was lost. A lost book costs its price (or the amount you type) plus any late fine.
The Loans tab lists books On loan, Overdue, Fines owed, Returned or All, with the same buttons. Undo removes a loan made by mistake.
Fines
A fine can be settled in three ways:
- Paid at the library (any desk user).
- Waive (Admin / Principal).
- Do nothing: a student's fine goes by itself onto their next fee voucher, as a Library fine line, when you generate vouchers. It is then paid with the fees. If that voucher is cancelled, the fine goes onto the next one again.
A staff member's fine is paid or waived at the library.
What parents see
In the Parent Portal, a child who has borrowed books has a Library tab: each book, the date it is due back (late ones in red), and any fine with whether it is paid, waived or on a voucher.
Notice board
Open Overview → Notice board to post circulars. Admin and Principal post them; other staff can read them.
- Click Post notice.
- Enter the Title and the Notice, and choose For: staff, parents or both.
- A notice for parents can be for some classes only. Tick the Classes, or tick none for every class.
- Choose Publish on and, if you like, Expires on. A notice can be pinned to stay on top and can carry an attachment.
- Click Post.
Staff see live notices on their Dashboard. Parents see the notices for their children's classes on the portal's first page, and the school sees how many parents have read each one (Seen by).
A parents' notice can also be texted: choose Send by (SMS or WhatsApp) and edit the Message. One text goes to each mobile number, even if a family has several children.
A notice for everyone (staff and parents, all classes) can also go on the school's public website: tick Also show on the school website. It shows there while it is live. See School website.
For the platform owner
This chapter is for the Owner (Super Admin) who runs School Hisaab and sells it to schools. Schools never see these pages. The owner's menu has Schools, Integrations, Billing, Requests, Packages and Website.
The website
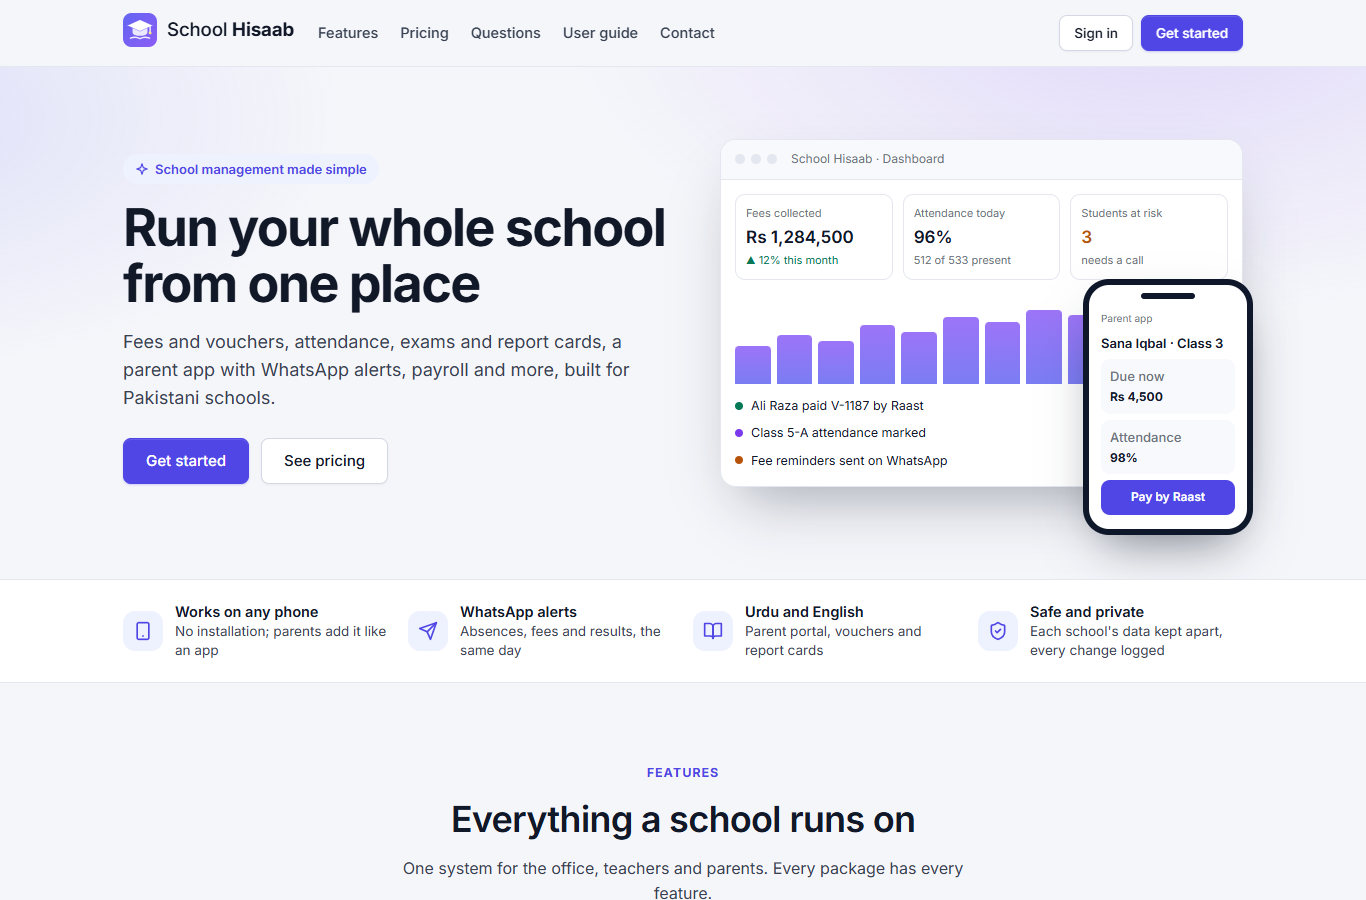
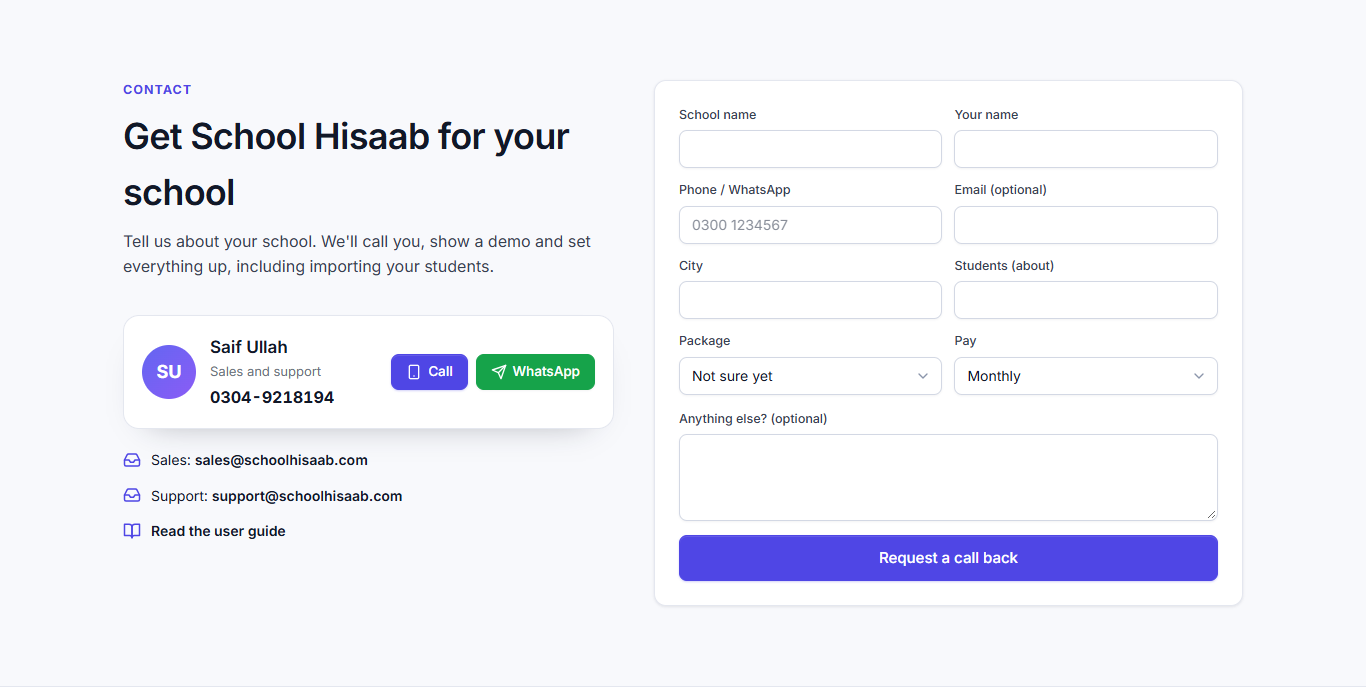
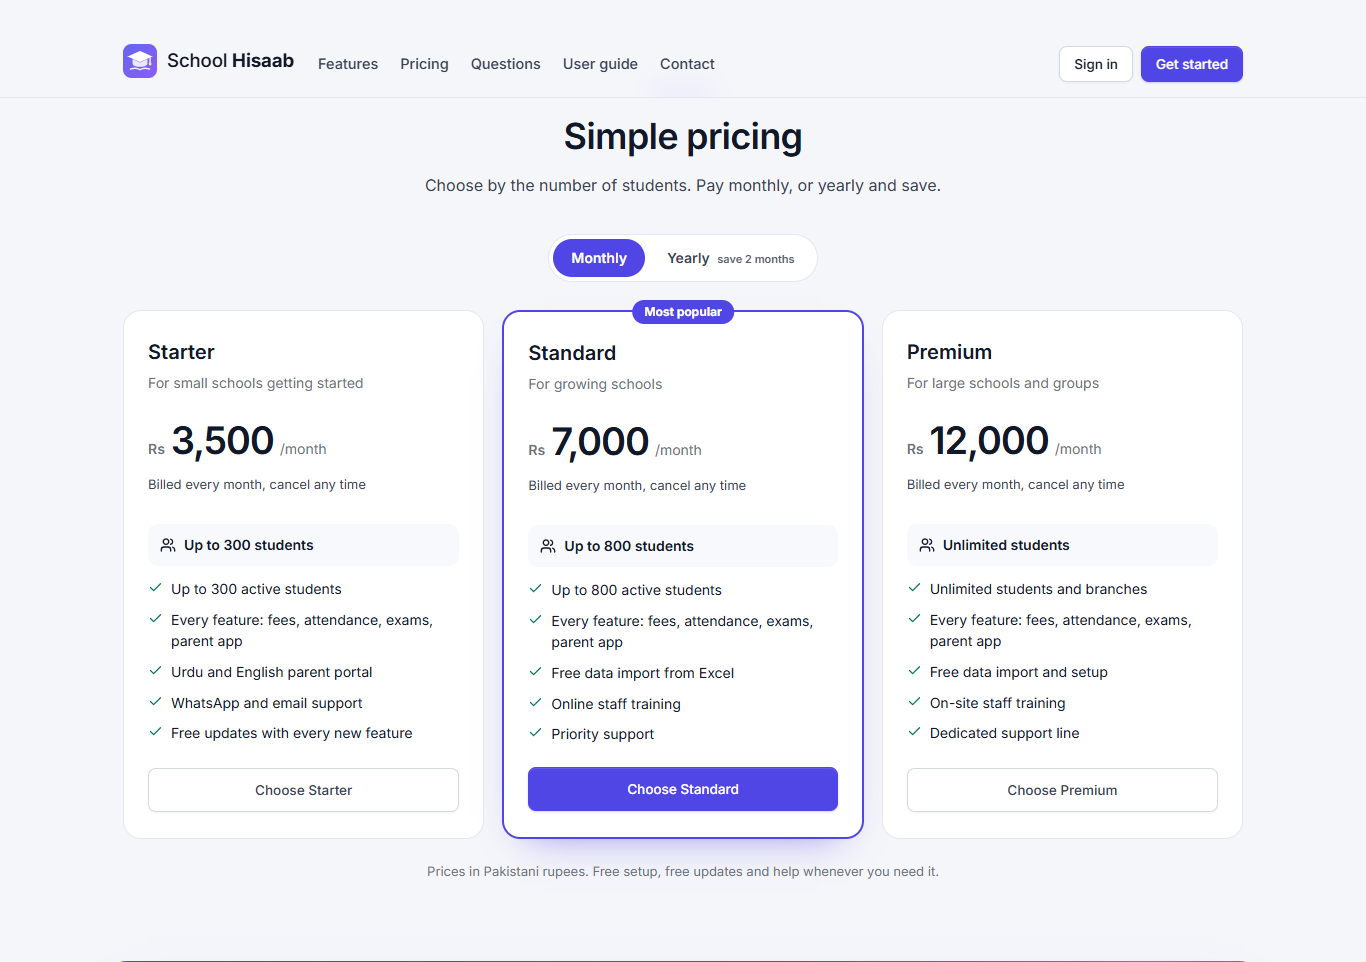
The main address of the app (without /login) opens the public website. From the top down it has: the headline, a strip of short highlights, the feature cards, How it works in numbered steps, the packages with their prices, a demo band with a button, common questions, and a contact card with the Get started form. Schools that already use the app click Sign in.
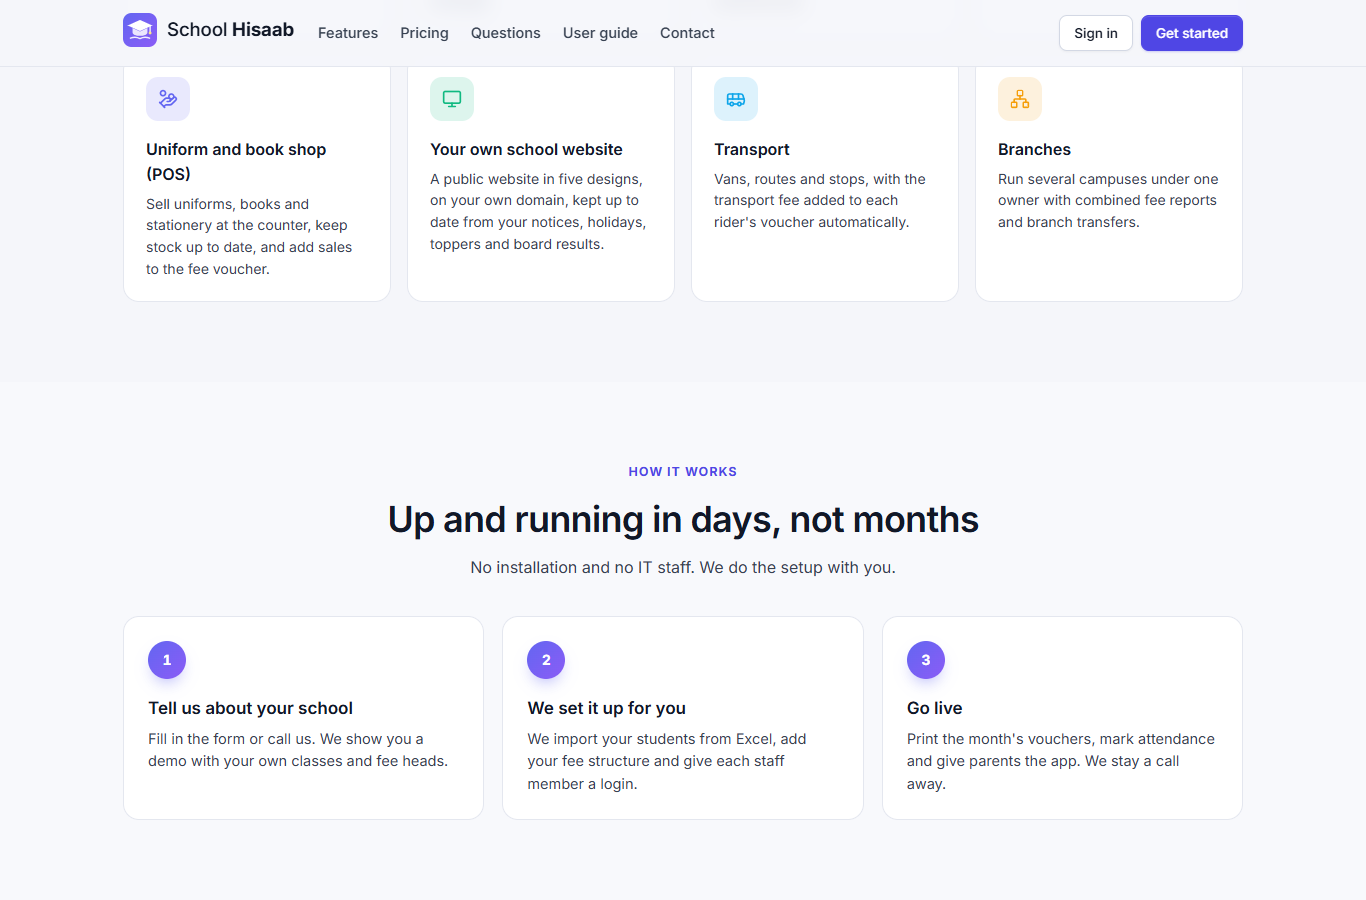
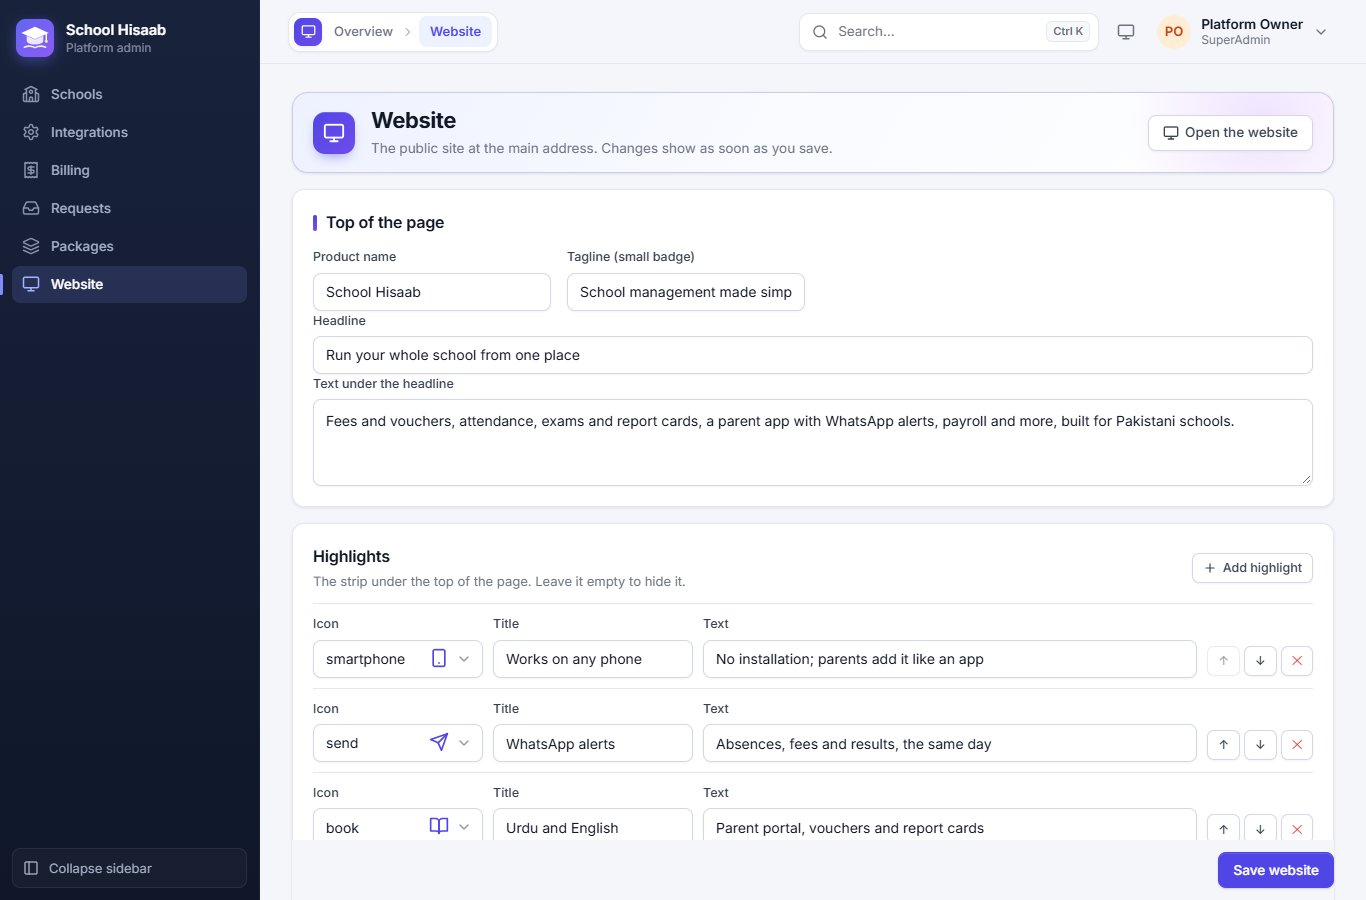
Website changes every word on that page, part by part, in the same order as the page:
- Top of the page: the product name, the tagline (the small badge), the headline and the text under it.
- Highlights: the strip under the top. Each has an icon, a title and a short text.
- Feature cards: each with an icon, a title and a text.
- How it works: the numbered steps, each with a title and a text.
- Demo band: its title, text and button words.
- Questions: the questions and their answers.
- Contact and links: the contact person and their role (like "Sales and support"), phone, WhatsApp number, the sales email (sales@schoolhisaab.com) and the support email for schools already using it (support@schoolhisaab.com), the address, the user guide link and the note at the foot of the page.
In the lists (highlights, cards, steps, questions), Add highlight / Add card / Add step / Add question makes a new one, the arrows move one up or down and ✕ removes it. A list left empty is hidden on the website, and so are the questions when there are none. Click Save website: the change shows at once. Open the website shows it.
Packages
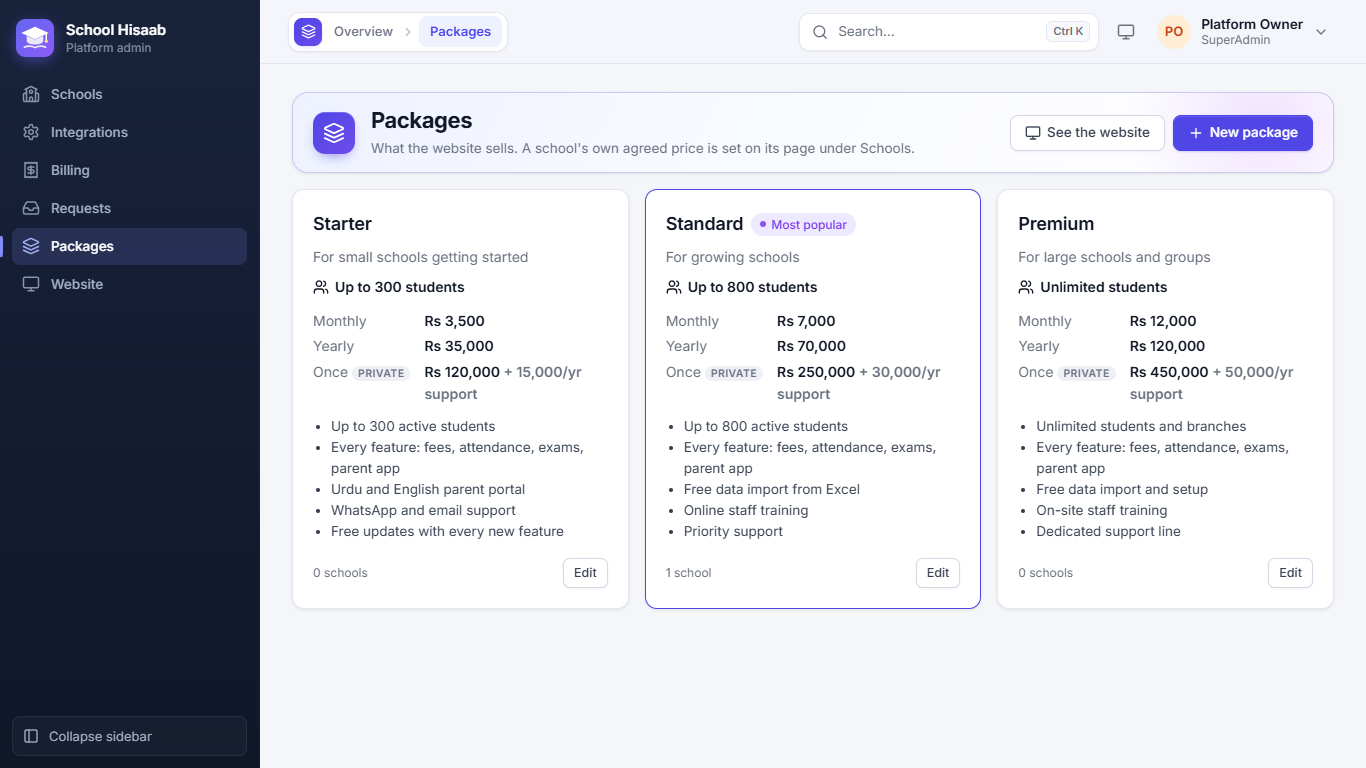
Packages are what the website sells, for example Starter (up to 300 students), Standard (up to 800) and Premium (no limit). Each has a short line, the student limit, the price Monthly and Yearly, a one-time (Once) price with a yearly support fee, and a list of what it includes. Tick Most popular to mark one on the website.
The one-time price is private: it is never shown on the website, only to you, for schools that ask to buy outright. A package can be hidden from the website without changing the schools already on it.
Requests from new schools
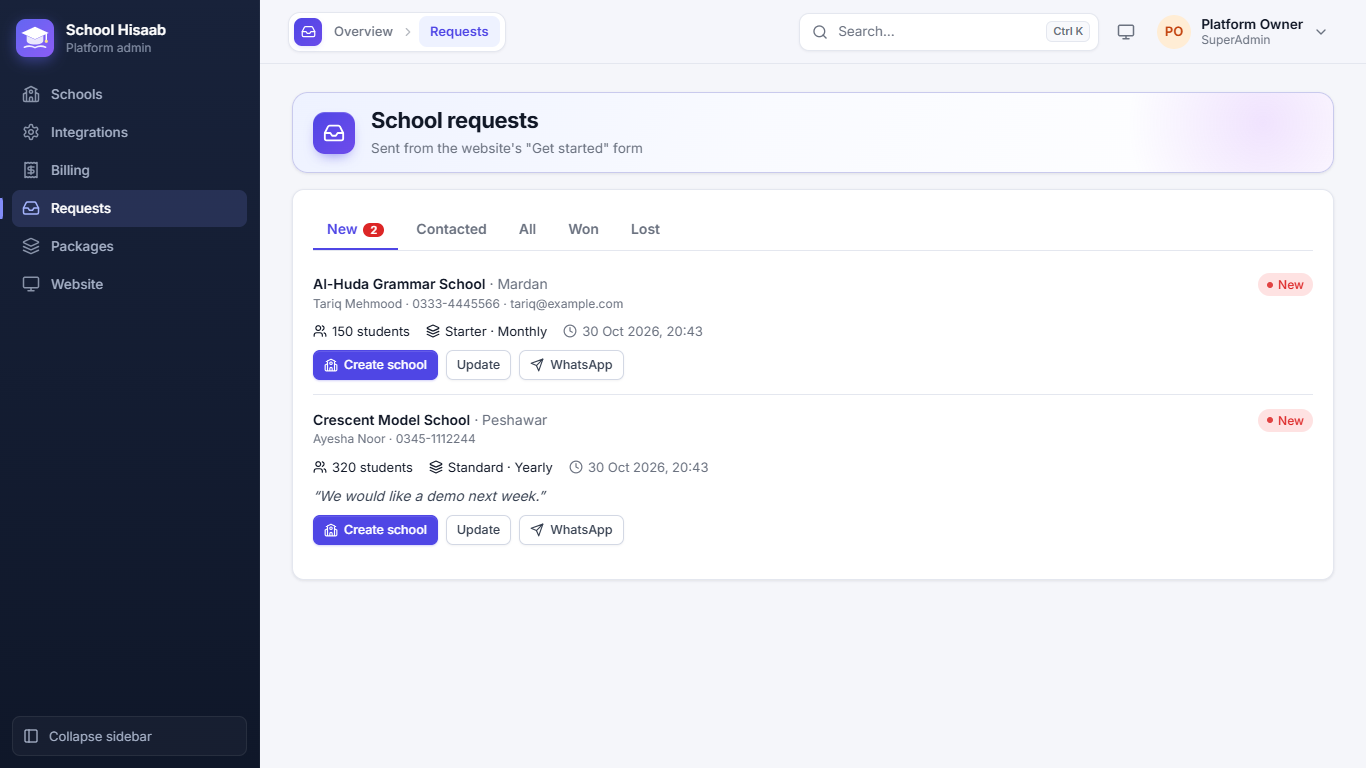
When a school fills in Get started on the website, it arrives in Requests (the menu shows how many are new): the school's name and city, the contact person, phone and email, how many students, which package and how they want to pay, and their message.
- WhatsApp opens a chat with the contact person.
- Update moves the request to Contacted or Lost and keeps your note.
- Create school opens the new-school form already filled in with the request; when the school is saved, the request is marked Won.
The form accepts only a few requests a minute from the same place, to stop spam.
A school's package and services
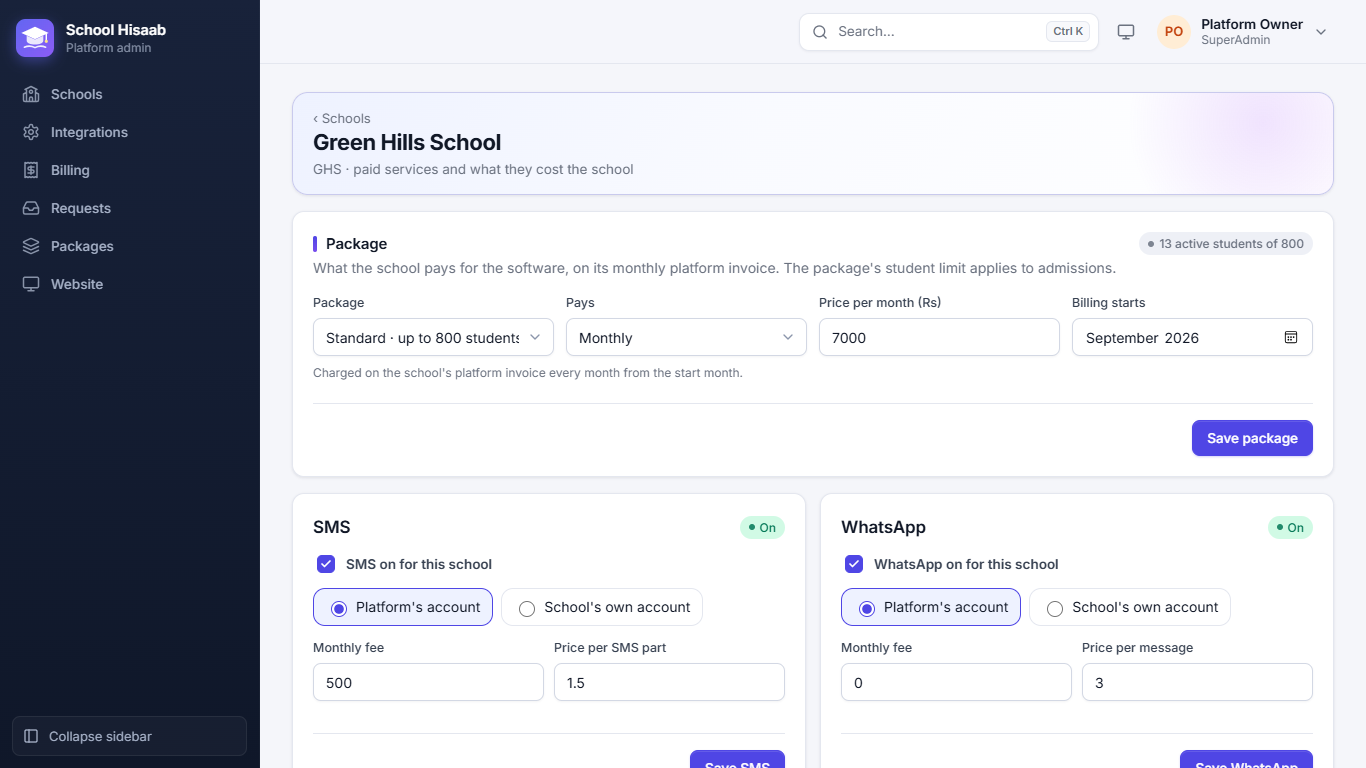
On Schools, click Services on a school. Its page has:
- Package: the package, how the school pays (Monthly, Yearly or Once), the price agreed with this school (it can differ from the website) and the month billing starts. A one-time sale also has a yearly support fee. The package's student limit applies to admissions: "13 active students of 800".
- SMS and WhatsApp: on or off for this school, sent through the Platform's account or the School's own account (their own Twilio account), the monthly fee and the price per SMS part / per message.
- JazzCash and Easypaisa: on or off, the school's own merchant details, the monthly fee and the charge per payment (a fixed amount and / or a % of the amount).
- School website: on or off, the monthly fee and the school's own domain (optional).
School website and its own domain
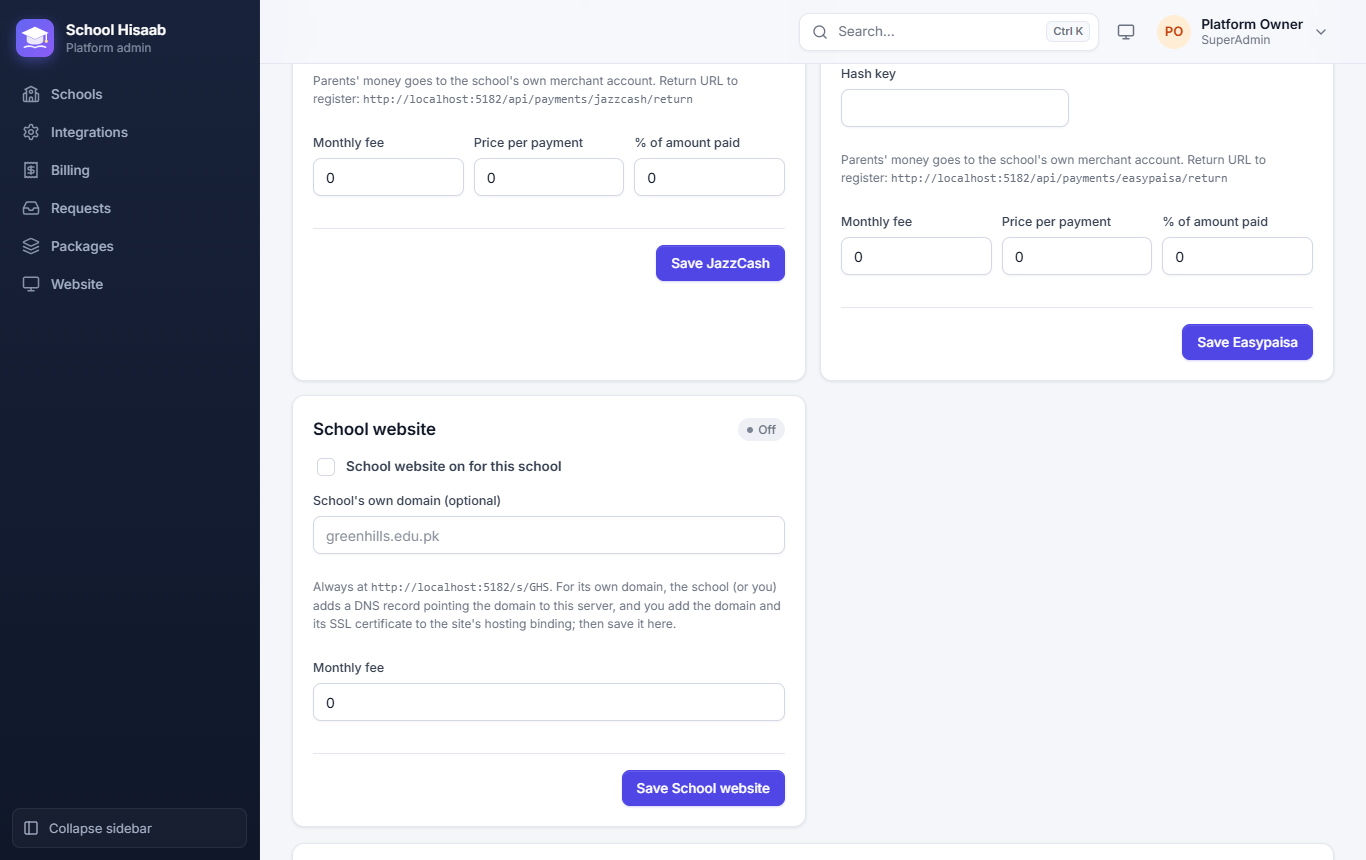
Tick School website on for this school, enter the monthly fee and click Save School website. The school can
then publish its site from School → School website (see School website);
it is always at <your address>/s/CODE. Switching the service off takes the site down at once; the school's words and
photos are kept.
For the school's own domain (greenhills.edu.pk):
- The school (or you) adds a DNS record at its domain company: an A record to your server's IP address (or a
CNAME to your app's address), for both
greenhills.edu.pkandwww.greenhills.edu.pk. - On the server, add the domain to the site's hosting binding (in IIS: Bindings → Add, host name
greenhills.edu.pk, and again forwww.) with an SSL certificate for it (for example a free Let's Encrypt one). - Enter the domain on the school's Services page and save. A domain can belong to one school only.
Visitors to that domain then see the school's website on the front page; the ERP itself still opens at /login.
Integrations
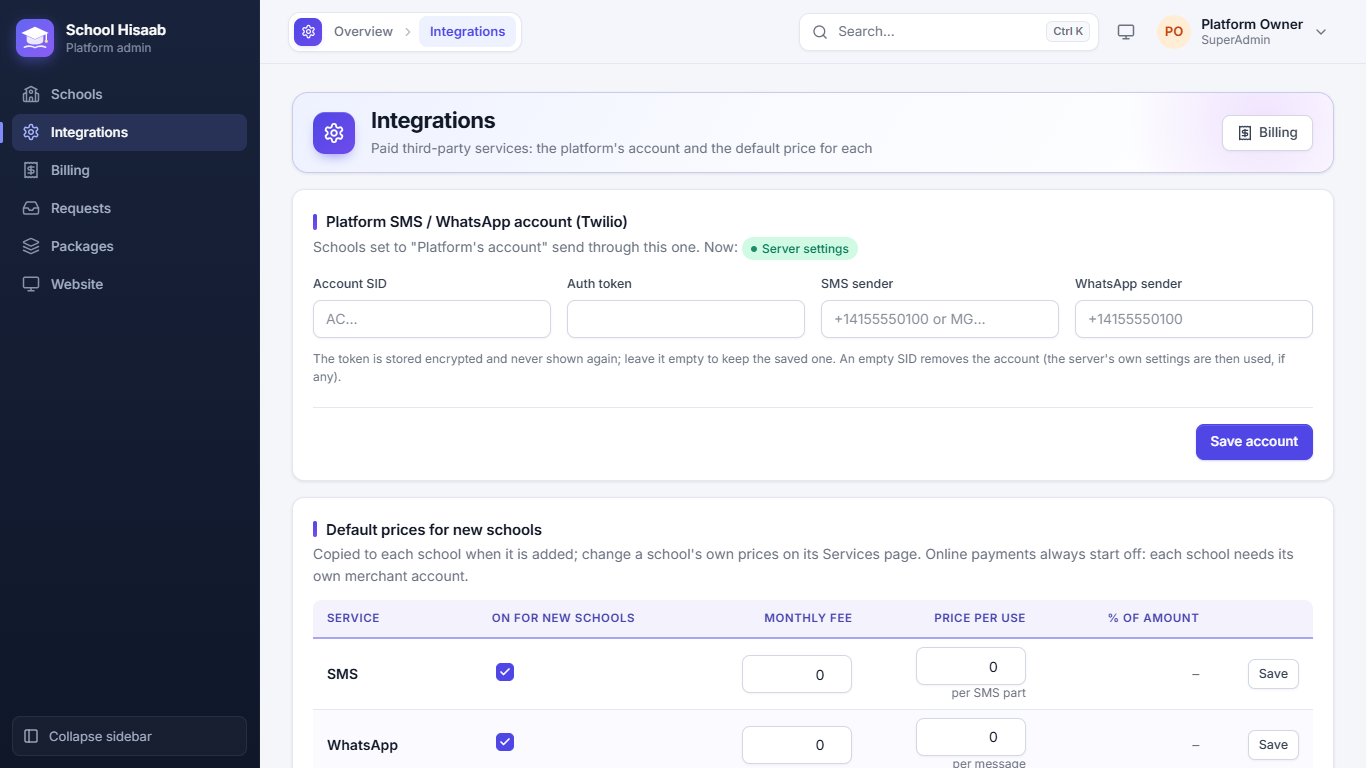
Integrations holds the platform's own SMS / WhatsApp account (Twilio): Account SID, Auth token, SMS sender and WhatsApp sender. Schools set to "Platform's account" send through it. The token is stored encrypted and never shown again; leave it empty to keep the saved one.
Default prices for new schools are copied to each school when it is added (on or off, monthly fee, price per use, % of amount). Change one school's prices on its Services page. Online payments always start off, because each school needs its own merchant account.
Billing
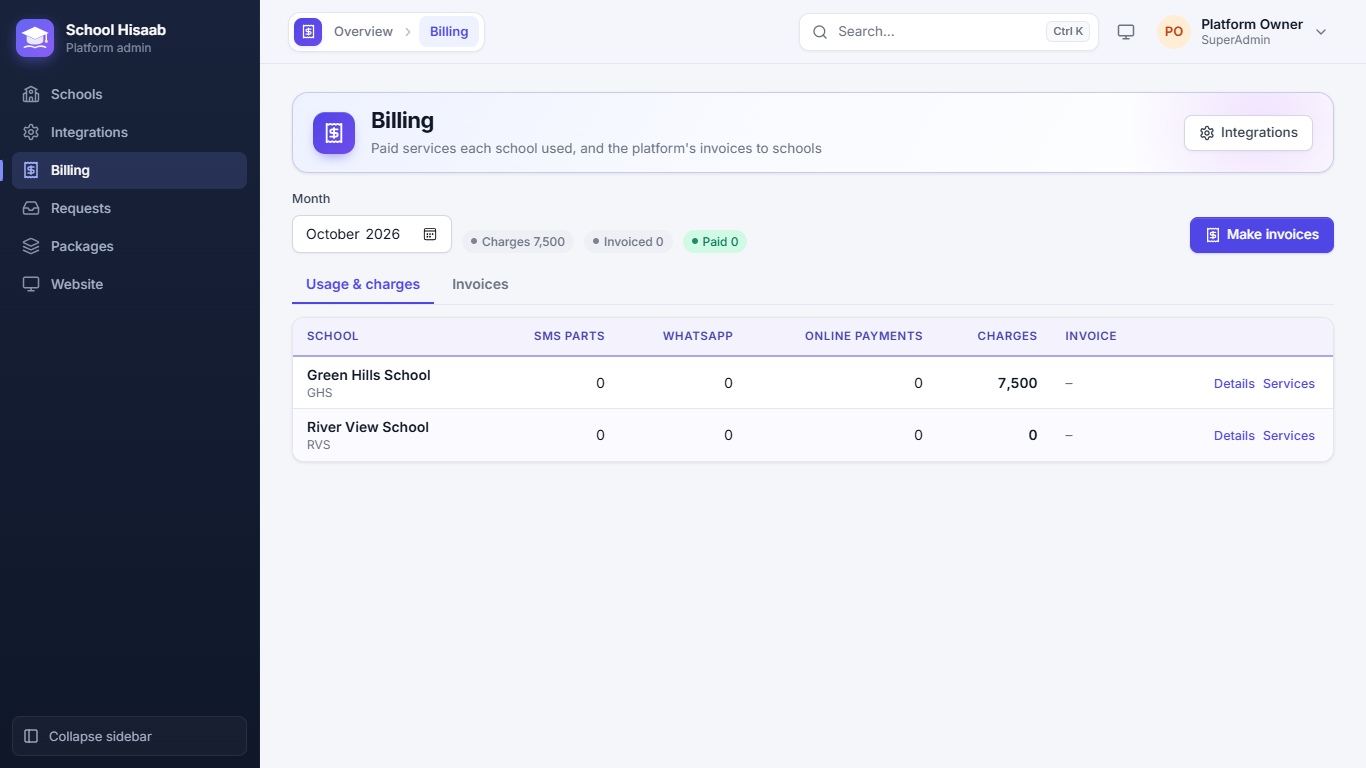
Billing shows, for the chosen month, how many SMS parts, WhatsApp messages and online payments each school used, and what it comes to with the monthly fees and the package. Details lists every charge; Services opens the school's page.
Click Make invoices to make that month's invoice for every school (PI-1, PI-2 …). The Invoices tab lists them; print one to send to the school, and mark it Paid when the money comes. Schools see their invoices under Administration → Paid services.